¶ Resolving Chamber Heater Malfunction
This guide will help you troubleshoot and resolve issues related to the malfunctioning of the chamber heater in the Vision Miner 22 IDEX 3D printer. Follow the steps outlined below to diagnose and fix the problem. If the issue persists, please contact our support team.
Note on Rarity of Failure
The chamber heater in the Vision Miner 22 IDEX is highly reliable and failures are extremely rare. In fact, some customers never experience issues with it at all. If you suspect a malfunction, it’s important to confirm each step in this guide before concluding the heater has failed.
Essential Components to Include:
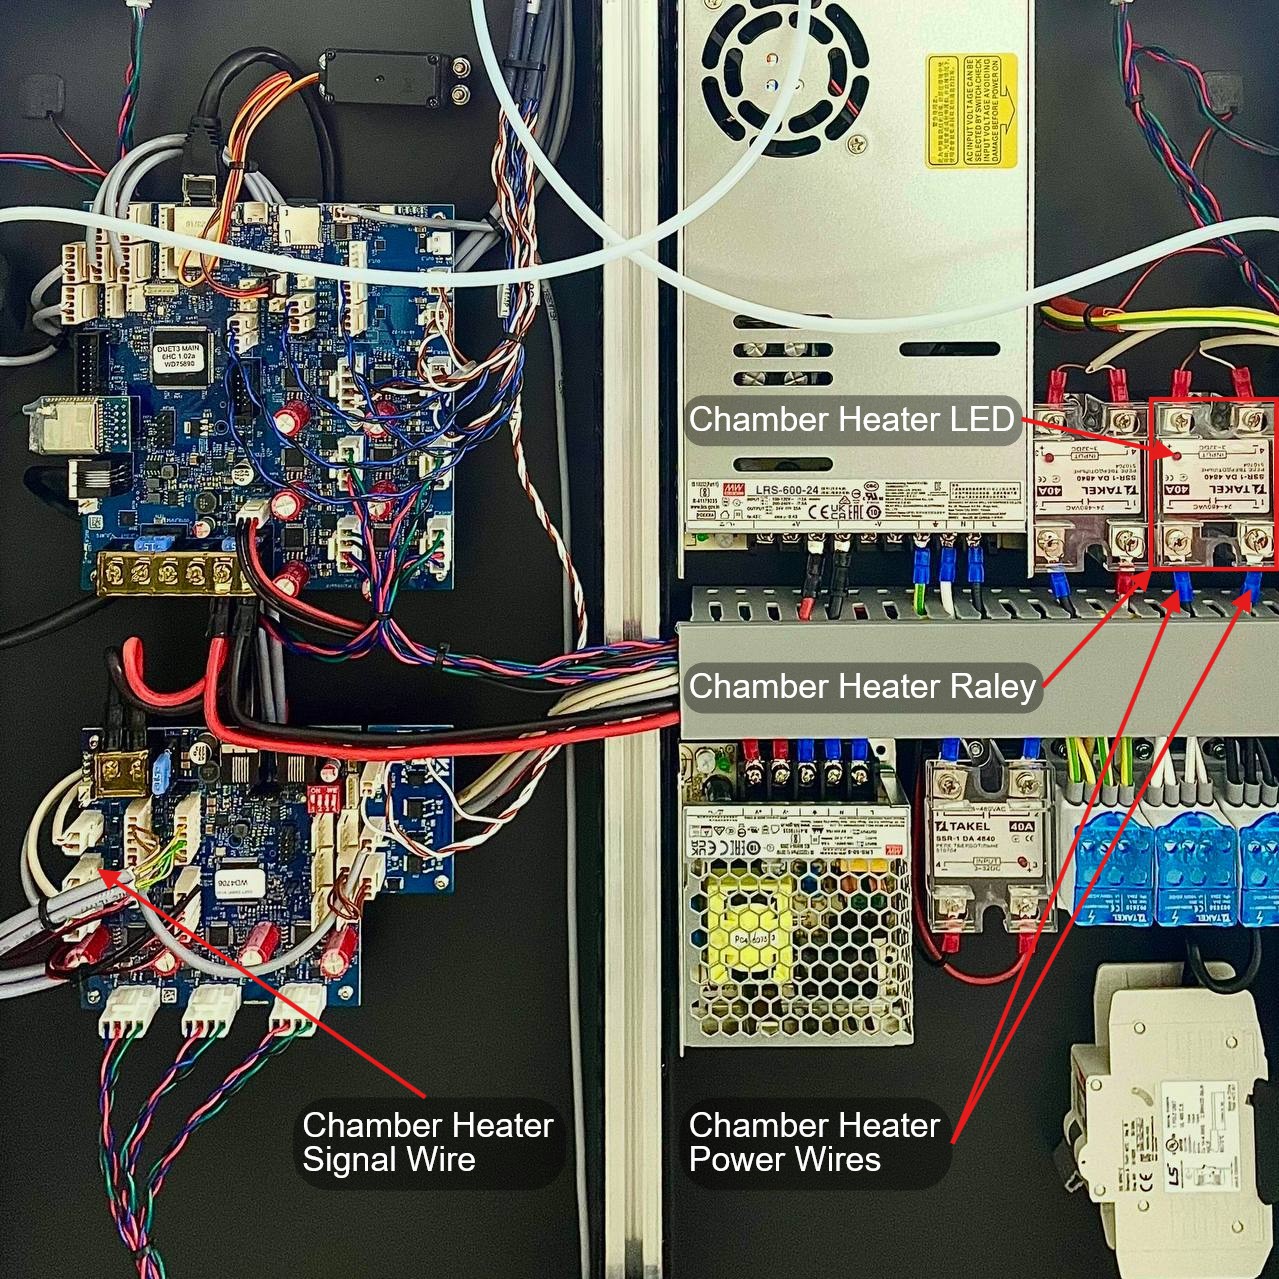
- Solid-State Relay (SSR):
- Clearly indicate the location and appearance of the SSR.
- Highlight the small red LED indicator.
- Mark clearly the four terminals at the bottom.
- Chamber Heater:
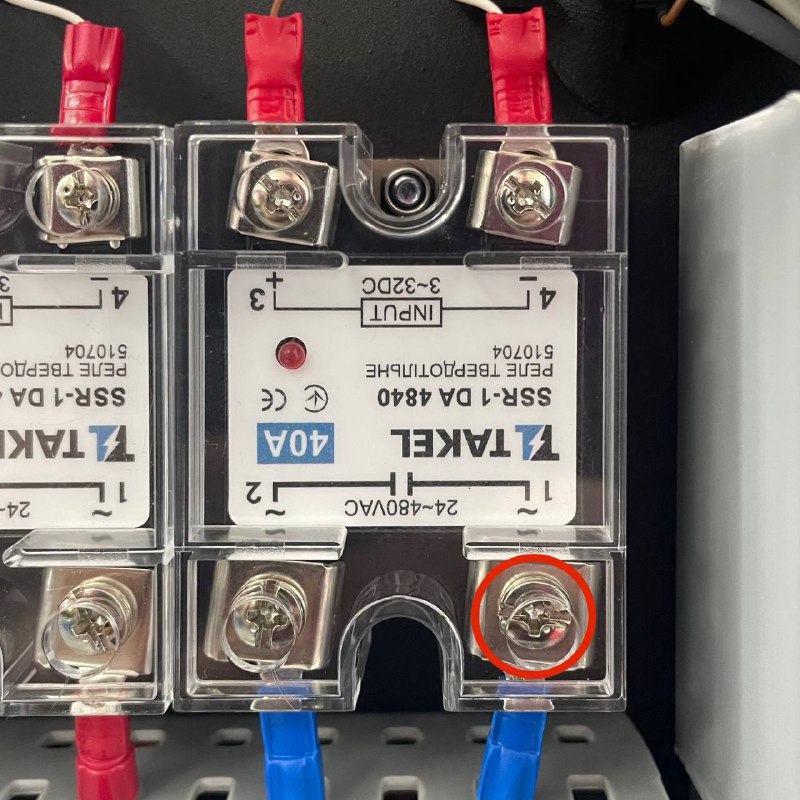
- Indicate wires running from the SSR terminals to the chamber heater.
- Highlight the two wires on the high-voltage side of the SSR.
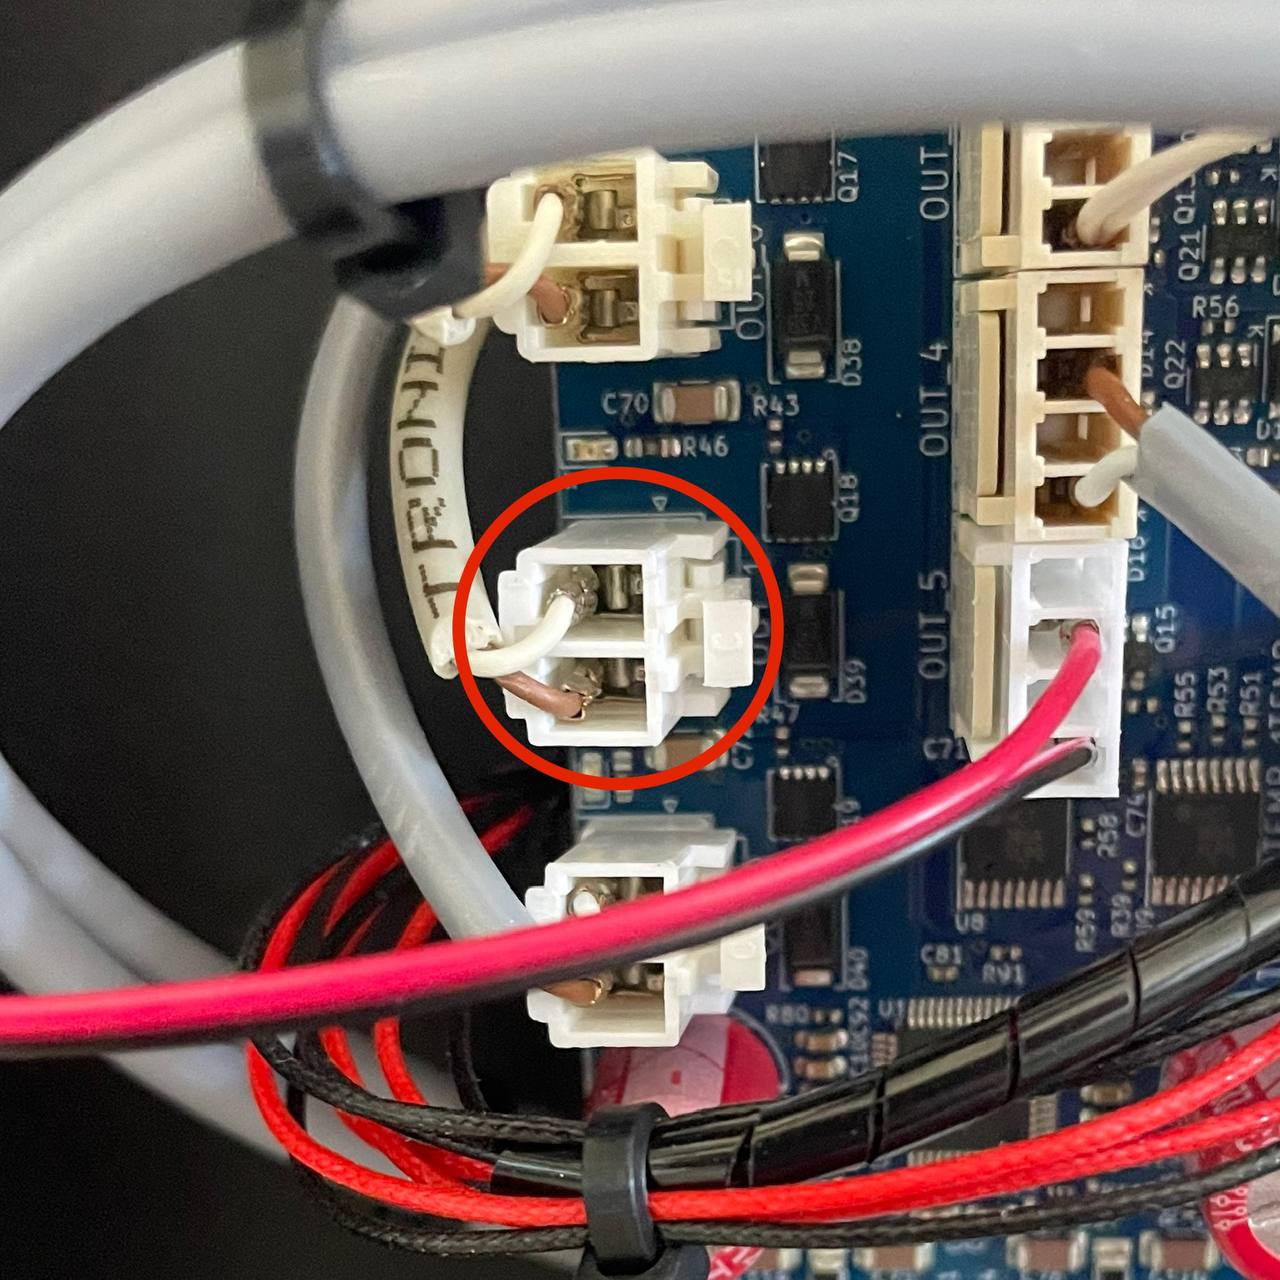
- Chamber Heater Signal Wire:
- Clearly illustrate the signal wire (small-gauge) connection from SSR to control board.
- Show connector points at both the SSR and the printer control board.
- High-Voltage Distribution Blocks:
- Depict blocks with blue covers, located above the circuit breaker.
- Show where connections must be inspected.
- Temperature Sensor:
- Clearly indicate the sensor position within the chamber, including wiring back to the control board.
Recommended Labels and Annotations:
-
SSR LED:
- Check if lit when heater activated (70–100°C).
-
SSR Terminal Screws:
- Ensure terminals are tight and secure.
-
Heater Resistance:
- Resistance measurement: 50–60 Ω normal range.
-
Signal Wire Connector:
- Verify tightness at SSR and control board connectors.
-
Temperature Sensor:
- Ensure correct ambient reading before troubleshooting heater.
-
Chamber Heater Wires:
- Disconnect here to measure resistance.
¶ Preliminary Check: Verifying Chamber Temperature Sensor at Ambient
-
Cool Down Completely
- Ensure your printer is at room temperature (no active heaters).
- Wait until all temperatures read near ambient conditions.
-
Check Chamber Temperature Reading
- On the printer’s Web Interface, go to the Dashboard.
- Click the Extra tab (where you see the Chamber Heater).
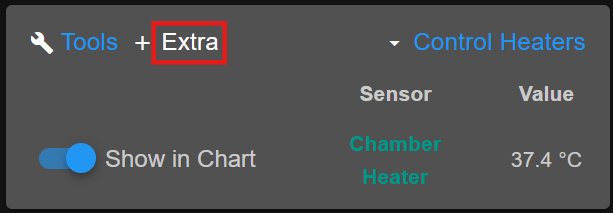
- Confirm that the Chamber temperature matches the other idle temperatures (e.g., hotend, bed) within a few degrees of ambient.
- If the Chamber temperature is significantly higher than ambient (but physically cold to the touch), you may have a worn or faulty temperature sensor that needs replacement.
- If the Chamber temperature is correct (matches ambient), proceed to the next sections.
¶ Step 1. Set Temperature Manually via Web Interface
-
Access the Web Interface
- At the top part of any tab, find the largest section labeled “Tools.”
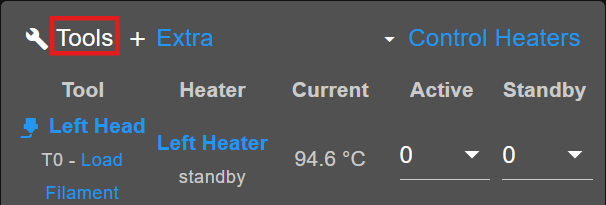
- At the bottom, locate the line for Chamber with two dropdowns.
- At the top part of any tab, find the largest section labeled “Tools.”
-
Set Temperatures
- Set both the Active and Standby temperature dropdowns to 70°C.

- Set both the Active and Standby temperature dropdowns to 70°C.
-
Observe the Temperature Graph
- Switch back to the Extra tab and observe if the Chamber Heater temperature is increasing.
- Fan Behavior: Note that the chamber fan should start spinning after the heater temperature exceeds approximately 70°C.
- Switch back to the Extra tab and observe if the Chamber Heater temperature is increasing.
-
Possible Outcomes
-
If the Chamber Heater Temperature Does Not Increase:
Proceed with the hardware checks described below to rule out wiring or component failure, proceed to the next step. -
If the Chamber Heater Temperature Increases: The chamber heater is functioning correctly. Verify if the chamber fan is working properly. Once the chamber heater temperature exceeds 70°C, the fan should start spinning. You will hear the fan operating and feel airflow from the chamber heater area.
- If the fan does not start spinning after reaching this temperature, it indicates the chamber fan is not functioning correctly. In this scenario, please contact support for replacement parts.
-
Safety Precautions
- Always ensure the printer is powered off and unplugged before performing any hardware checks or replacements.
- Handle electrical components carefully to prevent damage or injury.
¶ Step 2. SSR Check
-
Verify Relay Functionality
- The printer uses a solid-state relay (SSR) to power the chamber heater.
-
Check Relay LED
- While the chamber heater is supposed to be enabled (you have set a temperature above ambient eg 70-100C), look for a small red LED on the SSR itself.
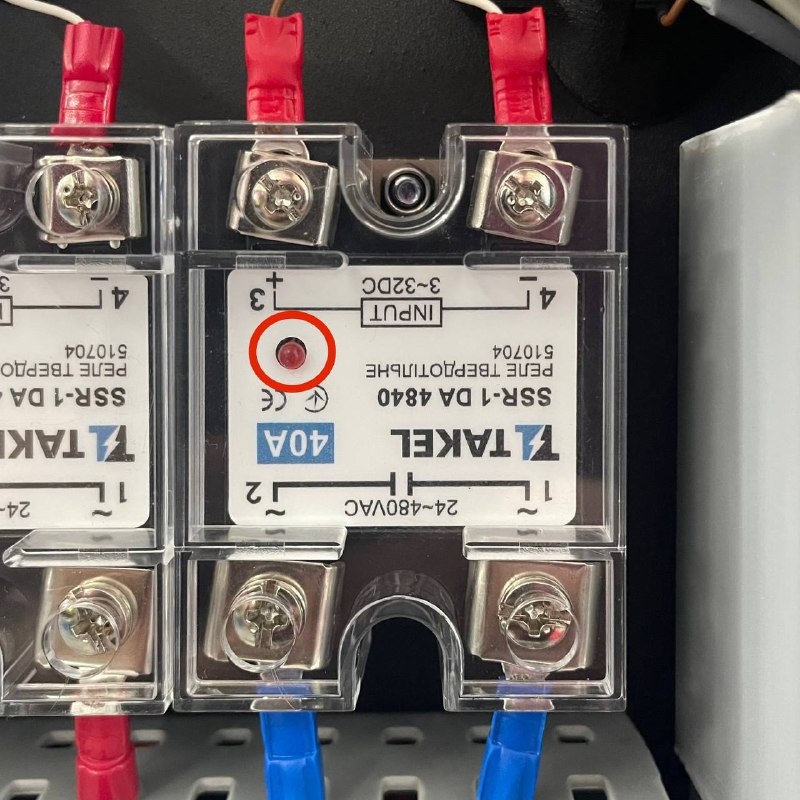
- If the LED on the relay is lit, it indicates the relay is sending power to the heater.
- If the LED on the relay is not lit, the relay may be faulty or is not receiving the correct signal.
- While the chamber heater is supposed to be enabled (you have set a temperature above ambient eg 70-100C), look for a small red LED on the SSR itself.
-
If the LED Is Not Lit
- The relay likely needs to be replaced
- Inspection of the Chamber Heater Signal Wire migh help, ispect plug on the board and 4 screws on the SSR.
-
If the LED Is Lit
- Proceed to check the heater itself (Step 3).
¶ Step 3. Check Terminal Connections
-
Power Off the Printer Completely
- Turn off the printer and unplug it from the wall to ensure there is absolutely no power.
- Wait a moment for any residual charge to dissipate.
-
Inspect All Solid-State Relay (SSR) Terminals
- Locate 4 terminals of the SSR.
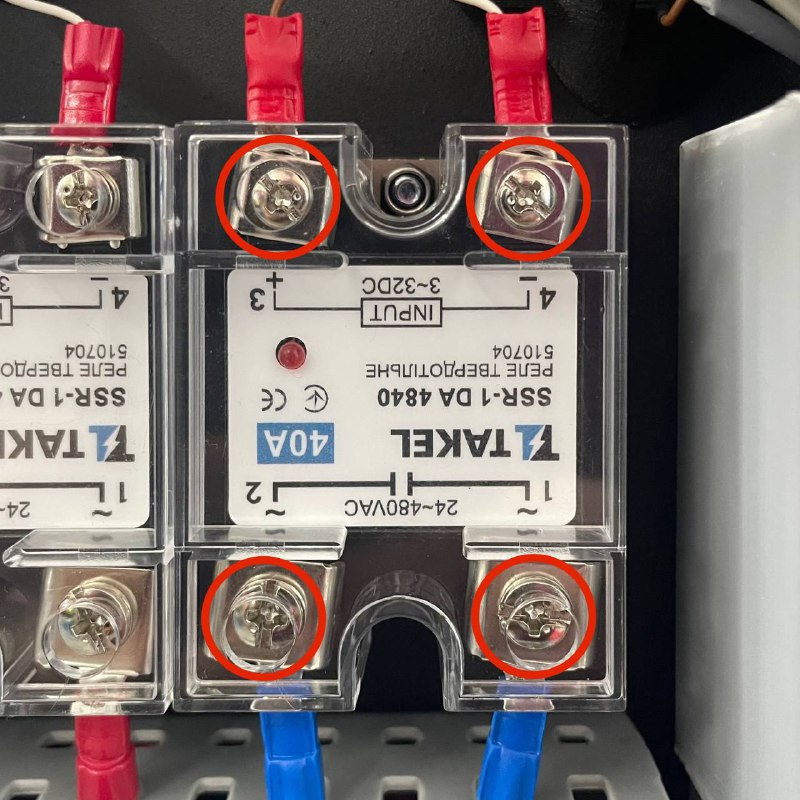
- Use a screwdriver to gently tighten each terminal screw, ensuring wires are firmly seated and not loose.
- Pull lightly on the wires to confirm they are secured and cannot easily detach.
- Locate 4 terminals of the SSR.
-
Check Chamber Heater Signal Wire
- Verify that the signal wire going into the SSR (the smaller-gauge wire) is properly connected, as shown in the manual’s initial diagrams.
-
Check High-Voltage Distribution Blocks
- Above the breaker, you will see high-voltage distribution blocks with blue covers.
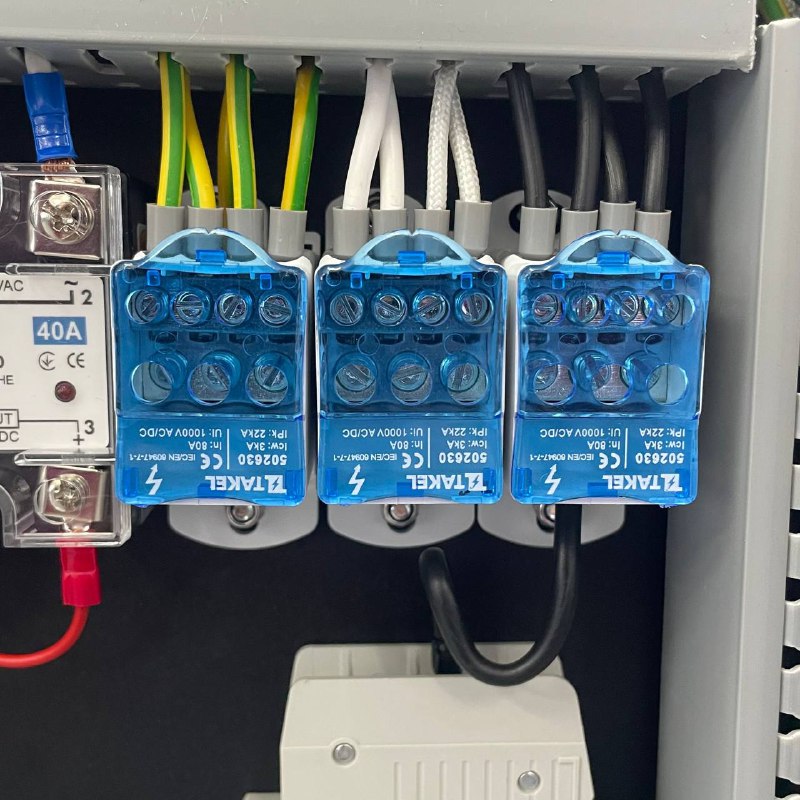
- Carefully remove these covers (if necessary) and ensure all wire connections are tight and properly seated.
- Above the breaker, you will see high-voltage distribution blocks with blue covers.
¶ Step 4. Heater Resistance Check
-
Power Off and Disconnect
- Confirm once again that the printer is completely powered off and unplugged from the wall.
-
Disconnect SSR Wires
- Identify the two wires from the chamber heater that connect to the bottom of the SSR (the high-voltage side).

- Gently remove them to isolate the heater.
- Identify the two wires from the chamber heater that connect to the bottom of the SSR (the high-voltage side).
-
Measure Heater Resistance
- Use a multimeter set to resistance (Ohms) mode.
- Touch the probes to the disconnected heater wire from the SSR and neutral terminal on the distribution block.

-
Evaluate Resistance
- A functioning chamber heater typically shows a resistance between 50–60 Ω for 110 V and 250-270 Ω for 220 V.
- If your reading is significantly higher or lower than this range, the chamber heater is likely defective and needs replacement.
¶ Conclusion & Next Steps
-
Re-check Chamber Temperature
- After any hardware replacement or wiring fix, run the Set Temperature Manually (Step 1) process again.
- Confirm the temperature rises on the graph.
-
Further Assistance
- If you have verified both the heater and temperature sensor are operating correctly, but still experience no heating, contact our support team.
- Rarely, an underlying board or firmware issue may require advanced troubleshooting.
-
Safety Reminder
- Exercise caution with high-voltage components behind the right-hand side panel.
- Power down whenever working near internal electronics.
If all steps have been followed and the chamber still does not heat, please contact us at support@visionminer.com with your findings and any relevant temperature graphs or photos. We’ll be happy to assist further.