¶ Brief Overview
This guide explains how to replace the internal PTFE (Teflon) liner tube within the hotend assembly of your Vision Miner 22IDEX printer. This short tube lines the filament path inside the hotend and is crucial for smooth filament feeding, especially with certain materials. Replacement is needed if the tube degrades, deforms, or causes frequent clogs.
¶ Introduction
The PTFE liner inside the hotend provides a low-friction path for the filament as it transitions from the cold end (heatsink) to the melt zone (nozzle). Over time, especially with higher temperatures or abrasive filaments, this tube can wear out, shrink, deform, or accumulate residue.
Symptoms of a worn or damaged internal PTFE tube include:
- Frequent or difficult-to-clear clogs.
- Under-extrusion or inconsistent extrusion.
- Difficulty loading or unloading filament.
- Increased filament grinding in the extruder.
- Problems printing PLA, especially with higher retraction settings, as heat can creep up and deform the liner.
This procedure details the disassembly of the hotend to access and replace this internal liner.
¶ Tools & Materials
- New Hotend PTFE Tube (Must be the exact correct length and diameter for your specific Vision Miner 22IDEX hotend, with clean, square cuts on both ends)
- 2 mm Hex Driver
- PH2 Phillips Screwdriver
- Tweezers (optional, for removing the old tube)
- Cleaning tools (e.g., small brush, compressed air for clearing debris)
- Precision measuring tool (ruler or calipers for verifying new tube length against old one)
¶ Safety & Pre-checks
WARNING: Ensure the hotend has completely cooled down to room temperature before starting any work. Hot components can cause severe burns.
WARNING: Power OFF the printer and unplug it from the mains power outlet before disassembling any components.
- Ensure your workspace is clean and well-lit.
- Verify your new PTFE tube is the correct length for your hotend model and that both ends are cut cleanly and perfectly perpendicular (square). An angled cut can cause issues.
¶ Step-by-Step Instructions
¶ 1. Preparation
- Remove Filament: It is highly recommended to perform a Cold Pull for the target toolhead to remove as much filament residue as possible from the hotend. Refer to the Cold Pull Procedure Guide. If a Cold Pull is not feasible, at least unload the filament using the standard unload function.
- Power Down & Cool Down: Confirm that the hotend assembly for the target toolhead (T0 or T1) is completely cool. Turn off the printer using the main power switch and unplug it from the electrical outlet.
- Gather Tools: Assemble all necessary tools and the new PTFE tube.
¶ 2. Hotend Disassembly
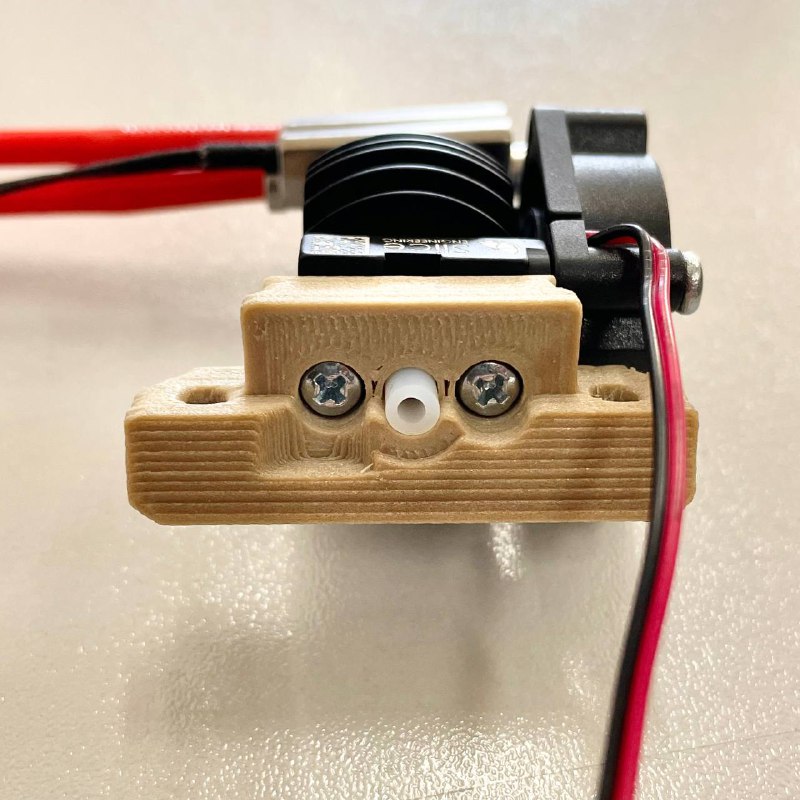
¶ 2.1 Remove Fan Shroud
- Using the 2 mm Hex Driver, unscrew the screws securing the Fan Shroud and Wire Guard to the toolhead.
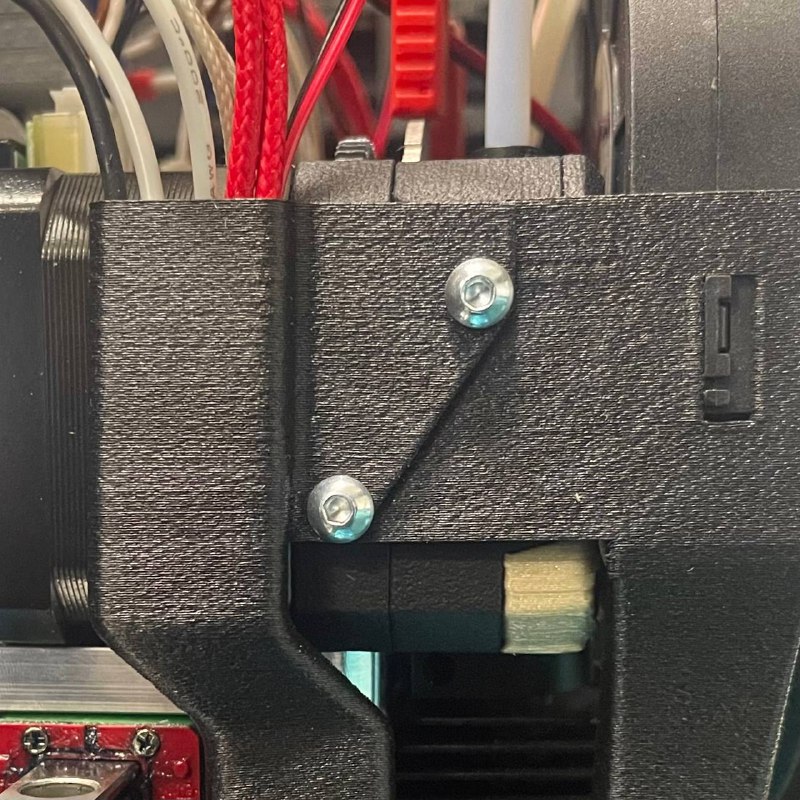
- Carefully remove the fan shroud with wire guard and set them aside along with its screws. Note its orientation.
¶ 2.2 Disconnect Wiring (Ground, Heater, Thermistor, Fan)
- Locate the ground wire attached to the heatblock of the hotend. Using the 2 mm Hex Driver, unscrew the retaining screw and detach the ground wire terminal.
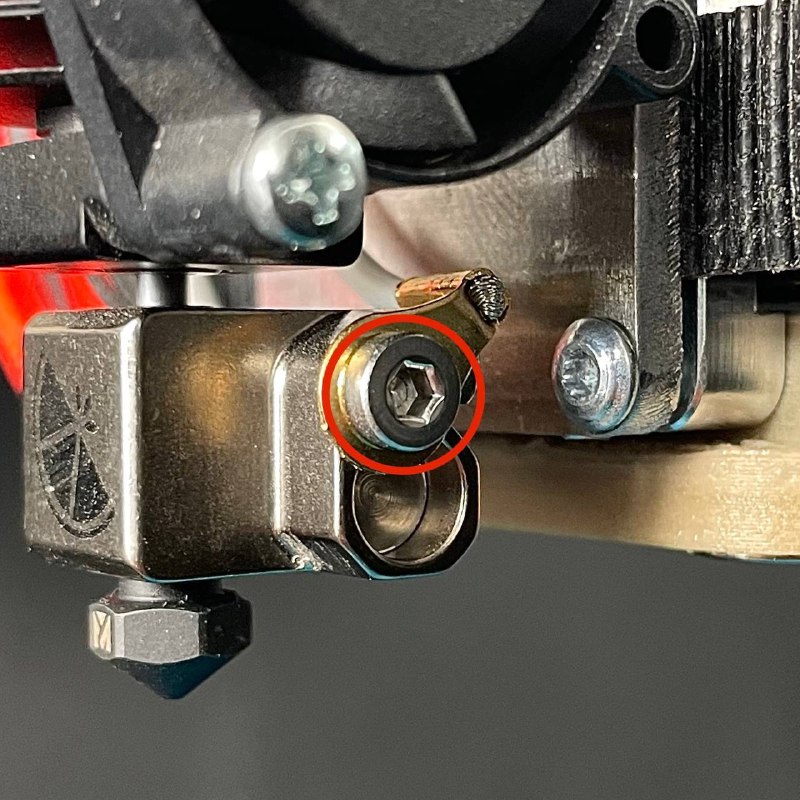
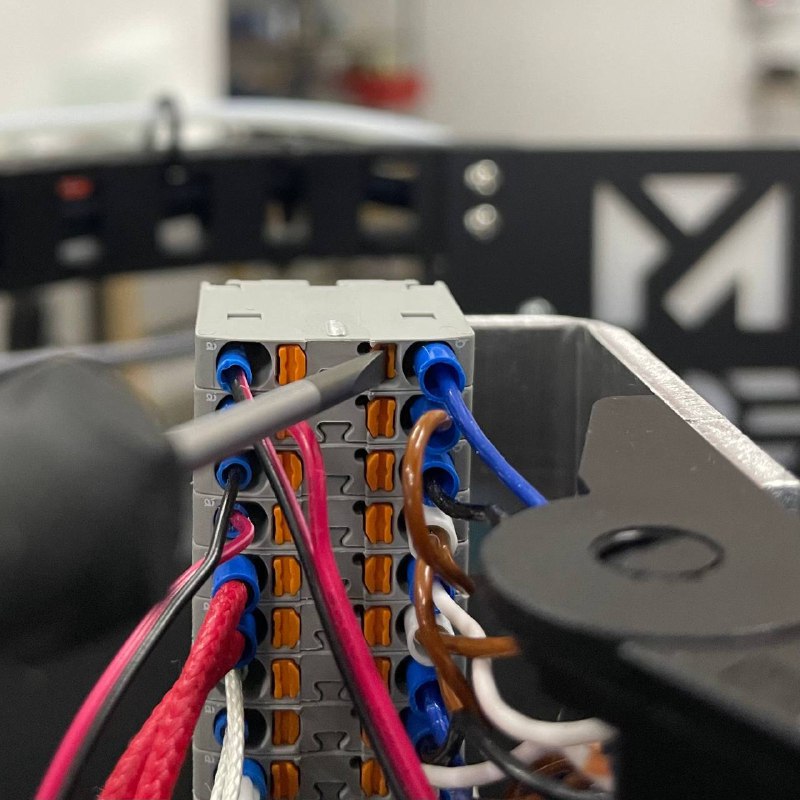
- Carefully disconnect the fan, heater and thermistor cables from their respective connectors on the toolhead's distribution block by pressing the orange button opposite the wire with something thin (e.g. 2mm Hex Screwdriver). Pay attention to the orientation of the connectors to ensure correct reassembly.
¶ 2.3 Detach Hotend Assembly from Toolhead
- Identify the screws that secure the PEEK interface to the main body of the extruder or toolhead carriage.
- Using the 2 mm Hex Driver, carefully unscrew these mounting screws. Support the hotend assembly as you remove the last screw.
- Gently pull the entire hotend assembly away and down from the toolhead. Place it on a clean, stable surface.
¶ 3. Replacing the PTFE Tube
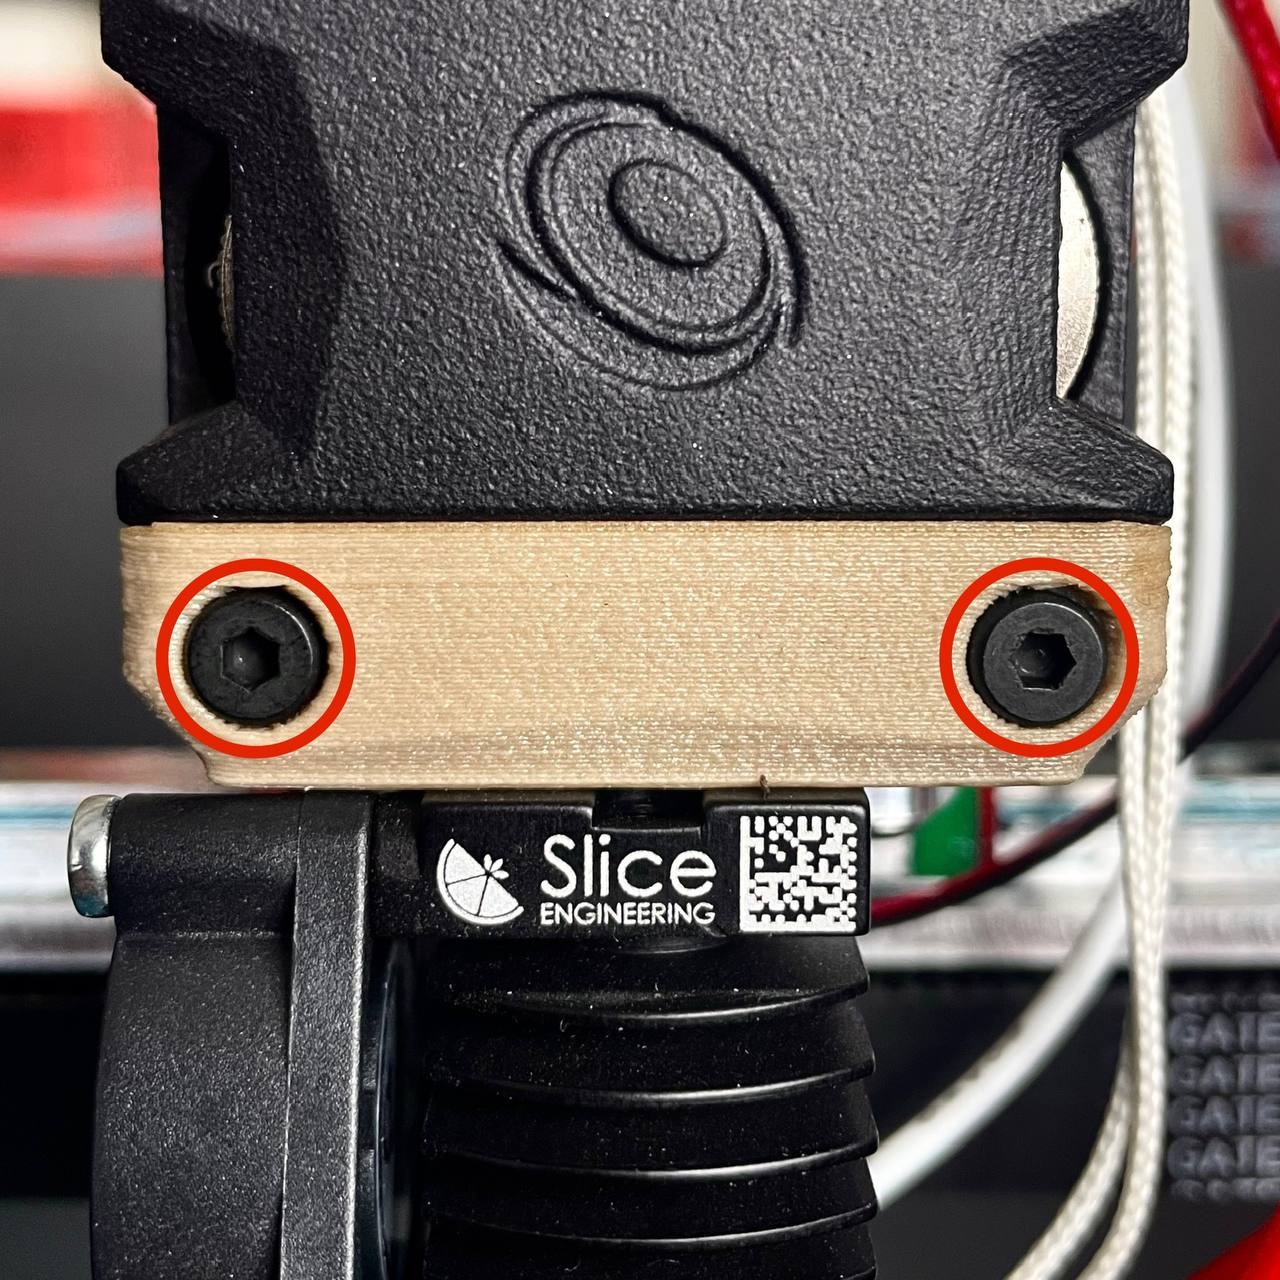
- With the hotend assembly removed from the printer, locate the screws that attach the PEEK interface to the hotend's radiator.
- Using the PH2 Phillips Screwdriver, unscrew these screws.
- Carefully separate the PEEK interface from the heatsink. This should expose the top of the internal PTFE tube.
- Using tweezers or your fingers, gently pull out the old PTFE tube from the central channel of the radiator.
- Thoroughly clean the inside channel of the hotend to remove any fragments of old plastic, burnt residue, or pieces of the old PTFE tube. Compressed air or a small, soft brush can be helpful.
- Take the new PTFE tube. Critically, verify that it is the exact same length as the old tube (measure both if unsure). Ensure both ends of the new tube have clean, perfectly square (perpendicular) cuts.
- Carefully insert the new PTFE tube into the hotend channel from the top, pushing it down gently until it is fully seated. Ensure it's a snug fit but not forced.
¶ 4. Reassembly (Reverse Order)
- Reattach PEEK Interface to Hotend: Align the PEEK interface back onto the radiator, ensuring the new PTFE tube remains fully seated. Secure it with its screws using the PH2 Phillips Screwdriver.
- Mount Hotend to Toolhead: Carefully re-insert the complete hotend assembly back into its position on the toolhead. Secure the PEEK interface to the extruder body/toolhead carriage using its screws and the 2 mm Hex Driver.
- Reconnect Wiring:
- Carefully reconnect the fan, heater and thermistor cables to their respective connectors on the toolhead's distribution block, ensuring correct orientation.
- Reattach the ground wire to the heatblock using its screw and the 2 mm Hex Driver.
- Reinstall Fan Shroud: Place the Fan Shroud and Wire Guard back into its original position and secure them with its screws using the 2 mm Hex Driver.
¶ Final Checks
- Secure Connections: Double-check that all screws are appropriately tightened and all electrical connectors are fully seated and secure.
- Cable Routing: Ensure no wires are pinched or strained.
- Filament Path Test: Power on the printer. Heat the hotend to the appropriate temperature for your filament. Load filament and perform a test extrusion. Check for smooth feeding and consistent extrusion.
- Auto Calibration Necessary: After replacing hotend components, it's necessery to perform a Auto Calibration.
¶ Troubleshooting & FAQs
- Q: Filament jams immediately after replacement.
- A: The PTFE tube might be too short, too long, not cut squarely, or not fully seated. There could also be debris remaining in the hotend channel. Disassemble and re-check carefully.
- Q: Temperature reading issues or heating failures after reassembly.
- A: Power off immediately. Double-check the thermistor and heater wire connections on the distribution block. Ensure they are secure and in the correct ports/orientation. Check for any damaged wires.
- Q: Leaking filament from around the PEEK interface or heatsink.
- A: Ensure the PEEK interface and heatsink components are assembled correctly and screws are tightened properly. The PTFE tube must be correctly seated to form a seal.
¶ Conclusion & Additional Resources
Replacing the internal hotend PTFE liner can resolve many common extrusion problems and extend the life of your hotend. Precision in cutting the tube to the correct length and ensuring clean, square ends is critical for success.