This manual provides step-by-step instructions for removing, inspecting, and reinstalling the front door glass panels on your 22 IDEX V4 printer. The front door consists of two glass panels: an outer glass panel and an inner glass panel, each held in a metal frame with mounting brackets.
You may need to perform this procedure if:
- The glass shifted during transit
- Inner glass needs cleaning (between outer and inner panels)
- Glass broke during operation
- Glass needs replacement
¶ Door Construction
The front door assembly consists of:
Outer Shell:
- Metal frame with outer glass panel
- High-temperature adhesive tape around glass perimeter (prevents rattling)
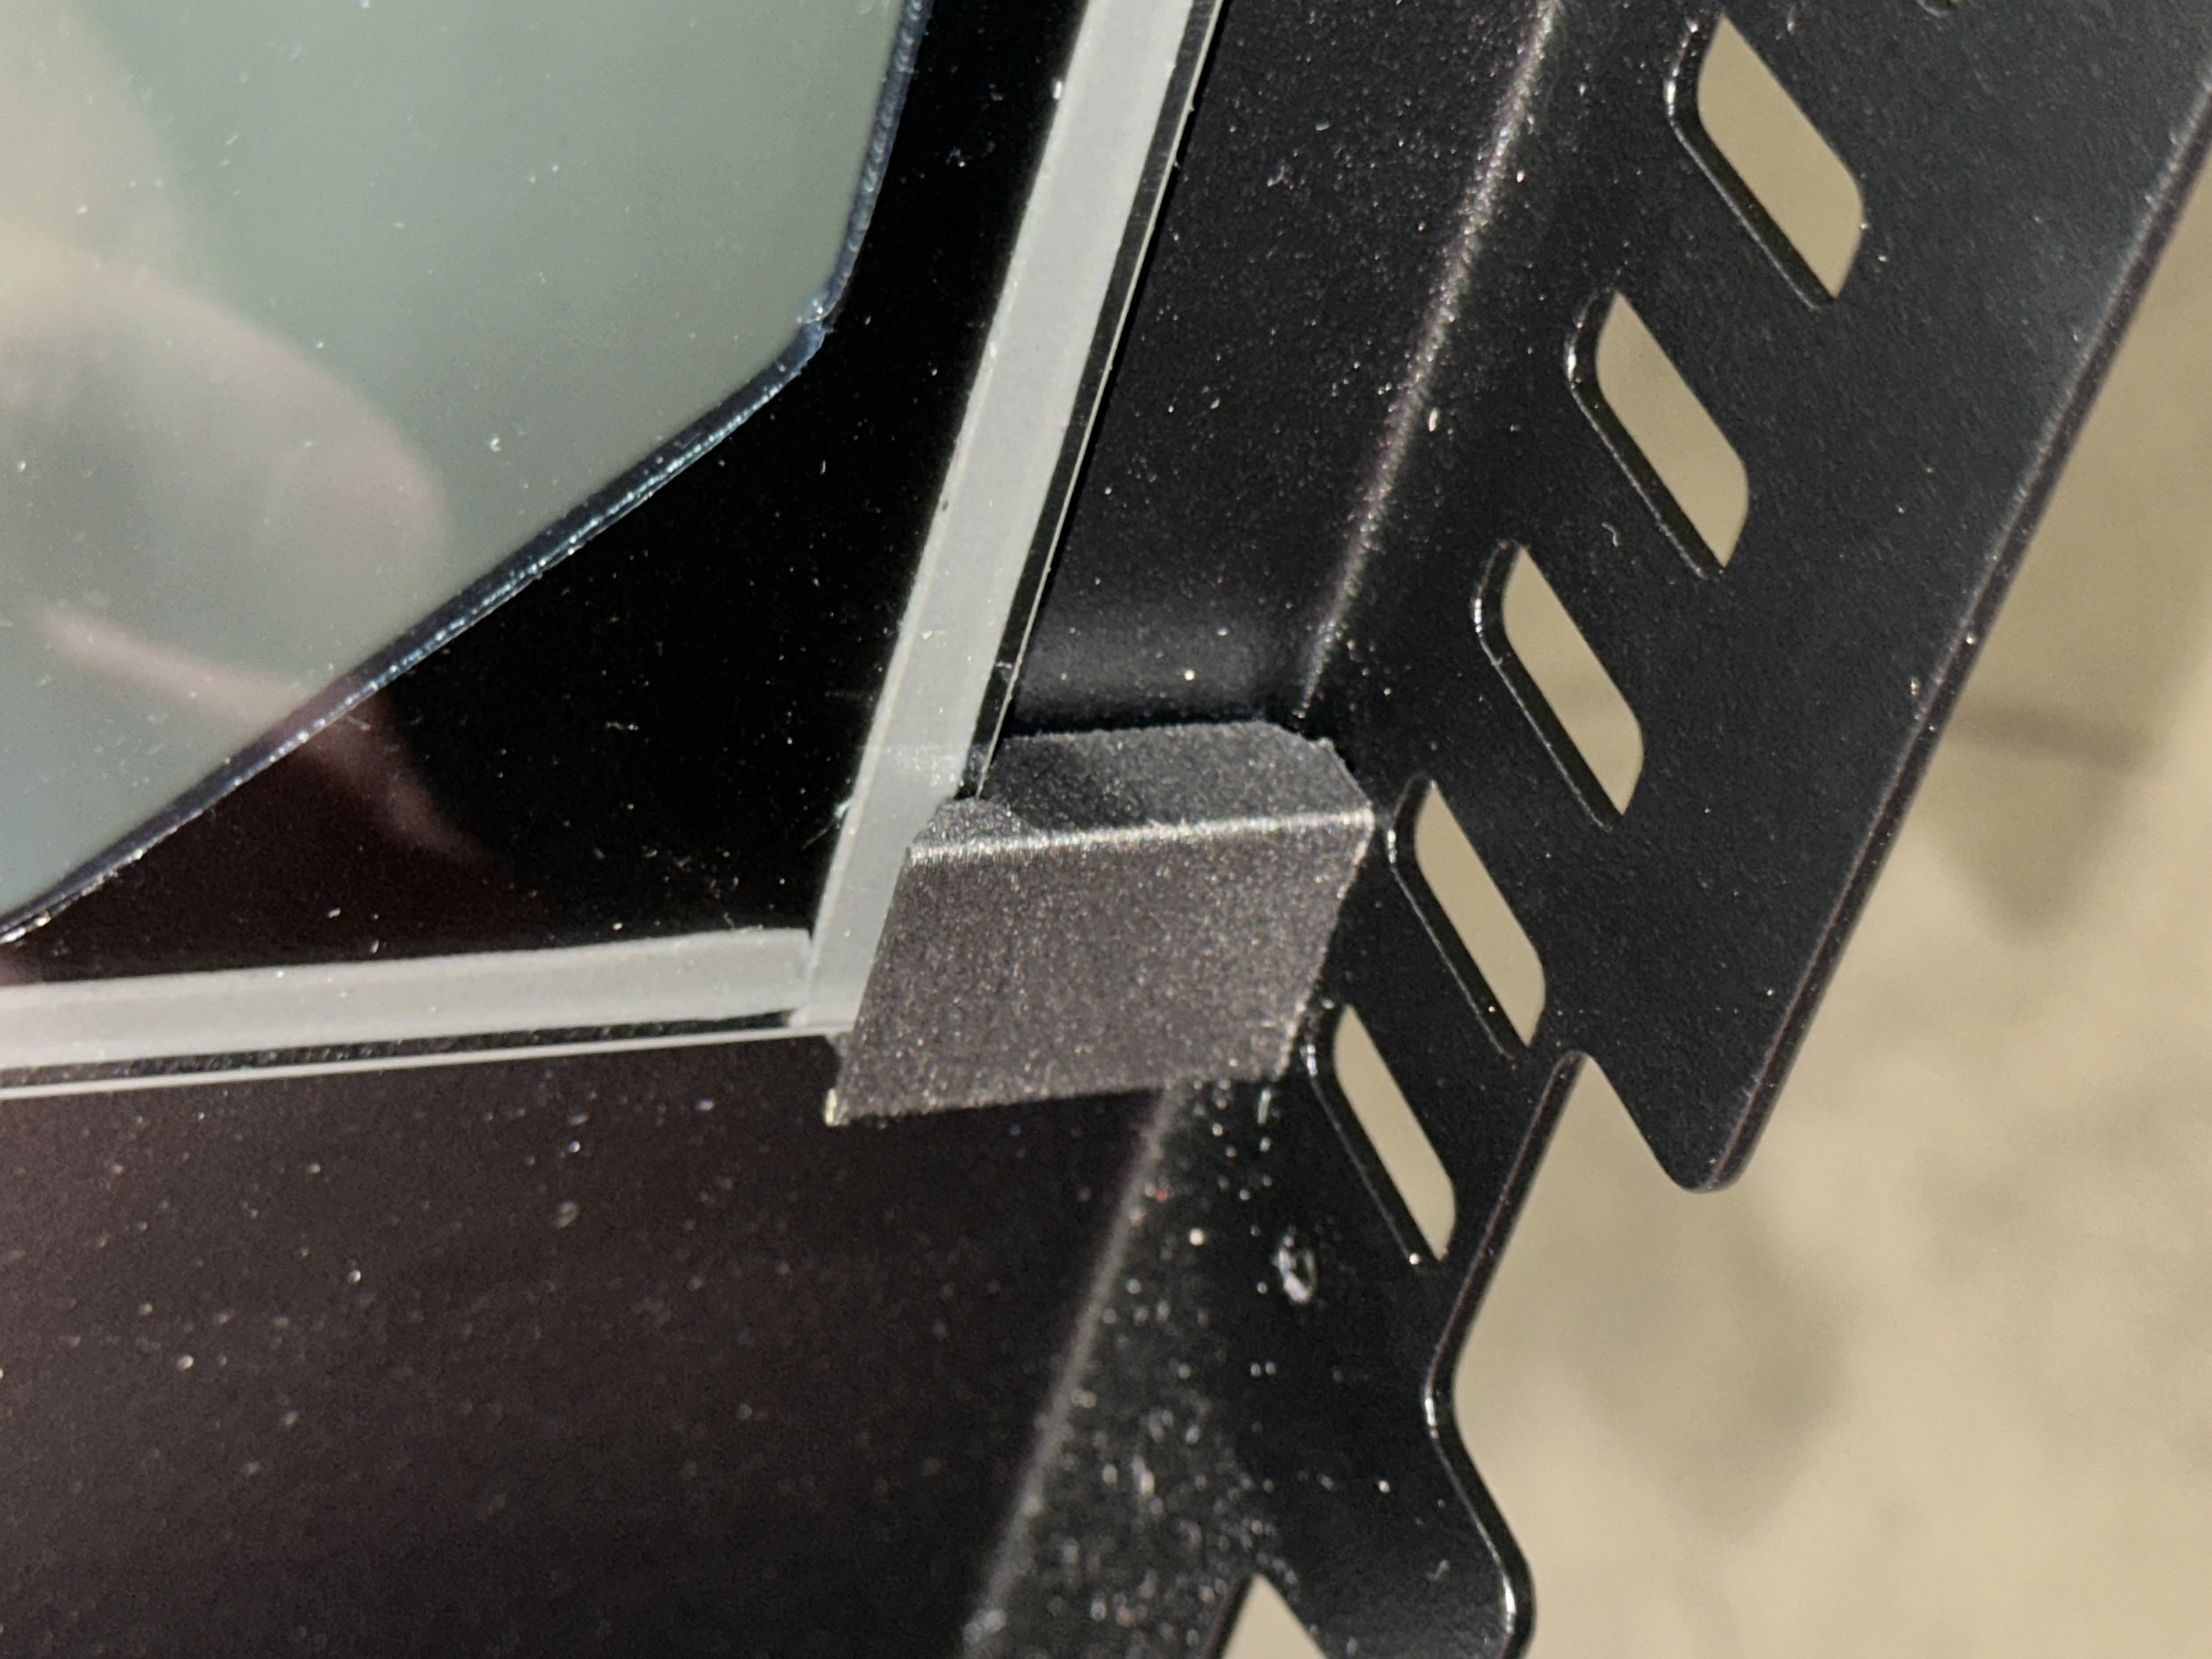
- Four corner brackets hold the glass in place
- Bottom corners: 2 shorter brackets
- Top corners: 2 longer brackets
Inner Panel:
- Metal frame with inner glass panel (inserted inside outer shell)
- High-temperature adhesive tape around glass perimeter (prevents rattling)
- Four corner brackets hold the glass in place
- Bottom corners: 2 shorter brackets
- Top corners: 2 longer brackets
Important: The adhesive tape's primary purpose is to prevent rattling, not to hold the glass in place. The brackets are what secure the glass.
¶ Tools Required
- 2mm hex screwdriver - For inner panel screws (hex head)
- PH1 Phillips screwdriver - For glass bracket screws
- Clean workspace or bench
- Assistance (if machine is positioned on the floor)
Tip: Ideally, position your machine on a bench or table for easier access, especially when working on the bottom screws. If the machine is on the floor, you'll need to lean it back and will require help from another person.
¶ Safety Precautions
- Handle glass carefully - Broken glass can cause injury
- Support the glass - Always hold the glass in the center when brackets are loosened
- Work on stable surface - Position machine on a bench or table if possible
- Keep screws organized - Separate hex screws from Phillips screws to avoid confusion
Warning: When removing or adjusting brackets, always hold the glass panel to prevent it from falling.
¶ Part 1: Removing the Inner Door Panel
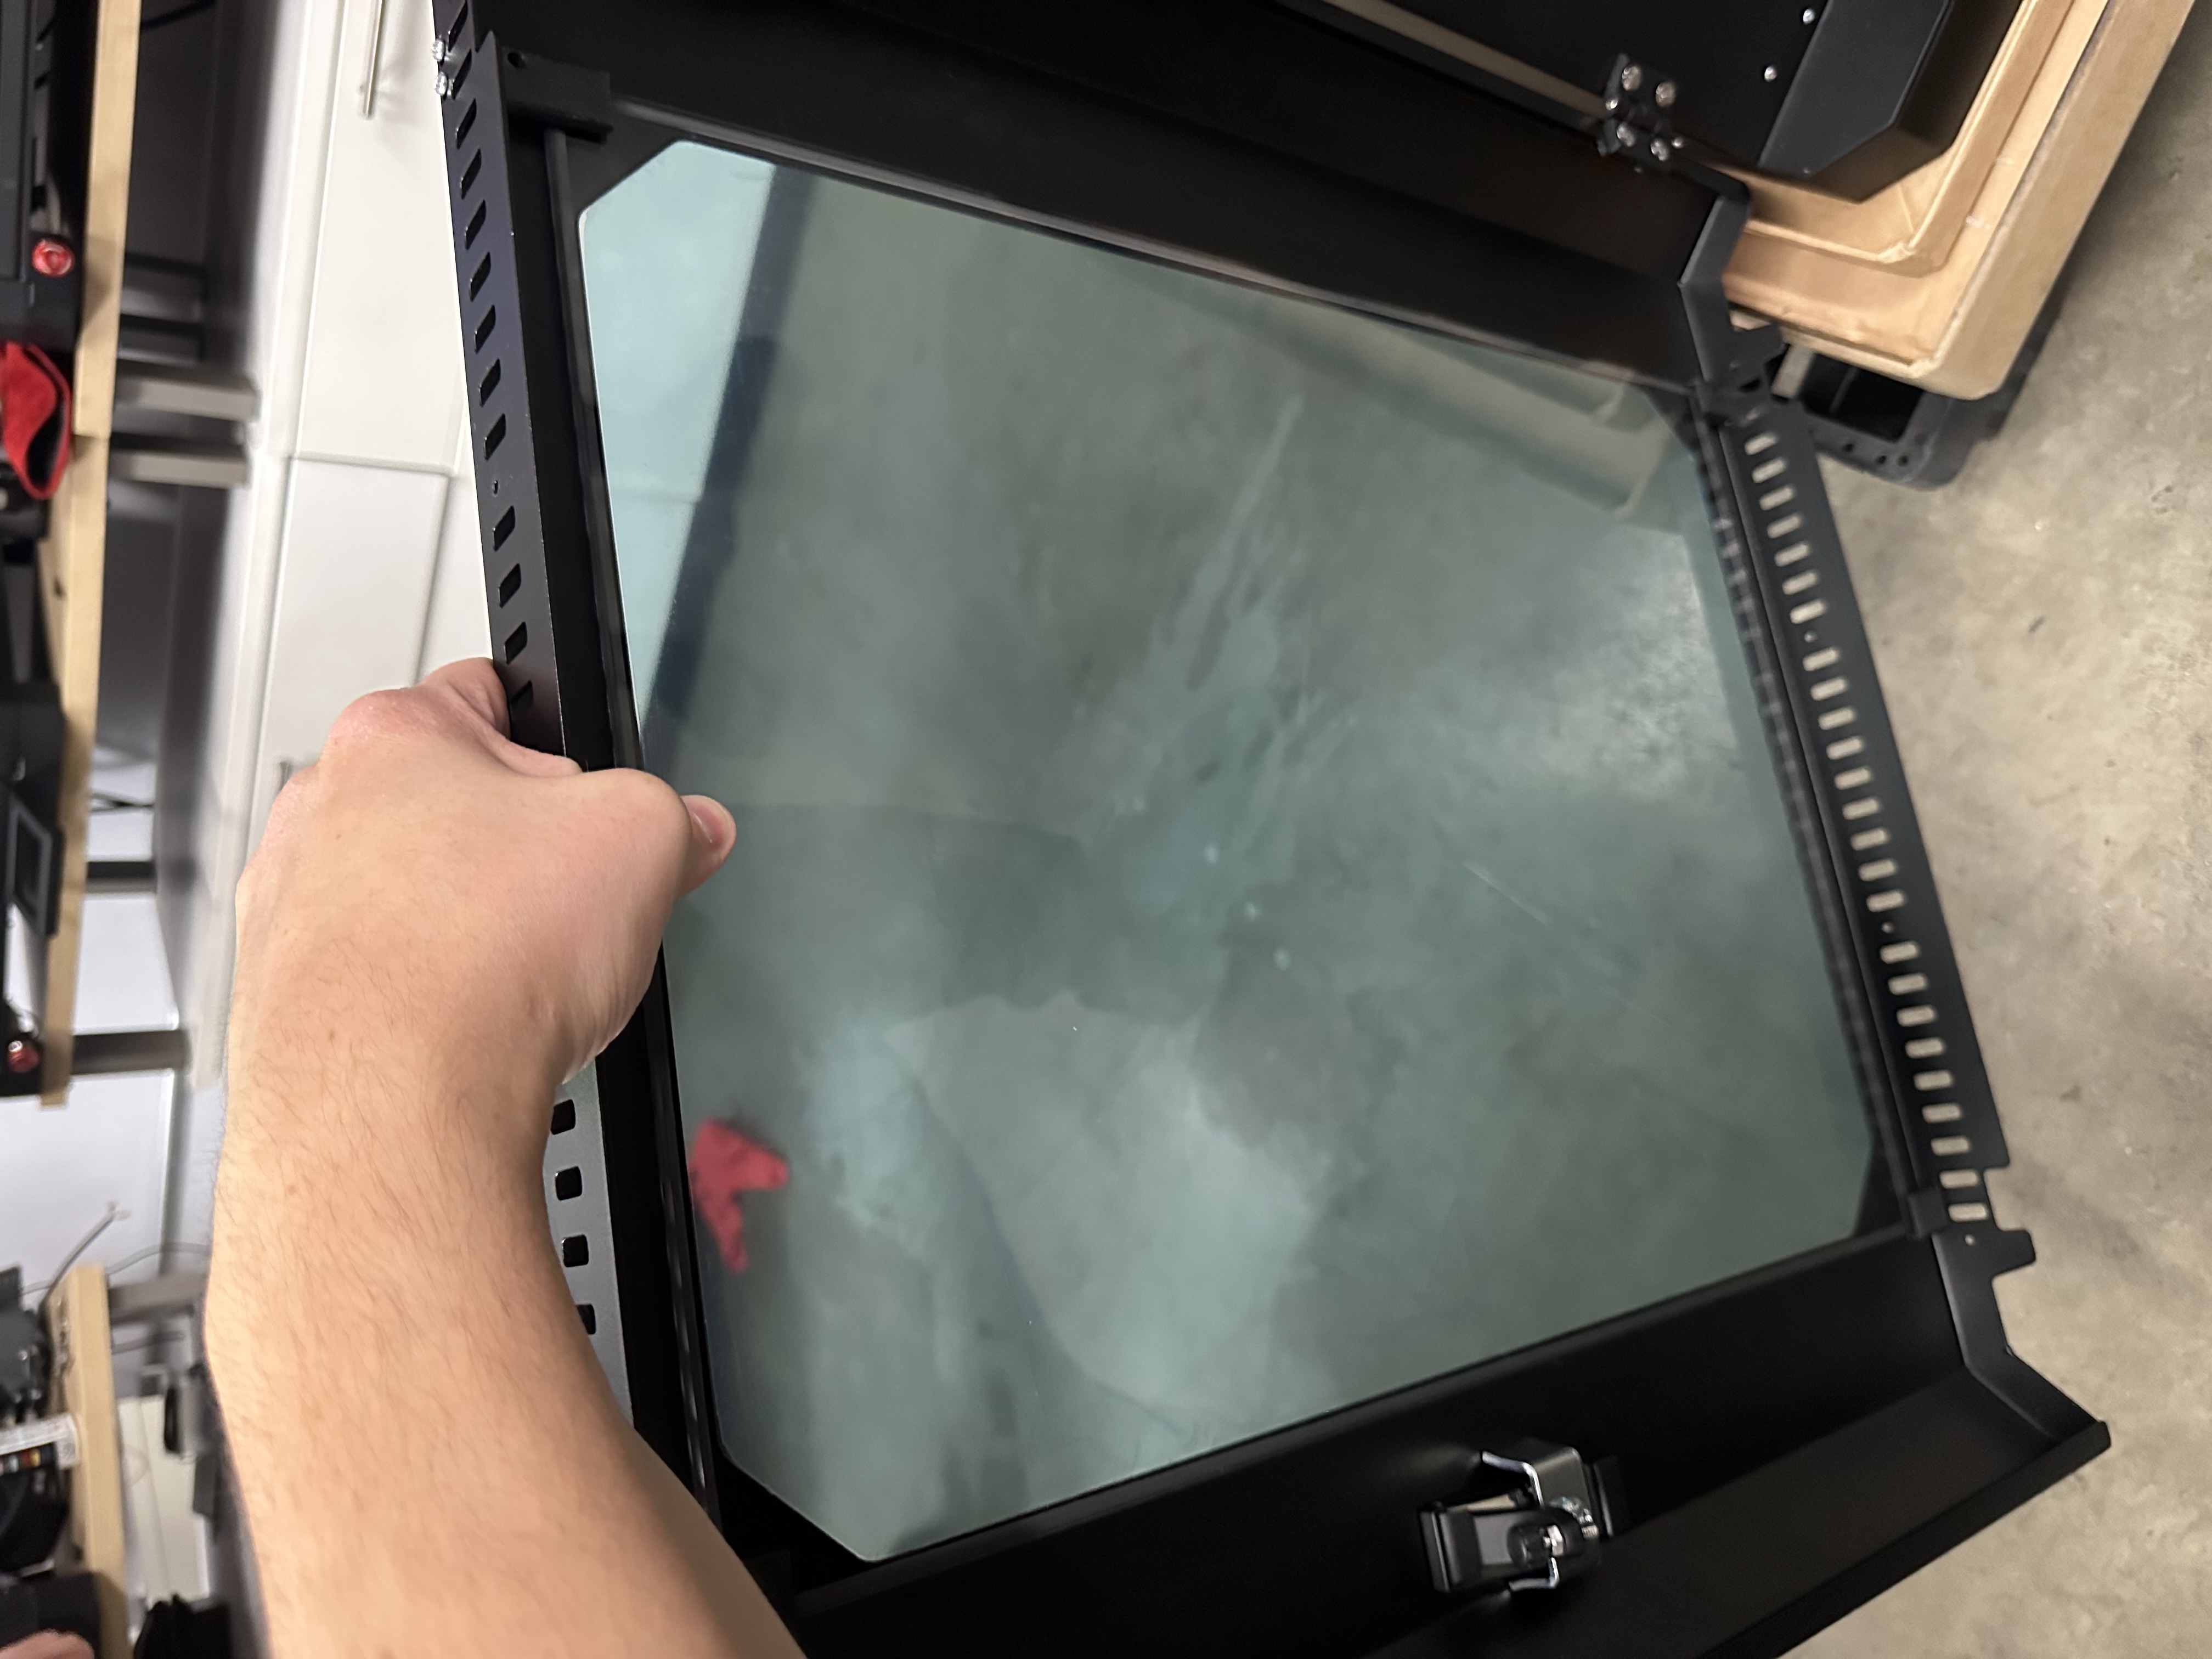
¶ Step 1: Open the Front Door
- Open the printer's front door completely
- Ensure you have clear access to the door interior
¶ Step 2: Identify and Remove Bottom Screws
The inner door panel is held by 8 hex screws (4 on top, 4 on bottom):
- Locate the bottom screws - Look for 4 hex head screws on the bottom of the door
- Use 2mm hex screwdriver to remove all 4 bottom screws completely
- Set screws aside in a safe location
Note: Only the inner panel screws are hex head. Glass bracket screws are Phillips head - don't confuse them.
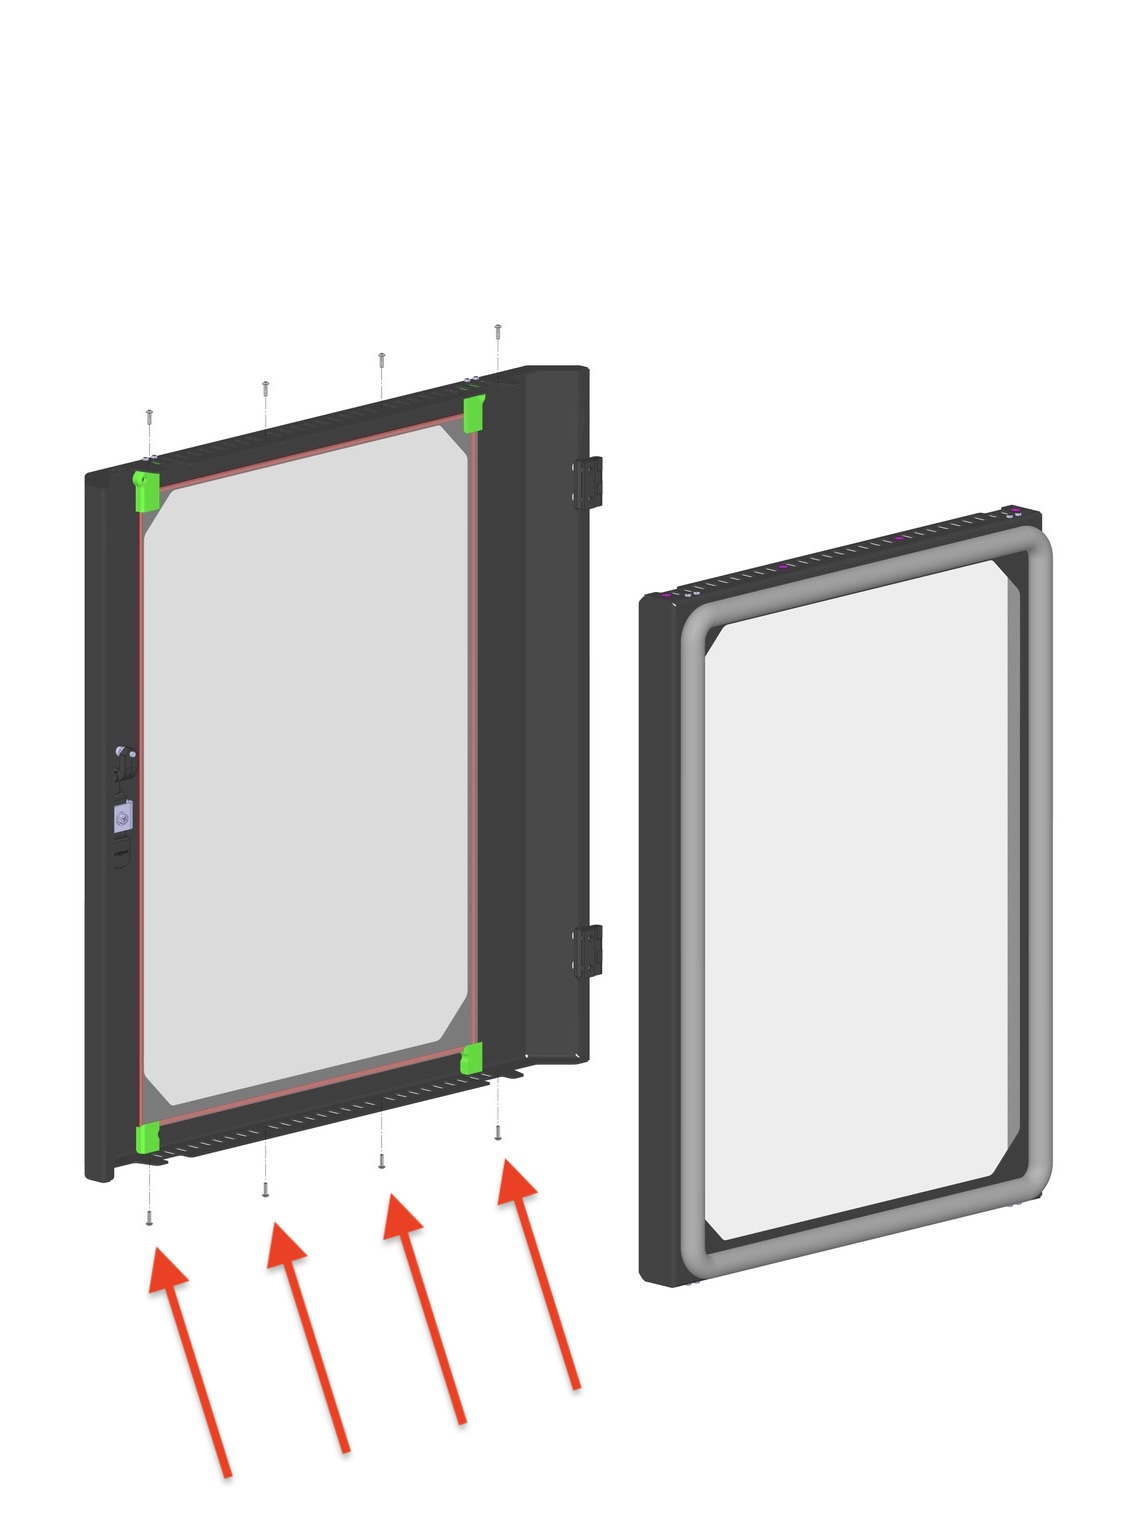
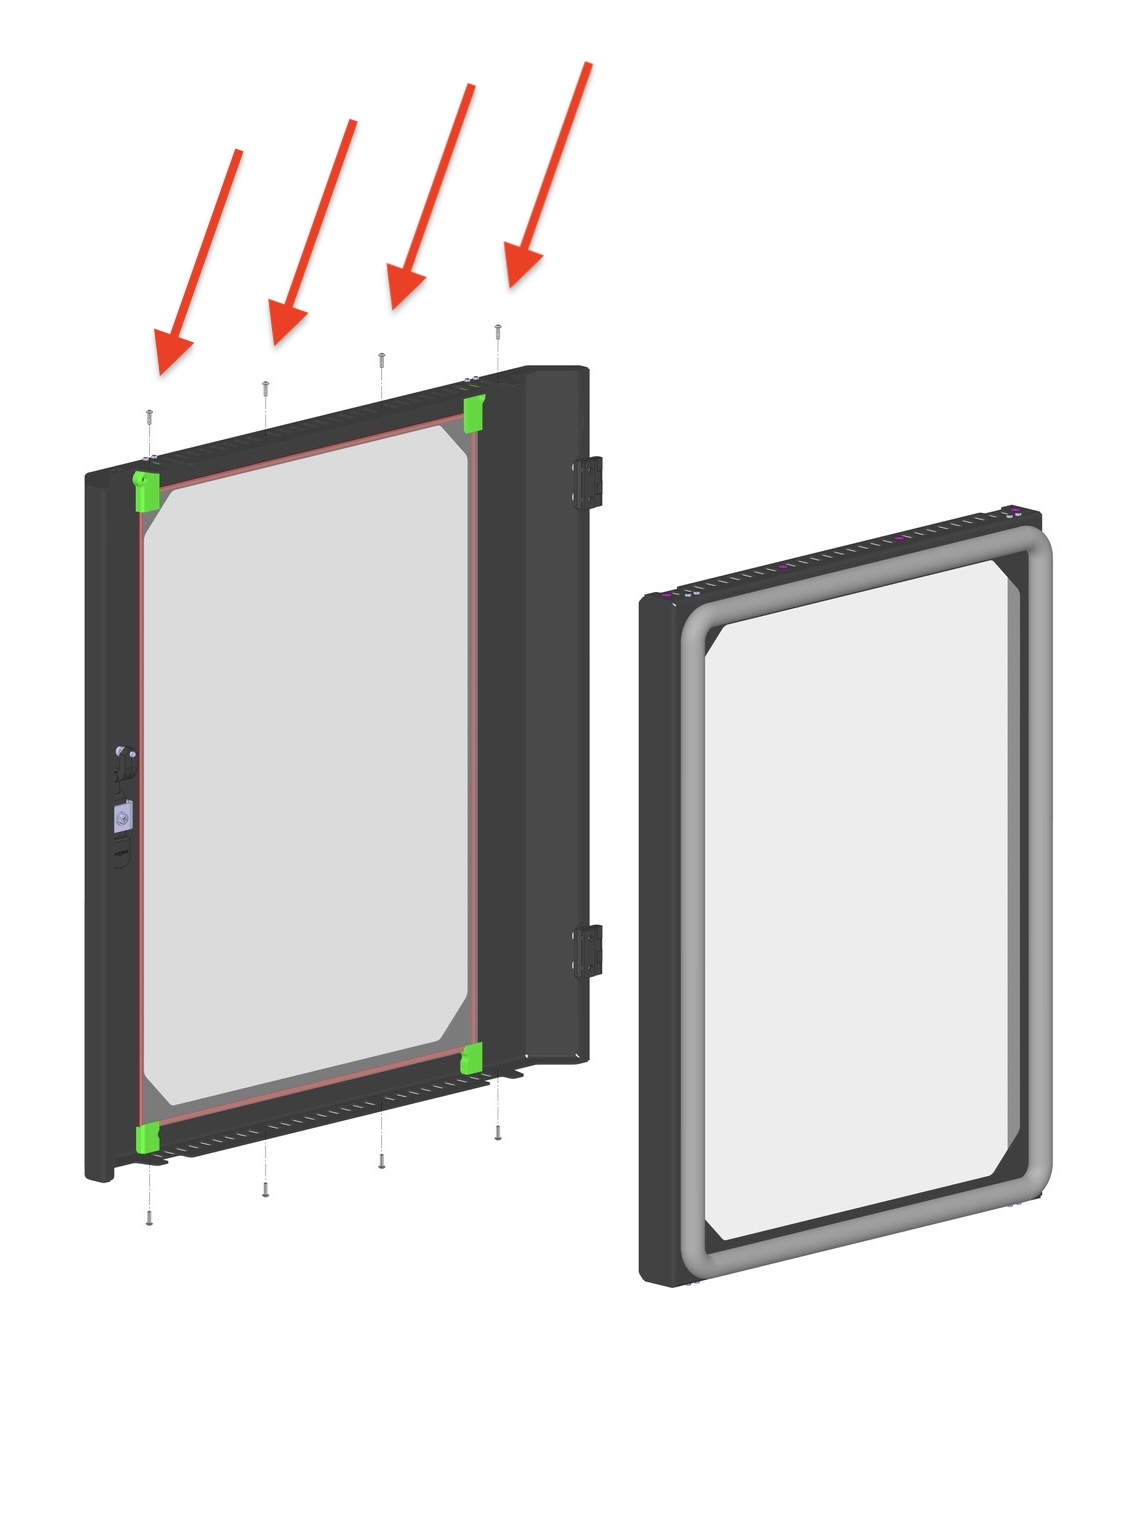
¶ Step 3: Remove Top Screws
- Locate the top screws - Look for 4 hex head screws on the top of the door
- Use 2mm hex screwdriver to remove all 4 top screws completely
- Set screws aside with the bottom screws
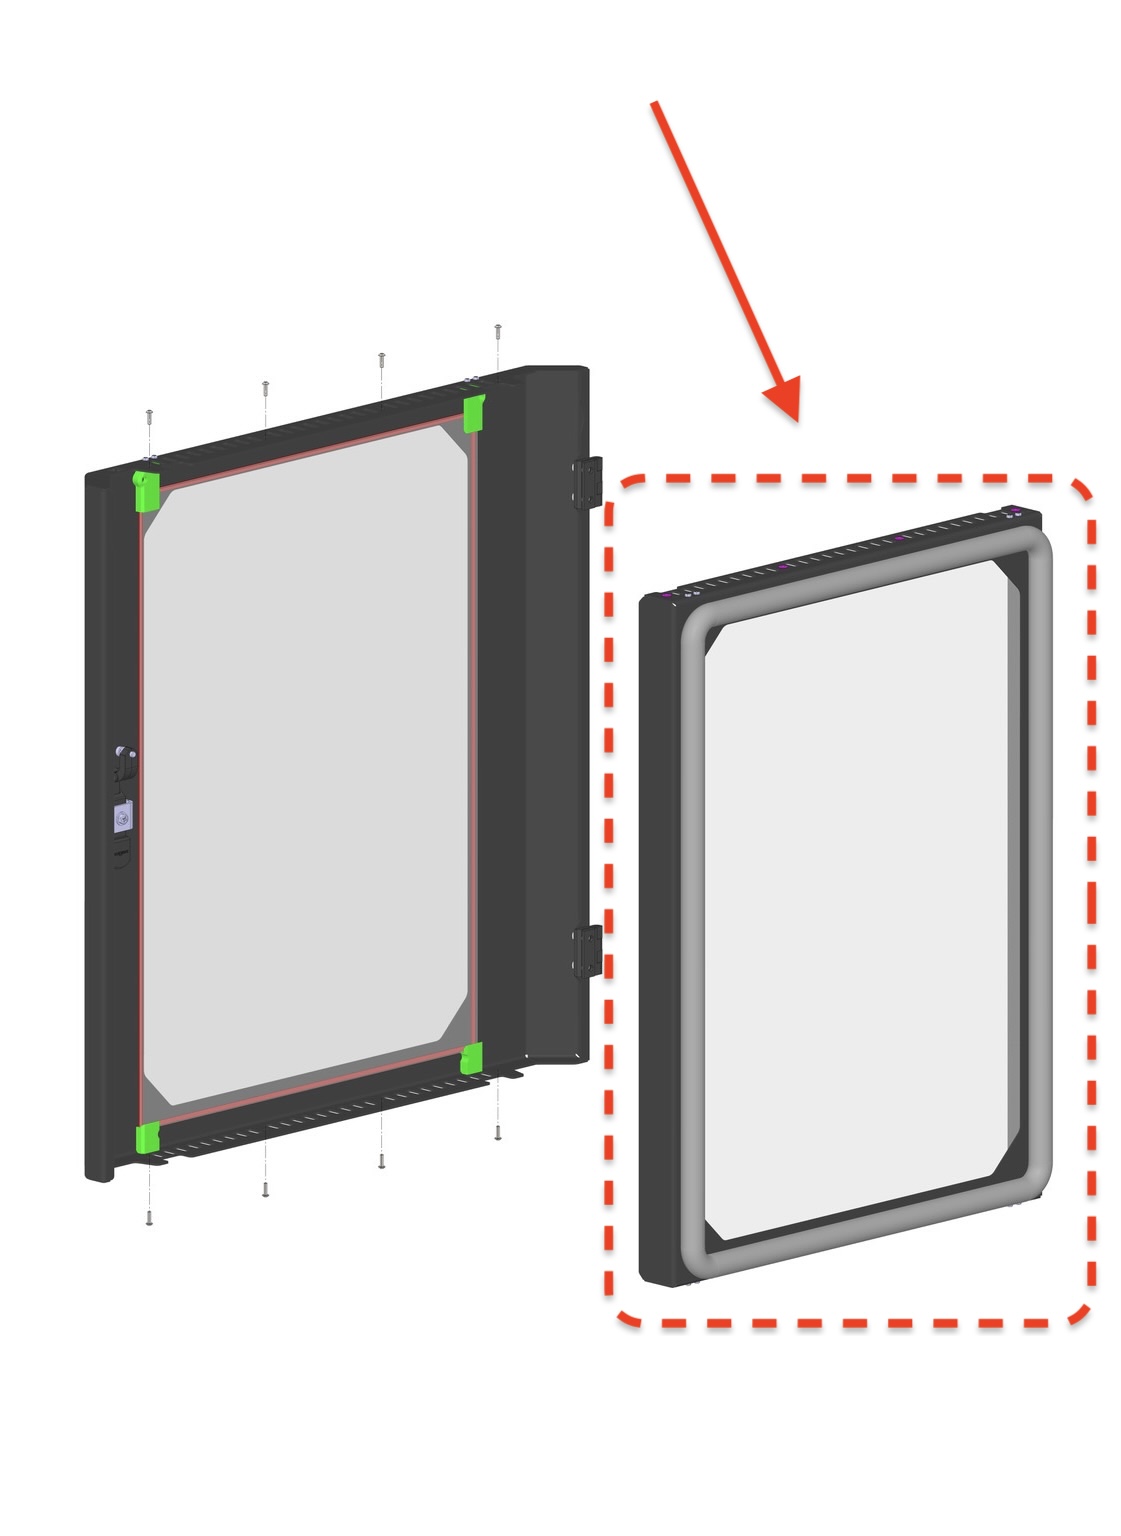
¶ Step 4: Remove Inner Door Panel
- Carefully lift the inner door panel straight out from the outer door shell
- Place on clean surface - Set the inner panel on a clean, flat workspace
- You now have access to clean or inspect the inner glass surfaces
¶ Part 2: Inspecting Glass Bracket Installation
Before reinstalling or if glass has fallen off, you must verify the brackets are installed correctly.
¶ Step 5: Inspect Bottom Brackets
Bottom brackets are shorter than top brackets.
- Look at both bottom corners of the glass frame
- Verify shorter brackets are installed on the bottom
- Check bracket orientation - brackets should properly support the glass

¶ Step 6: Inspect Top Brackets
Top brackets are longer than bottom brackets.
- Look at both top corners of the glass frame
- Verify longer brackets are installed on the top
- Check bracket orientation - brackets should properly support the glass
Important: Perform this inspection for both the inner glass panel AND the outer glass panel if glass has fallen off or shifted.
¶ Part 3: Reinstalling or Adjusting Glass
Choose the appropriate scenario below:
¶ Scenario A: Glass is Secure, Brackets are Correct
If the glass is properly installed and brackets are in the correct positions, skip to Part 4: Reinstalling Inner Door Panel.
¶ Scenario B: Glass Shifted but Brackets are Correct
If the glass has shifted but the brackets are in the correct positions (short on bottom, long on top):
¶ Step 7: Loosen Bracket Screws
- Hold the glass firmly in the center with one hand
- Use PH1 Phillips screwdriver to slightly loosen the 4 top bracket screws
- You don't need to remove them completely
- Just loosen enough so the brackets can move
- Slightly loosen the 4 bottom bracket screws as well
Important: Always hold the glass while loosening screws to prevent it from falling.
¶ Step 8: Reposition Glass
- Continue holding the glass in the center
- Center the glass in the frame
- Ensure even spacing around all edges
¶ Step 9: Tighten Brackets
- While holding the glass in position, tighten the top bracket screws
- Tighten the bottom bracket screws
- Verify glass is secure and properly positioned
Proceed to Part 4: Reinstalling Inner Door Panel
¶ Scenario C: Brackets are Installed Incorrectly or Glass Fell Off
If brackets are in the wrong positions (long/short swapped) or glass fell off completely:
¶ Step 10: Remove All Brackets
- If glass is still attached, hold the glass firmly in the center
- Use PH1 Phillips screwdriver to completely remove:
- All 4 screws from the top brackets
- All 4 screws from the bottom brackets
- Remove the brackets from the frame
- Set glass aside on a clean, padded surface
¶ Step 11: Identify and Sort Brackets
- Separate brackets into two groups:
- Shorter brackets (for bottom corners)
- Longer brackets (for top corners)
- Keep screws organized by bracket position
¶ Step 12: Install Bottom Brackets First
- Position shorter brackets on both bottom corners
- Insert screws but DO NOT fully tighten yet
- Screws should be snug enough to hold brackets in place
- Leave them loose enough that brackets can still move slightly
- Verify correct orientation using reference images from Step 5
¶ Step 13: Install Glass into Bottom Brackets
- Carefully position the glass into the bottom brackets
- Hold the glass at the top center to keep it in position
- Ensure glass sits properly in the bottom bracket channels
¶ Step 14: Install Top Brackets
- While holding the glass in position, place the longer brackets on both top corners
- Insert screws but DO NOT fully tighten yet
- Verify glass is centered in the frame with even spacing all around
¶ Step 15: Tighten All Brackets
- Tighten top bracket screws fully with PH1 Phillips screwdriver
- Tighten bottom bracket screws fully
- Verify glass is secure and doesn't rattle or shift
- Check alignment - glass should be centered with even gaps
¶ Part 4: Reinstalling Inner Door Panel
¶ Step 16: Position Inner Panel
- Carefully align the inner door panel with the outer door shell
- Insert the panel back into position
- Ensure proper fit - panel should sit flush with the outer shell
¶ Step 17: Install Top Screws First
- Use 2mm hex screwdriver
- Insert and tighten all 4 top hex screws
- Ensure screws are fully seated and tight
Tip: Installing top screws first makes it easier to align the panel before securing the bottom.
¶ Step 18: Install Bottom Screws
- Use 2mm hex screwdriver
- Insert and tighten all 4 bottom hex screws
- Ensure screws are fully seated and tight
¶ Step 19: Final Verification
- Close and open the door several times
- Check for rattling - glass should be secure and quiet
- Verify glass alignment - should be centered and even
- Look for gaps - inner panel should sit flush with outer shell
- Test door latch - door should close and latch properly
¶ Troubleshooting
¶ Glass Still Rattles After Installation
Cause: Brackets not tight enough or glass not seated properly in brackets.
Solution:
- Remove inner panel (Part 1)
- Tighten all bracket screws firmly
- Verify glass is properly seated in all bracket channels
- Check that high-temperature adhesive tape is present around glass perimeter
- Reinstall inner panel (Part 4)
¶ Glass is Not Centered in Frame
Cause: Glass shifted during bracket tightening.
Solution:
- Remove inner panel (Part 1)
- Loosen bracket screws slightly (don't remove)
- Hold glass and center it in frame
- Tighten screws while holding glass in centered position
- Reinstall inner panel (Part 4)
¶ Brackets Won't Hold Glass Securely
Cause: Wrong brackets installed (short/long swapped) or brackets damaged.
Solution:
- Verify shorter brackets are on bottom, longer brackets on top
- If brackets are correct, inspect for damage or bent metal
- Contact Vision Miner support for replacement brackets if damaged
- Follow Scenario C to reinstall correctly
¶ Glass Broke During Removal/Installation
Cause: Glass dropped or impacted during handling.
Solution:
- Safely dispose of broken glass
- Clean the frame thoroughly to remove glass fragments
- Contact Vision Miner support to order replacement glass panel
- Provide information: Specify if outer or inner glass, and machine serial number
¶ Inner Panel Won't Fit Back into Outer Shell
Cause: Glass brackets protruding too far or inner panel misaligned.
Solution:
- Check that all glass bracket screws are fully tightened and flush
- Verify brackets are not bent outward
- Ensure no debris between inner panel and outer shell
- Align panel carefully and insert straight, not at an angle
¶ Maintenance Tips
- Clean glass regularly - Remove inner panel to clean between glass surfaces
- Check bracket tightness - Periodically verify screws are tight if rattling develops
- Handle carefully - Always support glass when brackets are loosened
- Inspect after moves - Check glass alignment after transporting printer
¶ Summary
You have successfully learned how to:
- ✅ Remove the inner door panel for cleaning or maintenance
- ✅ Inspect and verify correct bracket installation
- ✅ Reposition shifted glass
- ✅ Completely reinstall glass with correct brackets
- ✅ Reassemble the door panel
Key Points to Remember:
- Shorter brackets go on bottom corners, longer brackets on top corners
- Always hold glass when loosening brackets
- Tighten bottom brackets loosely first, then add glass, then tighten fully
- Install inner panel top screws before bottom screws
¶ Contact Support
If you need assistance or replacement parts:
Vision Miner Support
Email: support@visionminer.com
When contacting support, provide:
- Machine serial number
- Description of the issue
- Photos of the door/brackets/glass (if applicable)
- Which glass panel needs replacement (inner or outer)