¶ Introduction
The 22 IDEX V4 printer is equipped with WiFi connectivity that allows you to access the printer through a web interface for uploading files, monitoring prints, and adjusting settings. Understanding how to connect your printer to your WiFi network is essential for seamless operation and remote management.
When you receive your 22 IDEX V4, the printer comes preconfigured in Access Point (AP) Mode. This means the printer creates its own WiFi network that you can connect to directly from any computer, tablet, or smartphone. This default configuration ensures you can access your printer immediately without requiring an existing WiFi network. However, for more convenient access—especially when multiple devices need to connect or when the printer is located away from your workstation—you can switch the printer to Client Mode, allowing it to join your existing WiFi network.
This guide focuses exclusively on WiFi connectivity for the V4 model. You will learn how the default Access Point mode works, how to connect to it, and most importantly, how to configure your printer to join your home or office WiFi network in Client Mode. By following these procedures, you'll enable network-wide access to your printer through your router's DHCP-assigned IP address.
Note: The 22 IDEX V4 WiFi module only supports 2.4 GHz WiFi networks. It will not connect to 5 GHz networks. Ensure your router broadcasts a 2.4 GHz SSID before attempting to connect.
¶ Default Network Configuration
When you first power on your 22 IDEX V4 printer, it automatically starts in Access Point Mode. In this mode, the printer broadcasts its own WiFi network with the following credentials:
- SSID (Network Name):
22 IDEX - Password:
1234567890 - IP Address:
192.168.0.1
¶ How to Connect in AP Mode
- Power on the printer and wait approximately 30 seconds for the network to initialize.
- Open WiFi settings on your computer, tablet, or smartphone.
- Locate the network named
22 IDEXin your available WiFi networks list. - Connect to
22 IDEXusing the password:1234567890 - Open a web browser and navigate to:
http://192.168.0.1orhttp://22idex.local
- The web interface will load, giving you full access to the printer.
Info: Access Point mode is ideal for quick setup, demonstrations, or situations where no existing WiFi network is available. However, only devices directly connected to the printer's
22 IDEXnetwork can access it in this mode.
¶ Connecting to Your WiFi Network (Client Mode)
¶ Prerequisites
Before connecting your printer to your WiFi network, ensure the following:
- 2.4 GHz WiFi Network: Your router must broadcast a 2.4 GHz network. The V4 WiFi module does not support 5 GHz.
- SSID and Password: You have the exact network name (SSID) and password. Both are case-sensitive.
- Network Range: The printer is within range of your WiFi router for a stable connection.
- Web Interface Access: You are currently connected to the printer's web interface.
Note: Switching to WiFi Client mode will disconnect your current session temporarily. You will need to reconnect to your regular WiFi network and access the printer using its new IP address.
¶ Step-by-Step: Connect to WiFi Network
¶ 1. Access Web Interface
Connect to the 22 IDEX network (password: 1234567890) and navigate to http://192.168.0.1 in your browser.
¶ 2. Run Connection Macro
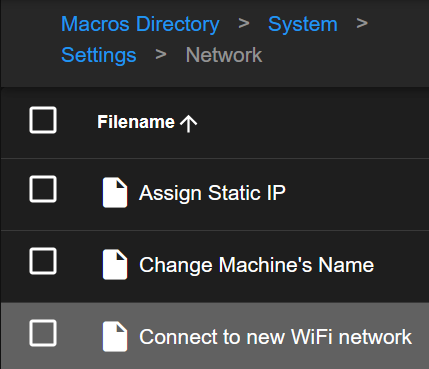
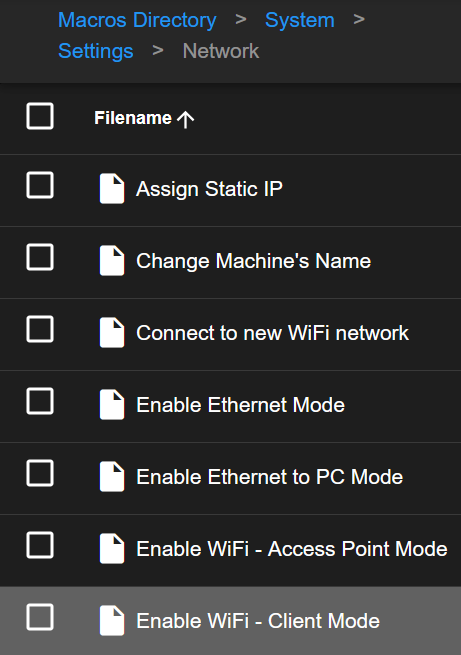
Navigate to Macros > System > Settings > Network and click Connect to new WiFi network.
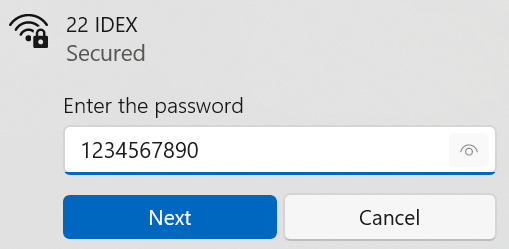
¶ 3. Enter WiFi Credentials
Enter your WiFi network name (SSID) and password when prompted. Both are case-sensitive and must be exact. Ensure you're connecting to a 2.4 GHz network (not 5 GHz).


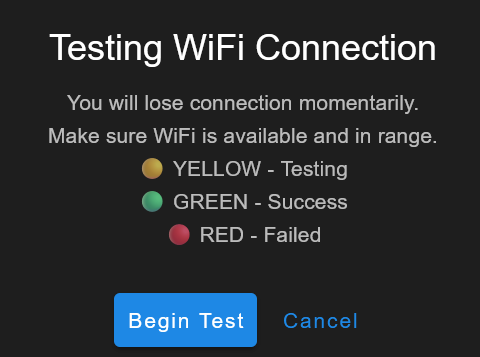
¶ 4. Begin Connection Test
Click OK to start the test. Watch the LED lights for status:
- 🟡 Yellow - Testing in progress
- 🟢 Green - Success (proceed to Step 6)
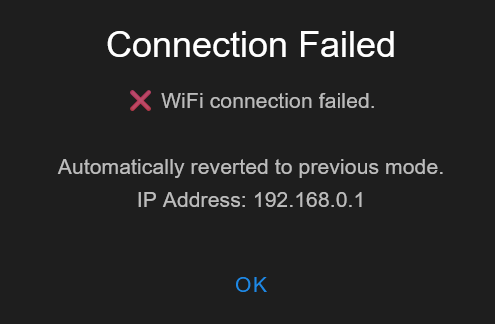
- 🔴 Red - Failed (automatically reverts to previous mode)
¶ 5. Connection Result
🟢 If Green LEDs: Success! A dialog shows the IP address (e.g., 192.168.1.116).
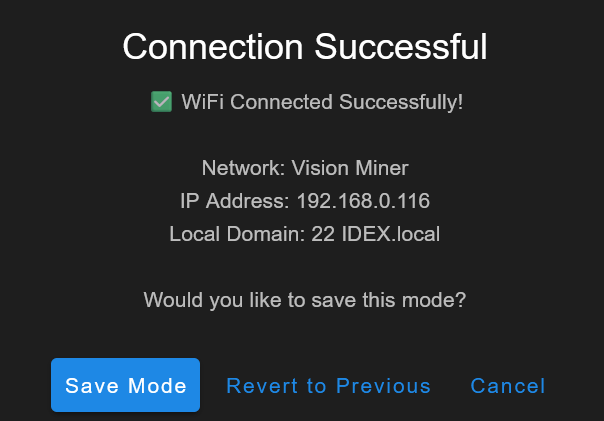
Warning: DO NOT click any button yet! Write down the IP address and proceed to Step 6.
🔴 If Red LEDs: Connection failed. The printer automatically reverted to previous mode. Check your credentials and try again (see Step 8).
¶ 6. Verify Connection (CRITICAL)
Warning: MANDATORY before saving! If you save without verifying, you may lose access.
- Connect your computer to the same WiFi network as the printer
- Open a new browser tab and enter the IP address:
http://192.168.1.105(orhttp://22idex.local)
✅ If web interface loads: Connection works! Proceed to Step 7 and click "Save Mode".
❌ If it does NOT load:
- Verify you're on the same WiFi network and same subnet (see Troubleshooting)
- Click "Revert to Previous" in the dialog and try again
¶ 7. Save Configuration
After successful verification in Step 6, choose an option from the success dialog:
Option 1: Save Mode (Recommended)
- Click "Save Mode" to permanently save WiFi Client mode
- Printer will reconnect to this network after every restart
- ✅ Done!
Option 2: Revert to Previous
- Use if Step 6 verification failed
- Switches back to previous network mode
- WiFi credentials are saved; try again or use "Enable WiFi - Client Mode" macro later
Option 3: Cancel
- Stays in WiFi mode but doesn't save to
networkmode.g - After restart, reverts to previous mode
- Use "Enable WiFi - Client Mode" macro to save later
¶ 8. If Connection Test Failed (Red LEDs)
The printer automatically reverted to your previous mode (AP: 192.168.0.1, Ethernet, or previous WiFi).
To retry:
- Verify credentials are correct (case-sensitive)
- Ensure you're using a 2.4 GHz network (not 5 GHz)
- Check WiFi signal strength
- Run the Connect to new WiFi network macro again
¶ Switching Between Network Modes
¶ From AP Mode to Client Mode
If your printer is in Access Point mode and you have previously saved WiFi credentials, you can switch to Client mode using a macro:
- Connect to the printer via Access Point mode (
192.168.0.1). - Navigate to Macros > System > Settings > Network.
- Click Enable WiFi - Client Mode.
- Choose to Change & Reconnect Now or Change after restart.
- If testing now:
- Yellow LEDs appear during test
- Green LEDs indicate success - write down IP address
- Verify connection works via web browser
- Save configuration via touchscreen or web interface
- Green LEDs change to white when saved
- If changing after restart:
- Configuration saves immediately
- Restart printer to activate WiFi Client mode
¶ From Client Mode to AP Mode
If you need to revert to Access Point mode (e.g., for troubleshooting or moving the printer to a location without WiFi):
- Connect to the printer via its current IP address or
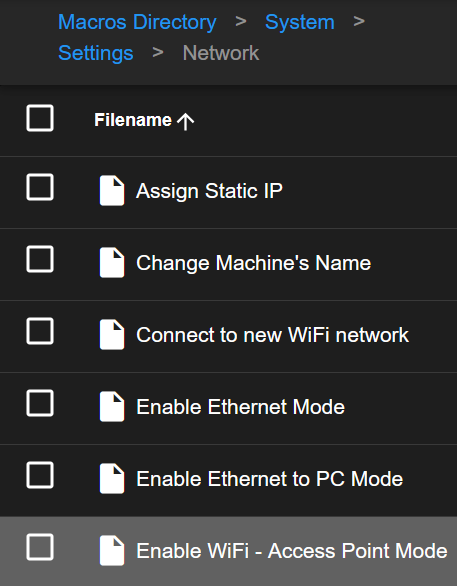
22idex.local. - Navigate to Macros > System > Settings > Network.
- Click Enable WiFi - Access Point Mode.
- Confirm the operation.
- The printer will restart in AP mode, broadcasting the
22 IDEXnetwork. - Connect to
22 IDEX(password:1234567890) and access viahttp://192.168.0.1.
¶ Network Self-Test at Startup
The 22 IDEX V4 includes an automatic network self-test that runs every time the printer starts up. This script (networktest.g) intelligently manages network connectivity and ensures your printer is accessible after each restart. Understanding how this process works will help you troubleshoot connection issues and know what to expect when powering on your printer.
¶ How the Self-Test Works
When you restart your printer (either after initial configuration or any subsequent power cycle), the network self-test follows these steps:
¶ 1. Check for Existing Connection
- At startup, the printer waits briefly (up to 15 seconds) for a network connection to establish.
- If a connection already exists from a previous configuration (e.g., saved WiFi Client credentials), the printer connects automatically and logs the IP address in
0:/IP_address.txt. - If a connection is detected, the self-test completes successfully, and no further action is needed.
¶ 2. Test Active Network Mode
- If no connection is detected, the script checks which network mode is configured (
networkmode.gfile). - The printer tests the configured mode for up to 15 seconds, waiting for a valid IP address.
- During this phase, the LEDs may turn yellow, indicating the printer is attempting to establish a connection.
¶ 3. Fallback to Access Point Mode
- If all connection attempts fail (no WiFi credentials saved or network unavailable), the printer automatically falls back to Access Point Mode.
- The printer will broadcast the
22 IDEXWiFi network with the default credentials. - Red LEDs indicate the printer has entered fallback AP mode.
- A notification message will appear in the web interface: "WiFi module was automatically switched to Access Point Mode"
¶ 4. Accessing After Self-Test
- If you see white LEDs, the printer successfully connected to a saved network configuration. The printer is ready to use at its assigned IP address or
http://22idex.local. - If you see green LEDs, the printer connected but the configuration was not saved. Access the printer and save the network mode to make it permanent.
- If you see yellow LEDs (after ~30 seconds), the printer is still attempting to connect. Try accessing via
http://22idex.localor check your router's DHCP client list for the printer's IP. - If you see red LEDs, the printer connection failed and automatically reverted to fallback mode. Connect to the
22 IDEXWiFi network and access viahttp://192.168.0.1.
¶ What This Means After Successful WiFi Configuration
After you successfully connect your printer to your WiFi network using the steps in this guide, the printer will automatically reconnect to that network every time it restarts. This means:
- Automatic Reconnection: You don't need to reconfigure WiFi settings after each power cycle.
- Consistent Access: The printer will obtain an IP address from your router (usually the same IP if your router supports DHCP reservations).
- Fallback Safety: If your WiFi network becomes unavailable, the printer will automatically revert to Access Point mode so you can still access it.
Note: If you move your printer to a different location or change WiFi networks, you may need to reconfigure the connection using the "Connect to new WiFi network" macro or connect via Access Point mode to access the web interface.
Warning: If the printer repeatedly falls back to AP mode after configuring WiFi Client credentials, verify that:
- Your WiFi network is 2.4 GHz (not 5 GHz)
- The SSID and password are correct (case-sensitive)
- The printer is within range of your WiFi router
- Your router is not blocking new devices
¶ Troubleshooting WiFi Connection Issues
¶ Issue: Cannot Access Printer - Wrong Subnet (MOST COMMON)
Symptoms:
- Connection test was successful (green LEDs)
- IP address was displayed
- You cannot access the printer via the IP address
- Browser shows "Cannot reach this page" or "Connection timeout"
Warning: This is the most common issue users encounter. Your computer and printer must be on the same subnet to communicate!
Explanation:
When your printer connects to your WiFi network, it receives an IP address from your router (e.g., 192.168.1.105). For your computer to access the printer, both devices must be on the same subnet.
An IP address consists of four numbers separated by dots. For devices to communicate on the same network:
- The first three numbers MUST be identical
- Only the last number can be different
Examples of CORRECT subnet matching:
✅ Printer IP: 192.168.1.105
✅ Computer IP: 192.168.1.50
Result: ✅ Can communicate (first three numbers match: 192.168.1)
✅ Printer IP: 192.168.0.200
✅ Computer IP: 192.168.0.15
Result: ✅ Can communicate (first three numbers match: 192.168.0)
✅ Printer IP: 10.0.0.75
✅ Computer IP: 10.0.0.120
Result: ✅ Can communicate (first three numbers match: 10.0.0)
Examples of INCORRECT subnet matching:
❌ Printer IP: 192.168.1.105
❌ Computer IP: 192.168.0.50
Result: ❌ Cannot communicate (third number different: 1 vs 0)
❌ Printer IP: 192.168.2.105
❌ Computer IP: 192.168.1.105
Result: ❌ Cannot communicate (third number different: 2 vs 1)
❌ Printer IP: 10.0.0.75
❌ Computer IP: 192.168.1.75
Result: ❌ Cannot communicate (first three numbers completely different)
Solutions:
-
Check Your Computer's IP Address:
- Windows: Open Command Prompt and type
ipconfig. Look for "IPv4 Address" under your WiFi adapter. - Mac: Go to System Preferences > Network > WiFi > Advanced > TCP/IP. Look for "IPv4 Address".
- Linux: Open Terminal and type
ifconfigorip addr. Look for your wireless interface IP.
- Windows: Open Command Prompt and type
-
Compare the IP Addresses:
- Write down your computer's IP address (e.g.,
192.168.1.50) - Write down your printer's IP address (e.g.,
192.168.1.105) - Check if the first three numbers match
- Write down your computer's IP address (e.g.,
-
If Subnets Don't Match:
- Option A - Reconnect to Correct Network: Your computer may be connected to a different WiFi network or a guest network. Ensure you're connected to the same WiFi network you configured the printer to use.
- Option B - Reconfigure Printer: If your computer is on the correct network but subnets still don't match, your network may have multiple subnets. Use the printer's Access Point mode to reconnect to your WiFi network and verify the correct network is selected.
- Option C - Connect via AP Mode: Connect your computer to the printer's
22 IDEXAccess Point network (192.168.0.1) to access it directly and reconfigure.
-
Check for Guest Network Isolation:
- Some routers have "guest networks" that isolate devices from each other
- If your printer is on the main network but your computer is on a guest network (or vice versa), they cannot communicate
- Connect both devices to the same main WiFi network
Note: If you're using a mesh WiFi system or multiple access points, ensure both devices are connecting through the same router subnet. Some mesh systems create different subnets for different nodes.
¶ Issue: Connection Test Fails Repeatedly
Symptoms:
- Red LEDs appear after testing
- Printer automatically reverts to previous mode
- Connection test consistently fails
What happened:
- The printer detected the connection test failed
- Red LEDs triggered automatic revert to previous working mode
- You can retry after correcting the issue
Solutions:
- Verify 2.4 GHz Network: Ensure your router broadcasts a 2.4 GHz network. The V4 WiFi module does not support 5 GHz.
- Check your router settings or documentation
- If your router uses a single SSID for both 2.4 GHz and 5 GHz, try creating a separate 2.4 GHz network
- Check SSID and Password: Both are case-sensitive. Double-check for typos, extra spaces, or incorrect capitalization.
- Signal Strength: Move the printer closer to your WiFi router to ensure adequate signal strength.
- Router Settings: Ensure your router is not blocking new devices (MAC address filtering disabled, DHCP enabled).
- Restart Router: Power cycle your WiFi router and try connecting again.
¶ Issue: Green LEDs Stay On After Restart
Symptoms:
- Connection test was successful (green LEDs)
- You chose "Cancel" in the dialog
- After restart, printer reverted to previous mode
- Configuration was not saved
What happened:
- You successfully tested the WiFi connection (green LEDs appeared)
- You clicked "Cancel" instead of "Save Mode"
- The WiFi credentials are saved, but the mode is not set to activate automatically
- After restart, printer uses previous network mode
Solutions:
Option 1: Run "Connect to new WiFi network" Macro Again
- Access the printer via its current mode (likely Access Point or Ethernet)
- Navigate to Macros > System > Settings > Network
- Click "Connect to new WiFi network"
- Enter the same WiFi credentials
- This time, click "Save Mode" when the success dialog appears
Option 2: Use "Enable WiFi - Client Mode" Macro
- Access the printer via its current mode
- Navigate to Macros > System > Settings > Network
- Click "Enable WiFi - Client Mode"
- The printer will use the previously saved WiFi credentials
- Choose "Change & Reconnect Now" or "Change after restart"
- The WiFi Client mode will be saved to
networkmode.g
Important: Always click "Save Mode" after verifying the connection works. If you click "Cancel", the printer will revert to previous mode after restart.
¶ Issue: Cannot Access Printer After Successful Connection
Symptoms:
- Connection test shows success (green LEDs)
- IP address is displayed
- Cannot access printer via IP address or
22idex.local
Important: Before trying other solutions, check if you're on the same subnet as the printer. This is the most common cause. See the "Cannot Access Printer - Wrong Subnet" section above for detailed explanation and examples.
Solutions:
- Verify Same Subnet ⚠️ MOST IMPORTANT: Check that your computer and printer have matching first three numbers in their IP addresses (see detailed subnet section above).
- Verify Same Network: Ensure your computer/device is connected to the same WiFi network as the printer (not a guest network).
- Check IP Address: Confirm you are using the correct IP address shown in the success message.
- Try Hostname: If the IP address doesn't work, try
http://22idex.localin your browser. - Firewall/Antivirus: Temporarily disable firewall or antivirus software that may be blocking the connection.
- Check DHCP Lease: Access your router's admin panel and check the DHCP client list to verify the printer's IP address.
¶ Issue: Printer Shows Yellow LEDs for Extended Period
Symptoms:
- Yellow LEDs remain on for more than 1 minute
- No connection result dialog appears
Solutions:
- Wait Longer: The connection test can take up to 30 seconds. Be patient.
- Try
22idex.local: Open a browser and navigate tohttp://22idex.localwhile the printer is testing. It may have connected but not yet displayed the result. - Check Router: Ensure your router is powered on and functioning properly.
- Restart Printer: Power cycle the printer to restart the network self-test.
¶ Issue: 22idex.local Does Not Work
Symptoms:
- IP address works, but
http://22idex.localdoes not load
Solutions:
- mDNS Not Supported: Your network may not support mDNS (Bonjour/Zeroconf). This is common on some routers or corporate networks.
- Use IP Address Instead: Bookmark the printer's IP address for easier access.
- Install Bonjour: On Windows, install Apple's Bonjour service (included with iTunes) to enable
.localhostname resolution.
¶ Issue: Connection Drops Frequently
Symptoms:
- Printer connects successfully but disconnects after some time
- Intermittent access to web interface
Solutions:
- WiFi Signal Strength: Move the printer closer to the router or use a WiFi range extender.
- Router Congestion: Reduce the number of devices on your 2.4 GHz network or switch to a less congested WiFi channel.
- DHCP Reservation: In your router settings, assign a static DHCP reservation to the printer's MAC address to prevent IP address changes.
- Router Firmware: Update your router's firmware to the latest version.
¶ Resetting Network Settings
If you need to completely reset all network configurations and start fresh:
- Connect to the printer (via AP mode or current network).
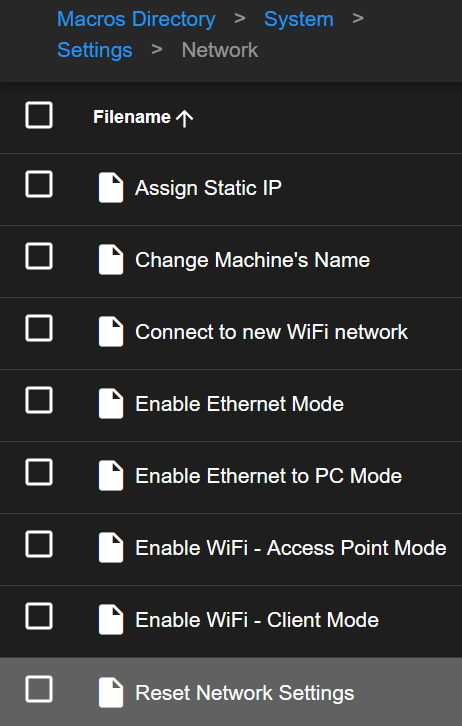
- Navigate to Macros > System > Settings > Network.
- Click Reset Network Settings.
- Confirm the operation by selecting "Yes, Erase".
- The printer will:
- Clear all saved WiFi credentials
- Revert to default Access Point mode
- Broadcast
22 IDEXnetwork (password:1234567890)
- Reconnect to
22 IDEXand access viahttp://192.168.0.1.
Warning: Resetting network settings will erase all saved WiFi networks. You will need to reconnect to your WiFi network using the "Connect to new WiFi network" macro.
¶ Conclusion
You have successfully learned how to connect your 22 IDEX V4 printer to your WiFi network. By default, the printer operates in Access Point Mode, allowing direct connection for initial setup. By following the steps in this guide, you can switch to WiFi Client Mode, enabling network-wide access through your router.
What You Can Now Do:
- Access the web interface from any device on your WiFi network
- Upload print files remotely without needing to connect directly to the printer
- Monitor print progress from anywhere in your home or office
- Adjust printer settings without physical access to the machine
Next Steps:
- Explore the web interface to familiarize yourself with printer controls
- Upload your first G-code file and start printing
- Configure additional printer settings such as filament profiles and temperature presets
If you encounter any issues not covered in this troubleshooting section or need further assistance, please don't hesitate to reach out to our support team.