¶ Part Placement Guide for Printing Modes
¶ Brief Overview
Correctly positioning your models on the build plate within your slicer software is a fundamental step for successful 3D printing on the Vision Miner 22IDEX. The optimal placement and setup vary significantly depending on whether you are using a standard printing mode (with a single extruder or both for dual-material/color prints) or engaging in specialized IDEX operations like Mirror or Duplicate Mode. This guide outlines these critical placement strategies and operational considerations.
¶ Tools & Materials
- Slicing software (e.g., PrusaSlicer) configured for the Vision Miner 22IDEX.
- Raft Material: Filament for printing rafts, especially when using Mirror or Duplicate modes where rafts are mandatory.
¶ Safety & Pre-checks
- Slicer Configuration: Ensure your slicing software has the correct build plate dimensions and origin settings for the Vision Miner 22IDEX.
- Mode Selection: Always verify that the intended printing mode (Standard Single T0, Standard Single T1, Standard Dual Extruder, Mirror, Duplicate) is correctly selected in your slicer before part placement and G-code generation.
- Raft Acknowledgment: Be aware that Mirror and Duplicate modes require the use of a raft. For Duplicate Mode, a raft of at least 3 layers is specified.
- Height Map in Duplicate Mode: Understand that automatic bed leveling compensation (height map) is disabled in Duplicate Mode. This makes first layer adhesion and manual bed leveling even more critical.
Warning: Misplacing parts in your slicer or failing to adhere to mode-specific requirements (like raft usage or understanding disabled features) can lead to the printer attempting to print outside reachable areas, collisions, failed prints, or unnecessary mechanical strain.
¶ Step-by-Step Instructions
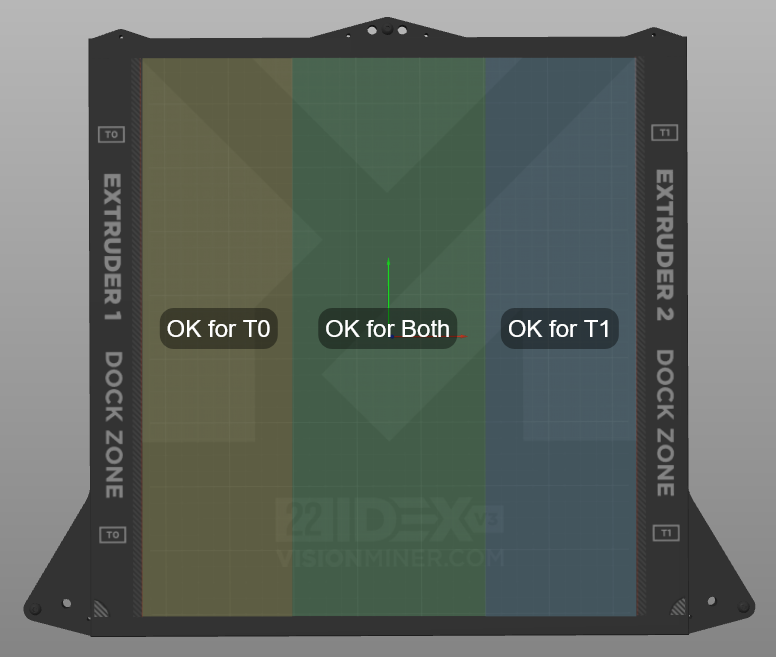
¶ Understanding Build Plate Zones for Standard Printing (Case 1)
In standard printing modes, the Vision Miner 22IDEX build plate can be understood as having three primary zones:
- T0-Exclusive Zone: The leftmost area reachable only by the T0 (left) extruder.
- T1-Exclusive Zone: The rightmost area reachable only by the T1 (right) extruder.
- Shared Central Zone: The middle area of the build plate reachable by both T0 and T1.
¶ 1. Standard Printing with a Single Extruder
¶ Using T0 (Left Extruder) Only
- In your slicer software, select T0 as the active extruder.
- Position your model(s) within the T0-Exclusive Zone (left side) and/or the Shared Central Zone.
- Avoid placing parts in the T1-Exclusive Zone (far right) or the T1 dock zone.
¶ Using T1 (Right Extruder) Only
- In your slicer software, select T1 as the active extruder.
- Position your model(s) within the T1-Exclusive Zone (right side) and/or the Shared Central Zone.
- Avoid placing parts in the T0-Exclusive Zone (far left) or the T0 dock zone.
¶ 2. Standard Printing with Both Extruders (e.g., Dual Color/Material)
When using both extruders for a single print (like two-color or soluble support):
- Parts are typically designed to utilize the Shared Central Zone where both extruders can operate.
- Extruder Reach Limitations:
- It's permissible for a feature printed by T0 (left extruder) to extend from the Shared Central Zone into the T0-Exclusive Zone.
- Similarly, a feature printed by T1 (right extruder) can extend from the Shared Central Zone into the T1-Exclusive Zone.
- However, T1 (right extruder) cannot enter the T0-Exclusive Zone (far left), and T0 (left extruder) cannot enter the T1-Exclusive Zone (far right). Ensure your model geometry and slicer setup respect these boundaries to prevent print failure or collisions.
¶ Specialized IDEX Modes: Mirror and Duplicate Printing
Mirror and Duplicate modes offer powerful ways to increase throughput but have strict setup and placement requirements, distinct from standard printing.
Important: For both Mirror and Duplicate modes, using a Raft is MANDATORY to ensure print success.
¶ 3. Mirror Mode Printing
In Mirror Mode, the printer creates a symmetrical reflection of your part.
- Part Placement:
- Position your original part in the slicer as close as possible to the absolute center of the entire build plate. The printer will mirror this part across the Y-axis centerline.
- Part Orientation:
- Orient your part so its longest dimension runs along the Y-axis (depth) of the build plate.
- Aim to minimize the part's dimension along the X-axis (width).
- (Example: For a long, thin rectangle, place it vertically along the Y-axis, not horizontally along the X-axis.)

- Raft: Use of a raft is mandatory.
- For more detailed settings, refer to the Printing in Mirror and Duplicate Modes guide.
¶ 4. Duplicate Mode Printing
In Duplicate Mode, the printer creates two identical copies of your part.
- Part Placement:
- Conceptually divide the build plate in half (left and right sections).
- Place your original part in the center of its respective half (e.g., center of the left half for T0 to print, and T1 will duplicate in the center of the right half).
- Part Orientation:
- Similar to Mirror Mode, orient your part so its longest dimension runs along the Y-axis (depth).
- Minimize the part's dimension along the X-axis (width).

- Critical Operational Notes:
- Height Map Disabled: Automatic bed leveling compensation (Height Map) is NOT active in Duplicate Mode.
- Print Small Parts: Due to the disabled height map, it is strongly recommended to print relatively small parts in this mode to minimize the impact of any minor bed unevenness.
- Mandatory Raft (Minimum 3 Layers): Using a raft is MANDATORY. The raft should have a minimum of 3 layers to provide a stable and level foundation.
- For more detailed settings, refer to the Printing in Mirror and Duplicate Modes guide.
Tip: Always use your slicer's "Preview" function after placing and configuring your parts. This allows you to visually inspect the generated toolpaths and confirm that they are within the expected boundaries for the selected mode and extruder(s) before sending the file to the printer.
¶ Troubleshooting & FAQs
-
Q: My printer starts printing in mid-air or off the side of the bed. What went wrong?
A: This usually indicates that the part was misplaced in the slicer relative to the selected extruder or printing mode, or the wrong printing mode was selected. It could also be due to incorrect printer dimensions or origin offsets configured in your slicer profile. Double-check your part placement and slicer settings. -
Q: Can the T0 (left) extruder print on the far right side of the bed in standard single extruder mode?
A: While the T0 (left) extruder might be able to physically reach some areas beyond the shared central zone towards the right, it is generally not recommended for printing in the T1-Exclusive Zone. Printing far outside its primary operational zone (the T0-Exclusive Zone and the Shared Central Zone) can lead to diminished print quality due to factors like increased mechanical stress or suboptimal extruder kinematics. For best results, keep T0 prints within its designated left and central areas. -
Q: The slicer preview looks correct, but the print still starts in an unexpected location.
A: Verify that you have loaded the correct G-code file onto the printer for the intended mode. If the issue persists, check the printer's homing sequence and ensure its home offsets are correctly calibrated in the firmware. Ensure no global G-code offsets are active in your slicer that might shift the origin. -
Q: What are the "DOCK ZONE" areas marked on the bed?
A: These areas are typically where an inactive extruder is "parked" or "docked" to keep it out of the way of the active extruder. Avoid placing parts directly in the dock zone of an extruder that will be inactive during the print. -
Q: Why is a raft mandatory for Mirror and Duplicate modes?
A: Rafts provide a consistent and reliable first layer, crucial for these modes. In Duplicate Mode, specifically, the automatic bed leveling (height map) is disabled, making the raft essential for leveling the print's foundation. For Mirror mode, it ensures both mirrored parts start on an ideal surface, minimizing discrepancies. -
Q: What happens if I don't use a raft in Duplicate Mode, or use fewer than 3 layers?
A: There is a very high risk of first-layer adhesion failure, warping, or inconsistent extrusion across the parts. Since the height map is disabled, the raft (with sufficient layers) is critical for creating a level printing surface. Failure to use an adequate raft will likely lead to failed prints.
¶ Conclusion & Additional Resources
Strategic part placement and adherence to mode-specific requirements are critical for successful and efficient printing on your Vision Miner 22IDEX. By understanding the operational zones and specialized setups for modes like Mirror and Duplicate, you can optimize print quality and throughput.
For more detailed information on specific IDEX modes, please refer to:
If you encounter persistent issues with part placement or print positioning: