Fallback BOSSA Update
Recover an unresponsive mainboard with BOSSA: erase the old firmware with a jumper, flash the Duet 3 firmware over USB-C, and confirm the STATUS LED blinks.
This guide covers manual firmware recovery for the Vision Miner 22 IDEX using Bossa software. The mainboard and flashing procedure are identical for V3 and V4 - only the firmware files differ. Use this procedure if the printer is unresponsive after a firmware update, shows no indicator lights, the red STATUS LED on the mainboard is lit solid instead of blinking, the touchscreen is stuck at "Connecting", or the support team has instructed you to reflash the mainboard firmware.
Before you begin - safety and risk
Read the Safety - Before You Begin article to understand the hazards involved in working on the Vision Miner 22IDEX V4 - including electrical, thermal, mechanical, and chemical risks. All procedures in this wiki are provided as recommendations only. By choosing to follow any procedure, you do so at your own risk.
Unplug, wait, and discharge static
Turn off the printer, unplug mains, and wait at least 60 seconds before touching the mainboard. Use an anti-static wrist strap or touch grounded metal before handling boards.
Tools and Materials
- USB-C cable (the one included with the printer works - it carries data)
- Computer (Windows strongly recommended - see the Mac note below)
- Needle-nose pliers (for jumper handling)
1. Download Firmware and Software
Board firmware only - restores basic mainboard operation
The firmware files listed below are board-level firmware only. These files restore basic operation of the mainboard so it can boot and communicate. If the printer does not function normally after BOSSA recovery, contact support team for further assistance.
Bossa software:
- Download and install Bossa from the official Duet3D repository:
Use a Windows computer
Use only the Duet3D build of Bossa linked above. In practice the Mac version often fails to install, especially on Apple Silicon (ARM) Macs, so plan to do this procedure on a Windows computer.
Board firmware:
- Download both board firmware files - one for the mainboard and one for the expansion board:
- Duet3Firmware_MB6HC.bin - mainboard firmware
- Duet3Firmware_EXP3HC.bin - expansion board firmware
2. Power Down the Printer
- Turn off the printer and unplug the power cord. No power should reach the machine during the entire procedure.
3. Erase the Mainboard Firmware
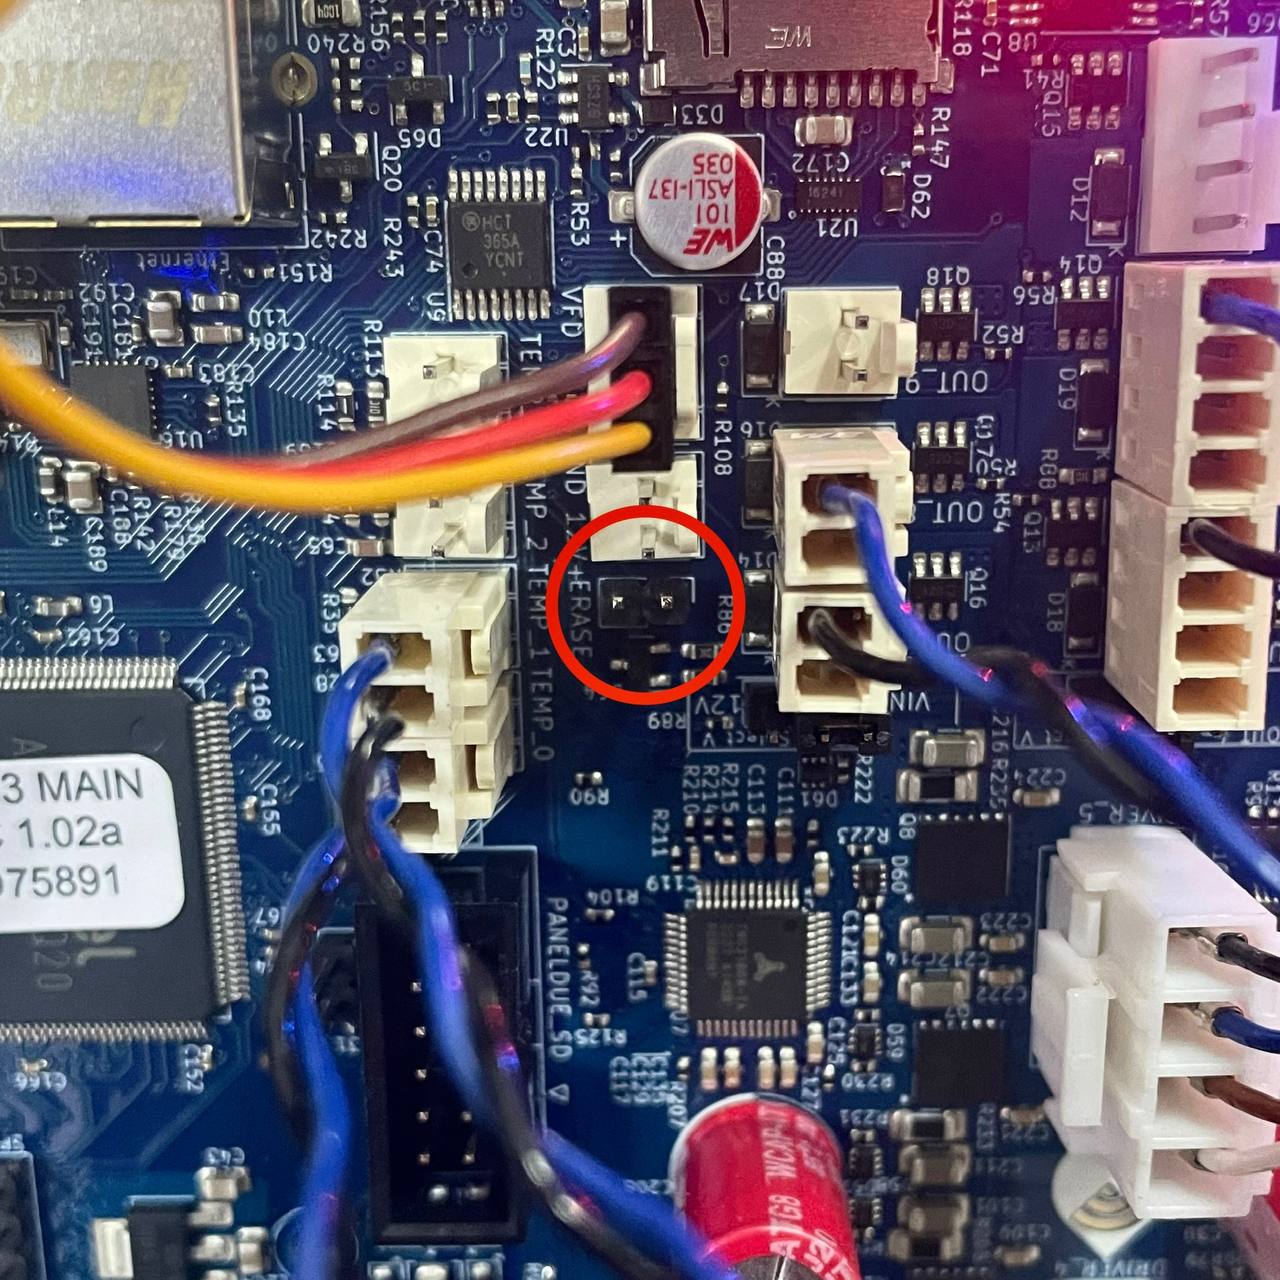
- Place a jumper cap on the erase pins to short them. This wipes the current firmware from the board.
No spare jumper? Borrow one temporarily
If you don't have a spare jumper cap, you can temporarily borrow one of the jumpers visible on the board in the photo above. These jumpers are not active during the firmware flashing procedure. Use needle-nose pliers to carefully remove one and place it on the erase pins. After the erase is complete, return the jumper to its original position.
Make sure the machine is completely powered off and unplugged whenever you handle jumpers with metal tools - a slip with the pliers on a powered board can short-circuit it. Note or photograph which jumper you borrowed and exactly where it sat: these jumpers control the fans, and a jumper returned to the wrong pins will leave fans not working.
- Press the Reset button on the mainboard.
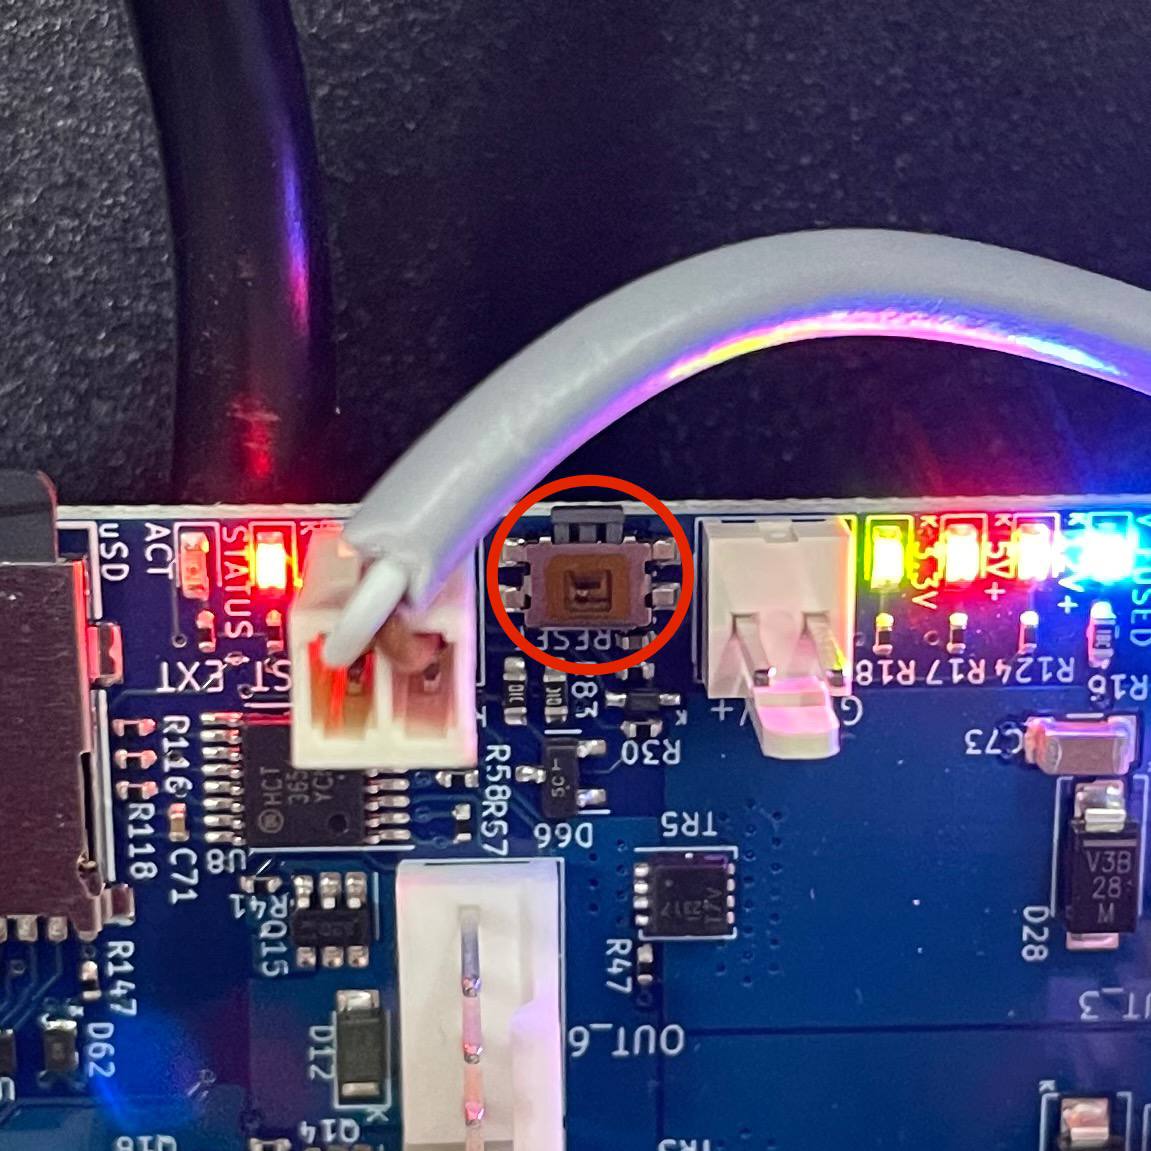
- Remove the erase jumper. If you borrowed a jumper from the board, return it exactly to the position it came from using needle-nose pliers - a jumper on the wrong pins will leave fans not working.
4. Connect and Verify
- Connect the printer to your computer using the USB-C cable. Make sure the Emergency Stop button is not pressed - with the button pressed, the board gets no 5V and the computer will not recognize it.
- Verify that the 5V (Red) and 3.3V (Green) LEDs on the mainboard are lit.
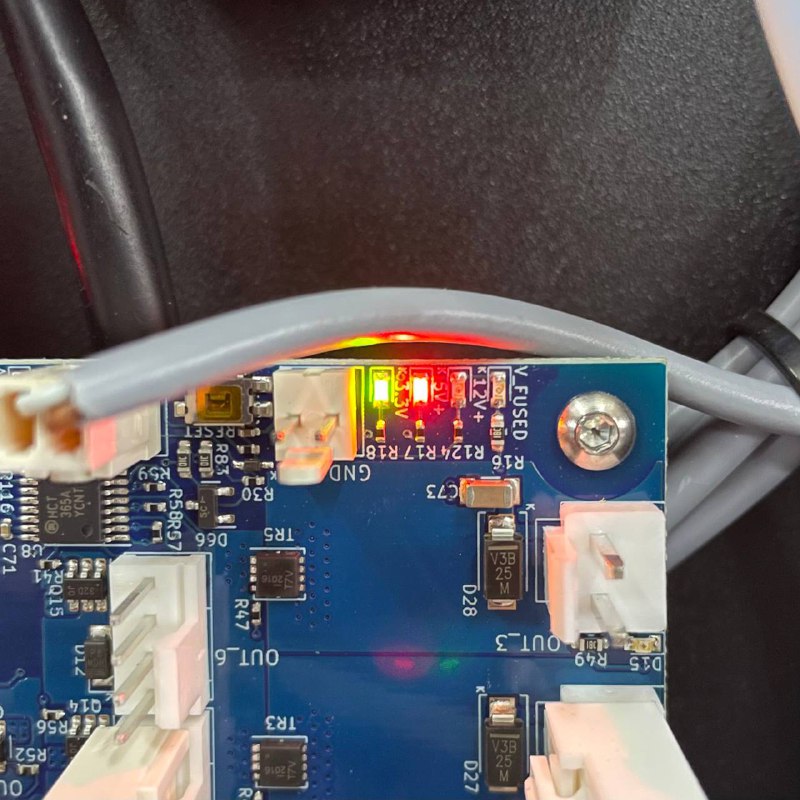
- Verify the erase worked. With USB connected, only the power LEDs should remain lit: 5V, 3.3V, and the LED near the USB connector. The red STATUS LED, which blinks once per second whenever firmware is present on the board, must not be blinking. If it still blinks, the firmware was not erased - repeat the erase procedure from step 4.
5. Flash the Firmware
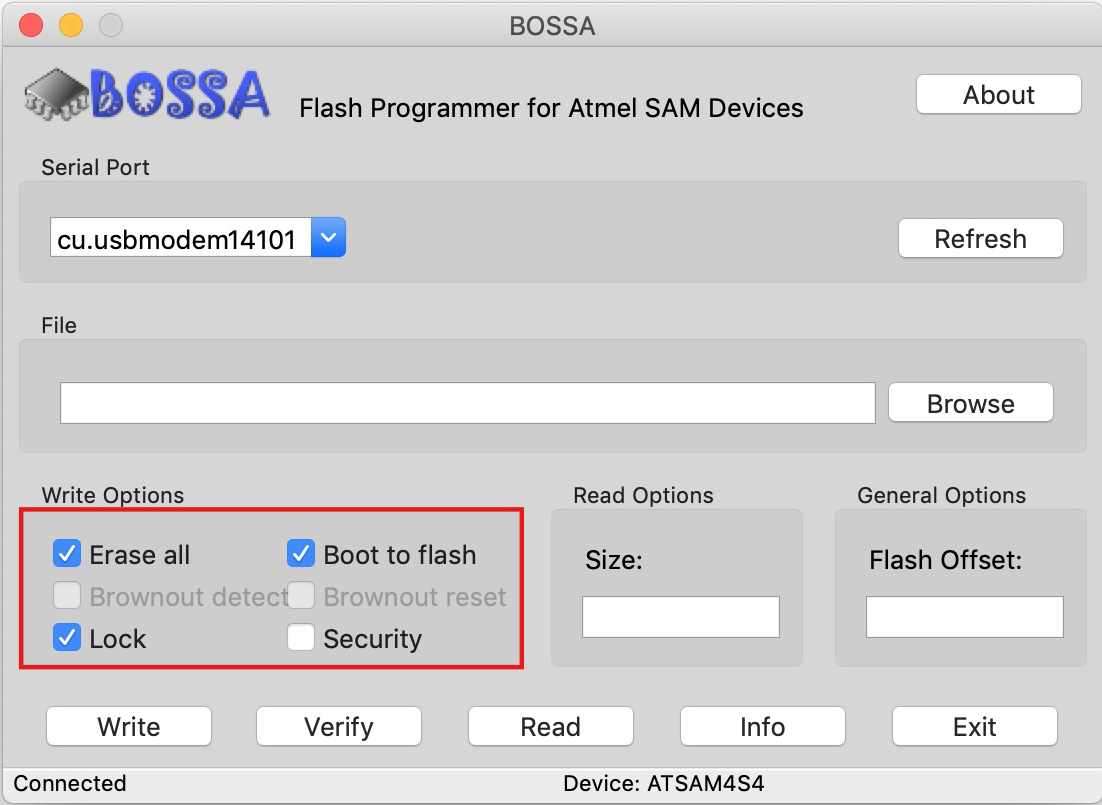
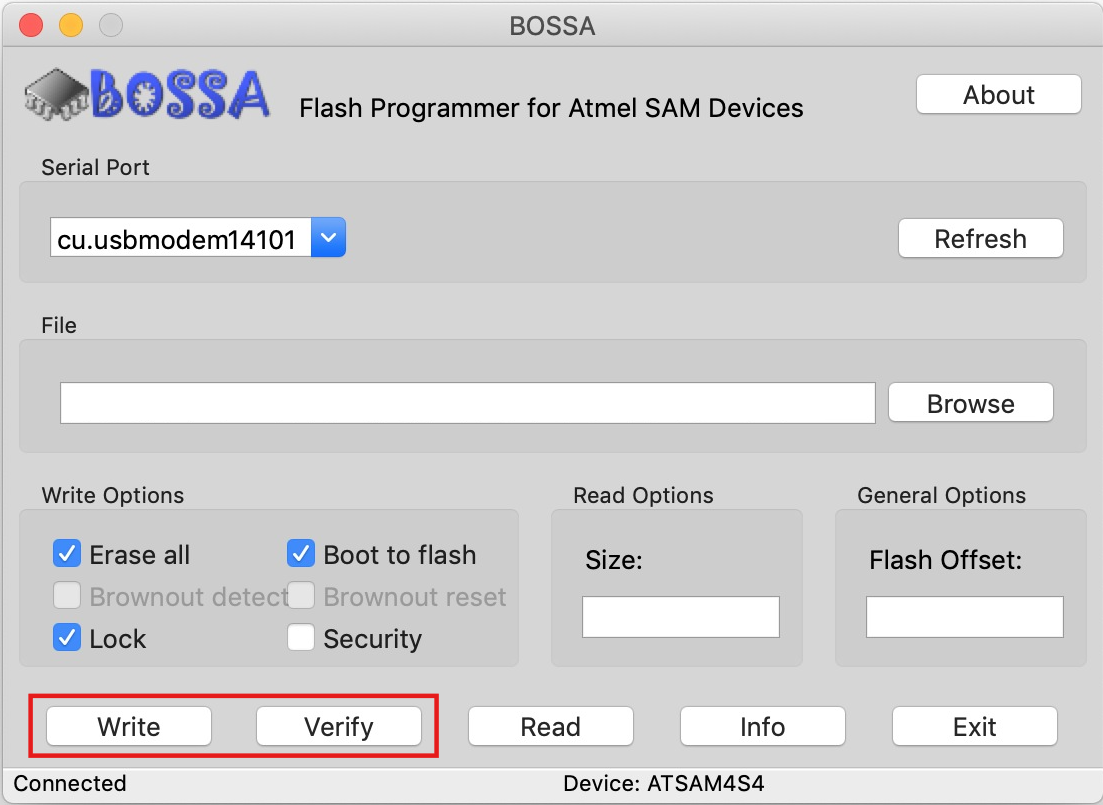
- Launch Bossa as administrator - this avoids permission issues. Click the refresh icon next to Serial Port. You may see several COM ports: try them one by one. On the right port, Bossa shows the connected device as ATSAME70x20 (the numbers may vary). If no port connects, close and reopen Bossa with the cable still connected, and make sure the Emergency Stop button is not pressed. If the board still does not connect, see Troubleshooting.
- Check the following boxes: Erase all, Lock, and Boot to flash.
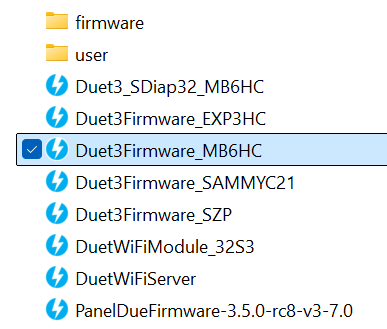
- Click Browse and navigate to the firmware binary:
22IDEX Firmware>firmware>Duet3Firmware_MB6HC.bin.
- Click Write to upload the firmware to the mainboard.
- Once the write completes, click Verify to confirm the firmware was written correctly.
6. Reconnect and Power On
- Disconnect the USB-C cable from the mainboard.
- Reconnect the power cord and turn on the printer. When the firmware is running normally, the red STATUS LED to the right of the SD card blinks steadily - one second on, one second off.
- Verify that the printer boots normally and the Web Interface is accessible.
A fan running at full blast is normal at this stage
If the blower fan or the HEPA fan spins at full speed after power-on, it means the expansion board has no firmware yet. This is expected and goes away once the expansion board is flashed through the Web Interface.
- No recalibration is needed if your user folder is intact - the calibration files are stored there. Finish by running the firmware update macro so the system files match the restored firmware; see the Firmware Update guide. The expansion board, if it also needs firmware, is flashed through the Web Interface afterwards (see the FAQ below).
FAQ
Troubleshooting
Support
If you could not find an answer here, reach out to our support team.