Firmware Update
Update 22 IDEX V2 firmware: identify your mainboard and endstop count, copy the OTA files to the SD card keeping the user folder, then run M997 S0:1.
This guide provides step-by-step instructions for manually updating the firmware on your Vision Miner 22IDEX V2 printer. Keeping your firmware current is crucial for accessing the latest features, performance enhancements, and stability improvements.
We are committed to the continuous improvement of our machines, integrating the latest features to enhance accuracy, speed, and ease of use. Regularly updating your firmware ensures your 22IDEX V2 operates at its full potential, producing strong, reliable parts with maximum efficiency.
This manual procedure requires downloading the correct firmware version, transferring the files to the printer's SD card, and running a command to flash the new firmware onto the mainboard.
Before you begin - safety and risk
Read the Safety - Before You Begin article to understand the hazards involved in working on the Vision Miner 22IDEX V2 – including electrical, thermal, mechanical, and chemical risks. All procedures in this wiki are provided as recommendations only. By choosing to follow any procedure, you do so at your own risk.
Create a backup before proceeding
Before proceeding, power off your machine, carefully eject the SD card from the mainboard, and create a complete backup of its contents on your computer. This ensures you can restore your configuration if an error occurs.
Defining Your Machine Version:
Before downloading, you must identify your specific hardware configuration to select the correct firmware package.
- Mainboard Version: Open the left-back door of the printer and visually inspect the mainboard.
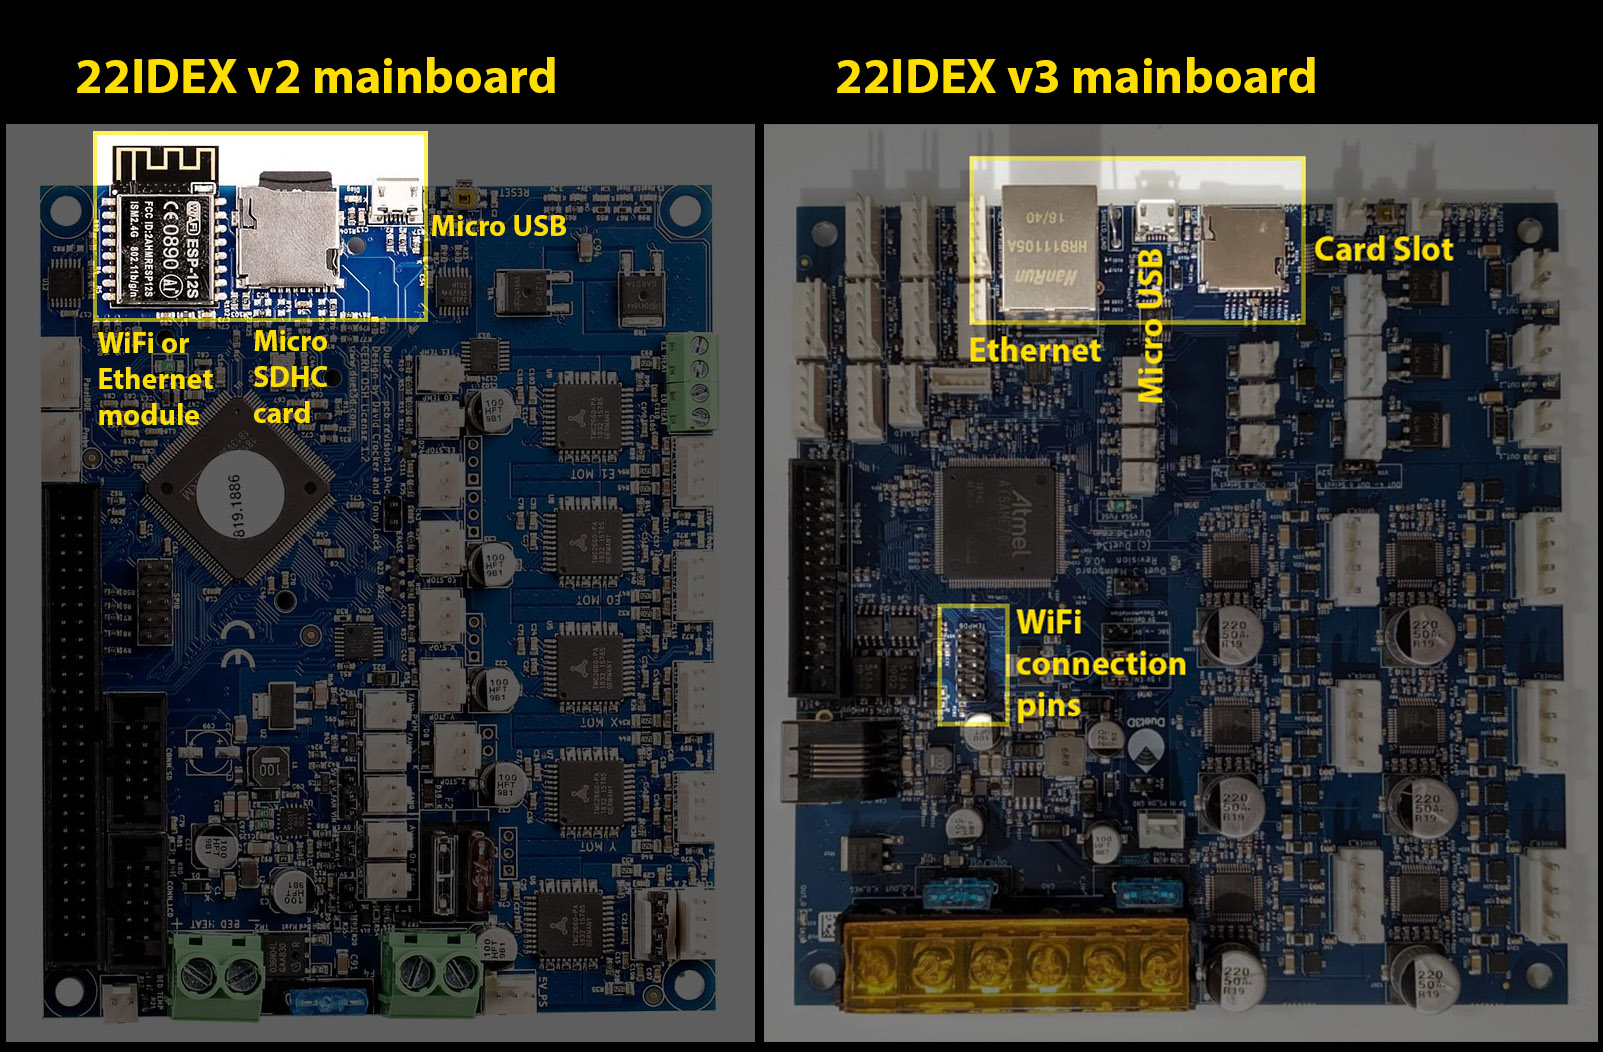
- Number of Endstops: Open the machine's top cover and look at the left rear corner of the rail system. A machine with four endstops will have an additional endstop visible in this corner.
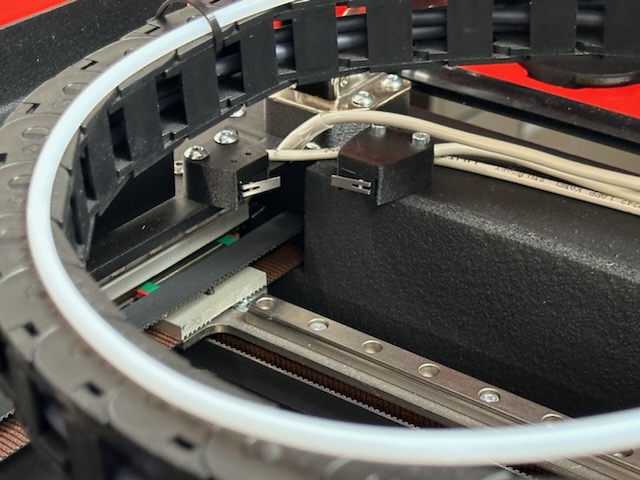
Tools and Materials
- Computer (with an SD card reader)
- SD Card (from the 22IDEX V2 mainboard)
1. Download and Prepare Firmware
- Download the correct firmware package for your machine configuration:
| Configuration | Firmware Package | Download Link |
|---|---|---|
| Standard V2 (2 Endstops) | V2_OTA.zip | Download V2 Firmware |
| V2 with 4 Endstops | V2_Y_OTA.zip | Download V2_Y Firmware |
- Unzip the downloaded file to a known location on your computer.
2. Update Files on SD Card
- Insert the printer's SD card into your computer.
- Open the SD card directory. Delete all folders EXCEPT for the
userfolder.
Do not delete the user folder
The user folder contains your specific machine settings, macros, and calibration data. Do not delete or overwrite this folder.
-
Open the unzipped firmware folder you downloaded in the previous step.
-
Copy all folders from the firmware folder and paste them onto the root of the SD card. When prompted, choose to replace any existing files or folders.
-
After the transfer is complete, your SD card should contain the following folders:
gcodes macros user filaments sys firmware www -
Safely eject the SD card from your computer.
3. Flash Firmware
- Ensure the printer is powered off.
- Insert the updated SD card back into the mainboard slot.
- Power on your machine.
- Connect to the printer's Web Interface from your computer.
- Navigate to the Console page.
- In the command input box, type the following command exactly as shown and press Enter or click Send:
M997 S0:1- The printer will begin the firmware update process for both the mainboard (
S0) and the Wi-Fi module (S1). The connection will be lost during this process. - Wait a few minutes, then reconnect to your machine through the Web Interface. The update is now complete.
Replacing the SD Card
SD cards wear out with use. On a worn or slow card, writing cannot keep up with the network transfer, so uploads of large G-code files fail or the Web Interface loses connection to the printer partway through the upload. A badly worn card can even switch to read-only mode. Replacing the card with a new one solves the problem.
- Get a new microSD card from a reputable brand: 8-32 GB, Class 10 or faster.
- Power off the printer and eject the old card from the mainboard.
- Insert the old card into your computer and create a complete backup of its contents - you will need the
userfolder. - Format the new card as FAT32.
- Download the firmware package for your machine configuration (see the table in 1. Download and Prepare Firmware), unzip it, and copy all its folders to the root of the new card.
- Copy the
userfolder from your backup to the root of the new card.
- Insert the new card into the mainboard, power the printer on, and connect to the Web Interface. All your machine settings are preserved - they live in the
userfolder you copied.
Troubleshooting
Support
If you could not find an answer here, reach out to our support team.