¶ Brief Overview
This guide explains the working principles of the 22IDEX Z-Probe system and provides comprehensive troubleshooting steps for common issues. Learn how to interpret LED indicators, web interface values, general symptoms, and specific error messages to diagnose and resolve problems related to probe detection, pickup, placement, and operation during homing or calibration.
¶ Introduction
The Z-Probe is a critical component for establishing accurate Z-height and performing bed compensation on the 22IDEX. It uses a magnetically attached mechanical switch with an opto-isolated detection circuit. Understanding how it works and how to troubleshoot potential problems is essential for reliable printing. This guide covers the probe's operating principles, monitoring methods (LEDs, Web Interface), and detailed solutions for common failure scenarios and specific error codes displayed by the printer.
¶ Tools & Materials
- 2 mm Hex Screwdriver (for checking magnet seating)
- Multimeter (optional, recommended for continuity checks)
- Flashlight (for visual inspection)
- Clean Cloth (for wiping magnets)
¶ Safety & Pre-checks
- Power Off: For any checks involving wiring, physical manipulation near electronics, or removing components (like the PEEK interface), power off the printer and unplug it first unless otherwise specified (e.g., checking LEDs or Web Interface requires power).
- Cool Down: Components like the hotend, nozzle, and bed can be very hot. Allow the printer to cool or use heat-resistant gloves when working near these areas.
- Clear Path: Ensure the probe's pickup and placement path near the dock is free from obstructions (e.g., stray filament, tools, debris).
Warning: Working on electrical components carries risks. If you are unsure about any step, contact Vision Miner support.
¶ 1. Z-Probe Working Principles
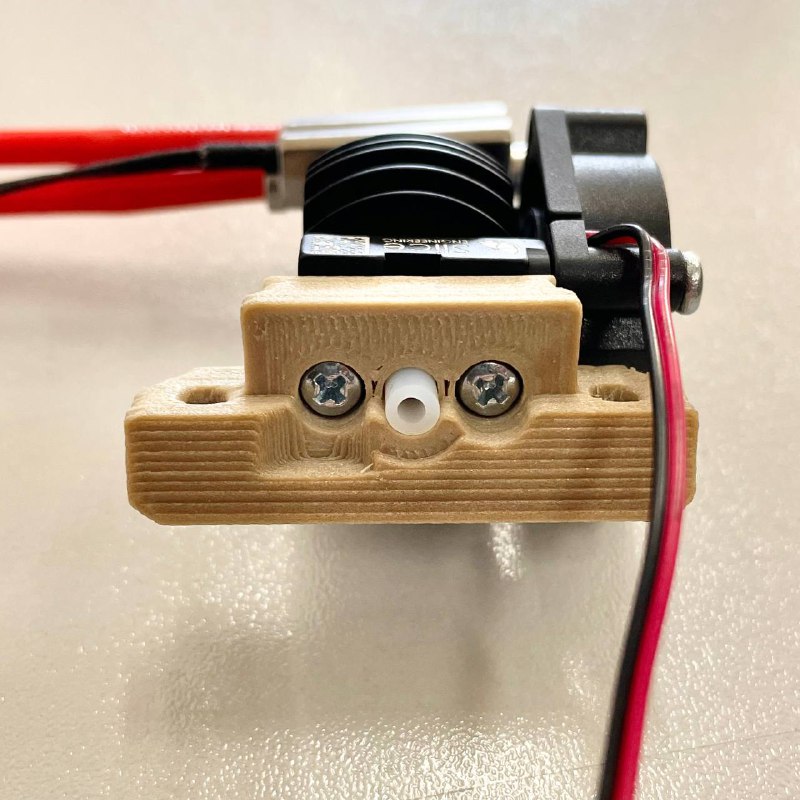
The Z-Probe system relies on two magnets located on the toolhead (T0) and an optocoupler PCB (printed circuit board) providing electrical isolation, typically located at the back of the machine.
- Current Flow Enabled: The optocoupler PCB enables ("allows") current flow between the toolhead magnets only when needed (e.g., during AutoCalibration or Z-homing). By default, the circuit is disabled for ESD protection.
- Normally Closed Switch: The Z-Probe itself contains a normally closed switch. When the probe is attached to the toolhead magnets and not triggered, current flows through it, completing the circuit.
- Trigger Detection: When the probe's plunger is pressed against a surface (triggered), the internal switch opens, breaking the current flow. The firmware detects this change to register the contact point.
¶ 2. LED Indicators (Optocoupler PCB)
A pair of LEDs on the small optocoupler PCB (usually at the back of the machine) provide real-time feedback:
-
Green LED (Circuit Enabled/Allowed)
- Illuminates only when the firmware activates the probe detection circuit (e.g., during homing/probing).
- Stays off at all other times.
-
Troubleshooting: If the Green LED is lit when the probe circuit should be disabled, this may indicate a short circuit to the printer’s frame or other wiring issues.
-
Blue LED (Probe Detected/Circuit Complete)
- Lights up when the Z-Probe is physically attached to the toolhead magnets and the internal switch is closed (not triggered).
- Turns off when the probe is triggered (plunger pressed, switch opens) OR if the probe is not attached.
- Its state should not affect the Green LED.
| Z-Probe Status | Green LED | Blue LED |
|---|---|---|
| Not Allowed, Not Picked | Off | Off |
| Allowed, Not Picked | On | Off |
| Allowed, Picked, Not Triggered | On | On |
| Allowed, Picked, Triggered | On | Off |
| Not Allowed, Picked, Not Triggered | Off | On |
| Not Allowed, Picked, Triggered | Off | Off |
Important: If the Blue or Green LEDs behave differently than described in the table, this typically points towards a wiring, grounding, or component issue. Note the LED states when contacting support.
¶ 3. Web Interface Monitoring
You can monitor the probe’s status value in the printer’s Web Interface (typically under the "Machine Status" or "General" section):
- Default / Detached / Triggered Value:
1000(Indicates an open circuit) - Attached & Not Triggered Value:
0(Indicates a closed circuit)
Note: The Web Interface may have a slight delay (up to a second) in reflecting status changes compared to the LEDs. The G-code macros use thresholds like
< 200or< 500to reliably detect the0state.
¶ 4. Symptom-Based & Error Code Troubleshooting
Use the LEDs, Web Interface values, observed printer behavior, and any specific error messages on screen to diagnose the issue.
¶ Scenario A: Probe Signal Always Detected (Short Circuit Symptoms)
Symptoms:
- The printer attempts Z-homing even if the probe is not physically picked up, acting as if it is attached.
- During Z-homing with the probe attached, the printer does not stop when the probe contacts the build plate and may crash the nozzle.
- The Blue LED might be stuck ON (even when the probe is detached or triggered), or the Green LED might be ON when it shouldn't be.
- The Web Interface value might be stuck at
0. - You may receive the error:
GND Wire is Shorted on T0
Probable Cause:
A short circuit (unintended electrical connection) is making the probe circuit read as "always closed," preventing the printer from detecting the triggered (open) state or the detached state.
¶ Troubleshooting Steps for Shorts Error: GND Wire is Shorted
-
Check Tool 0 Grounding Lug:
- Power off the printer.
- Carefully inspect the gold-colored grounding lug crimp attached to the Tool 0 (T0) hotend heater block.
- Crucially, ensure this lug and its wire are NOT touching the aluminum bracket holding the belts or any other metal component on the tool head. This is a common cause of the
GND Wire is Shorted on T0error.

- If contact is found, gently bend or reposition the wire/lug slightly to create clearance. Ensure the screw remains secure.
- Also check the grounding lug on Tool 1 (T1) if applicable, ensuring it only touches its own heater block.
-
Inspect All Z-Probe & Nearby Wires:
- Look for damaged insulation, pinched cables, or wear along the Z-probe wires from the toolhead magnets back towards the distribution block/PCB.
- Also inspect nearby wiring: Check fan wires, temperature sensor wires, and heater wires for damage. Frayed wires from these components could potentially short to the probe circuit.
-
Check Connections:
- Lightly tug each wire related to the Z-probe at the distribution block or PCB terminals to ensure they are secure.
- If using push-in terminals (like Wago blocks with orange tabs), gently press the tab, remove the wire, inspect the end for fraying/corrosion, and reinsert securely.
-
Check PEEK Interface Screws (Advanced):
- Power off and allow cooling.
- Carefully remove the PEEK interface (the part joining the extruder motor to the hotend assembly).
- Verify the screws securing the hotend within the PEEK part do not protrude and are slightly recessed from the surface that mounts against the extruder housing. Protruding screws could cause shorts.
- Hotend Remove Guide
- Repeat for both tool heads (T0 and T1).
If symptoms persist after these checks, contact support.
¶ Scenario B: Probe Signal Never Detected (Open Circuit Symptoms)
Symptoms:
- The printer attempts to pick up the probe, but the system does not recognize it ("see" it) once attached.
- The Blue LED remains OFF even when the probe is attached to the toolhead magnets (and the Green LED is ON during a probe attempt).
- The Web Interface value might be stuck at
1000. - You may receive errors like:
Probe is not connected(after a failed pickup attempt)Error: Probe not detected at start of placing(probe signal lost unexpectedly)
Probable Cause:
The probe circuit is open (broken connection / no continuity), preventing the "probe attached" signal from reaching the mainboard.
¶ Troubleshooting Steps for Open Circuits Error: Probe is not connected, Error: Probe not detected
-
Verify Probe Presence & Dock Alignment:
- Is the Z-Probe physically present in its docking station?
- Has the docking station become loose or shifted out of alignment?
- Is the pickup path clear of obstructions (filament strands, debris)?
-
Verify Electrical Connections:
- Power off the printer.
- Trace the Z-Probe wiring from the magnets on the toolhead dock back to the distribution block/PCB.
- Check connections as described in Scenario A (Step 3): ensure wires are secure in terminals, inspect ends if removed.
-
Inspect Wire Integrity:
- Check the wires right at the toolhead magnets for damage or strain. Ensure the cable is firmly attached.
- Carefully inspect the wiring harness running from the toolhead back to the electronics enclosure for pinches, abrasions, or sharp bends.
- Continuity Test (Requires Multimeter):
- Disconnect the probe wiring at a convenient point (e.g., distribution block).
- Set multimeter to continuity mode (beeps when probes touch).
- Test continuity along each individual wire path from the toolhead magnet end to the connector end. Each wire should show continuity (beep). If not, the wire is broken.
-
Test the Z-Probe Sensor Itself:
- Manually detach the probe. Gently press the plunger; you should hear and feel a crisp, audible click. If it feels mushy or silent, the internal switch may be faulty.
- Continuity Test (Requires Multimeter):
- Place multimeter probes on the two magnet contacts on the Z-Probe body.
- Not Triggered: Multimeter should show continuity (beep).
- Triggered (Plunger Pressed): Continuity should break (no beep).
- If the probe fails this test, it likely needs replacement.
-
Clean the Magnets:
- Wipe both the toolhead dock magnets and the magnets on the Z-Probe body with a clean, dry cloth. Remove any filament residue, oil, or debris that could interfere with the physical and electrical connection.
-
Check Magnet Seating:
- Using a 2 mm hex screwdriver, gently check the tightness of the screws securing the magnets:
- Two magnets on the Z-Probe body.
- Two magnets on the tool head docking station.
- Ensure they are properly seated and secure. Loose magnets can cause intermittent or failed connections.
- Using a 2 mm hex screwdriver, gently check the tightness of the screws securing the magnets:
If the probe is still not recognized after these steps, contact support.
¶ Scenario C: Probe Placement Fails
Symptoms:
- The printer attempts to place the probe back in its dock but fails.
- The probe might be knocked off the toolhead prematurely or fail to magnetically latch onto the dock.
- You may receive the error:
Error: Probe was not detected at the dock after placing(Note: Despite the wording, this often indicates a placement failure, not necessarily a detection issue at the dock itself.)
Probable Cause:
The physical alignment or movement parameters for placing the probe are incorrect, often due to a collision with the dock or surrounding area.
¶ Troubleshooting Steps for Placement Failures Error: Probe was not detected at dock
- Check for Obstructions: Visually inspect the probe dock area for any physical obstructions that might interfere with the placement movement.
- Verify Dock Stability: Ensure the probe dock itself is securely mounted and hasn't shifted.
- Adjust Placement Parameters: The positioning for pickup/placement likely needs adjustment. This usually involves fine-tuning software parameters:
- Refer to the specific manual section detailing Z-Probe calibration for instructions on how to adjust these values. See Z-Probe Calibration Guide
- Follow the procedures in that guide to carefully tune these parameters until placement is reliable.
¶ 5. Conclusion & Additional Resources
By systematically checking the Z-Probe's physical condition, wiring, connections, and alignment—guided by LED indicators, Web Interface values, and specific error messages—most issues can be resolved. Remember to approach troubleshooting logically, starting with the simplest checks (cleanliness, obstructions, loose connections) before moving to more involved steps like continuity testing or parameter adjustments.
If problems persist after following this guide:
- Note the specific symptoms (LED behavior, error messages, physical actions).
- Detail the troubleshooting steps you have already taken.
- Contact Vision Miner Support for further assistance.