Heater Faults
Heater fault diagnosis from the temperature graph - spikes to 2000 °C, drops to -273 °C, slow heat-up, PID oscillation - plus how to reset the fault.
Heater faults are protective mechanisms built into the printer's firmware to prevent damage or fire hazards. When the control system detects abnormal temperature behavior – such as a spike, drop, or slow heat-up – it triggers a fault and shuts off the heater.
This guide covers what causes heater faults, how temperature sensors work, common fault scenarios with their symptoms, and step-by-step troubleshooting to diagnose, fix, and prevent these issues.
Before you begin - safety and risk
Read the Safety - Before You Begin article to understand the hazards involved in working on the Vision Miner 22IDEX V4 – including electrical, thermal, mechanical, and chemical risks. All procedures in this wiki are provided as recommendations only. By choosing to follow any procedure, you do so at your own risk.
Tools and Materials
Before starting troubleshooting or maintenance, gather the following:
- Replacement temperature sensor – hotend, bed, chamber heater, or chamber air
- Thermal conductive paste (we recommend Boron Nitride Paste) – for thermal contact when installing a new sensor
- 2 mm Hex screwdriver (hex wrench) – for accessing panels or sensor mounts
- High-temp gloves – for handling hot components
How Temperature Sensors Work
-
Basic Principle – The temperature sensor changes its electrical resistance in response to temperature changes. The printer's firmware measures this resistance and converts it into a temperature reading in Celsius.
-
Firmware Monitoring – The control system continuously checks if temperature increase or decrease matches predicted values. If the system detects a sudden spike, drop, or slow rise during heat-up, it triggers a heater fault to protect the machine.
Heater fault right at print start?
If the fault appears at the very start of a print – during initial heat-up, before any layers are printed – see the dedicated Heater Fault at Print Start guide.
Common Heater Fault Scenarios
Below are the main scenarios that trigger heater faults, along with typical symptoms, possible causes, and recommended fixes.
1. Temperature Spikes Up
Symptom: The temperature graph shows abrupt upward spikes (potentially reading up to 2000°C).
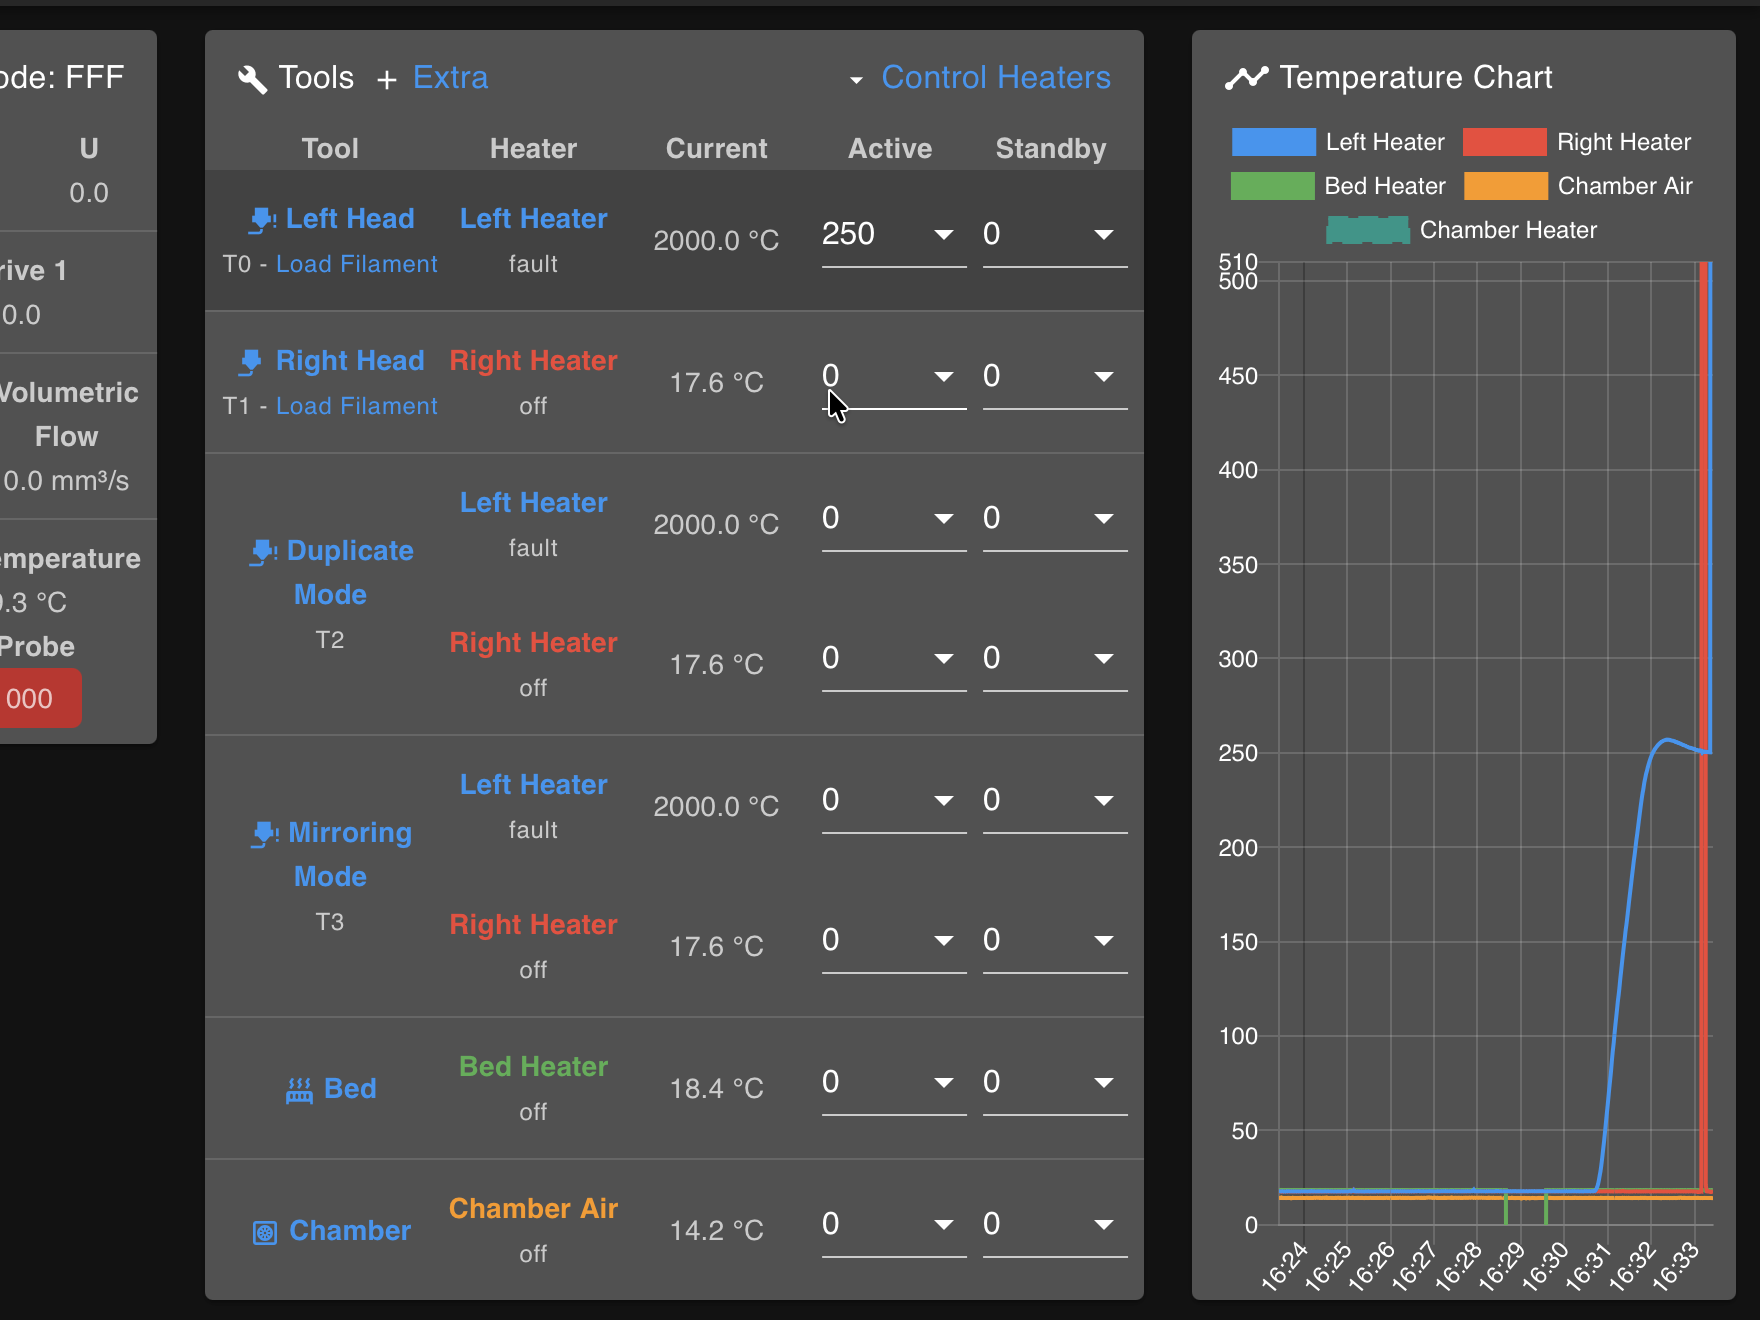
Possible Cause:
- Poor connectivity or loose/disconnected wire in the temperature sensor circuit
- Damaged or improperly seated wiring inside the distribution block
Power off before opening distribution block
Disconnect power before inspecting or reseating wires to avoid electrical shock.
Diagnostic Steps:
- Power off the printer.
- Check and reseat wiring connections in the distribution block:
- Press the orange tab to release the wire
- Inspect the wire ends and crimps for damage
- Reinsert securely
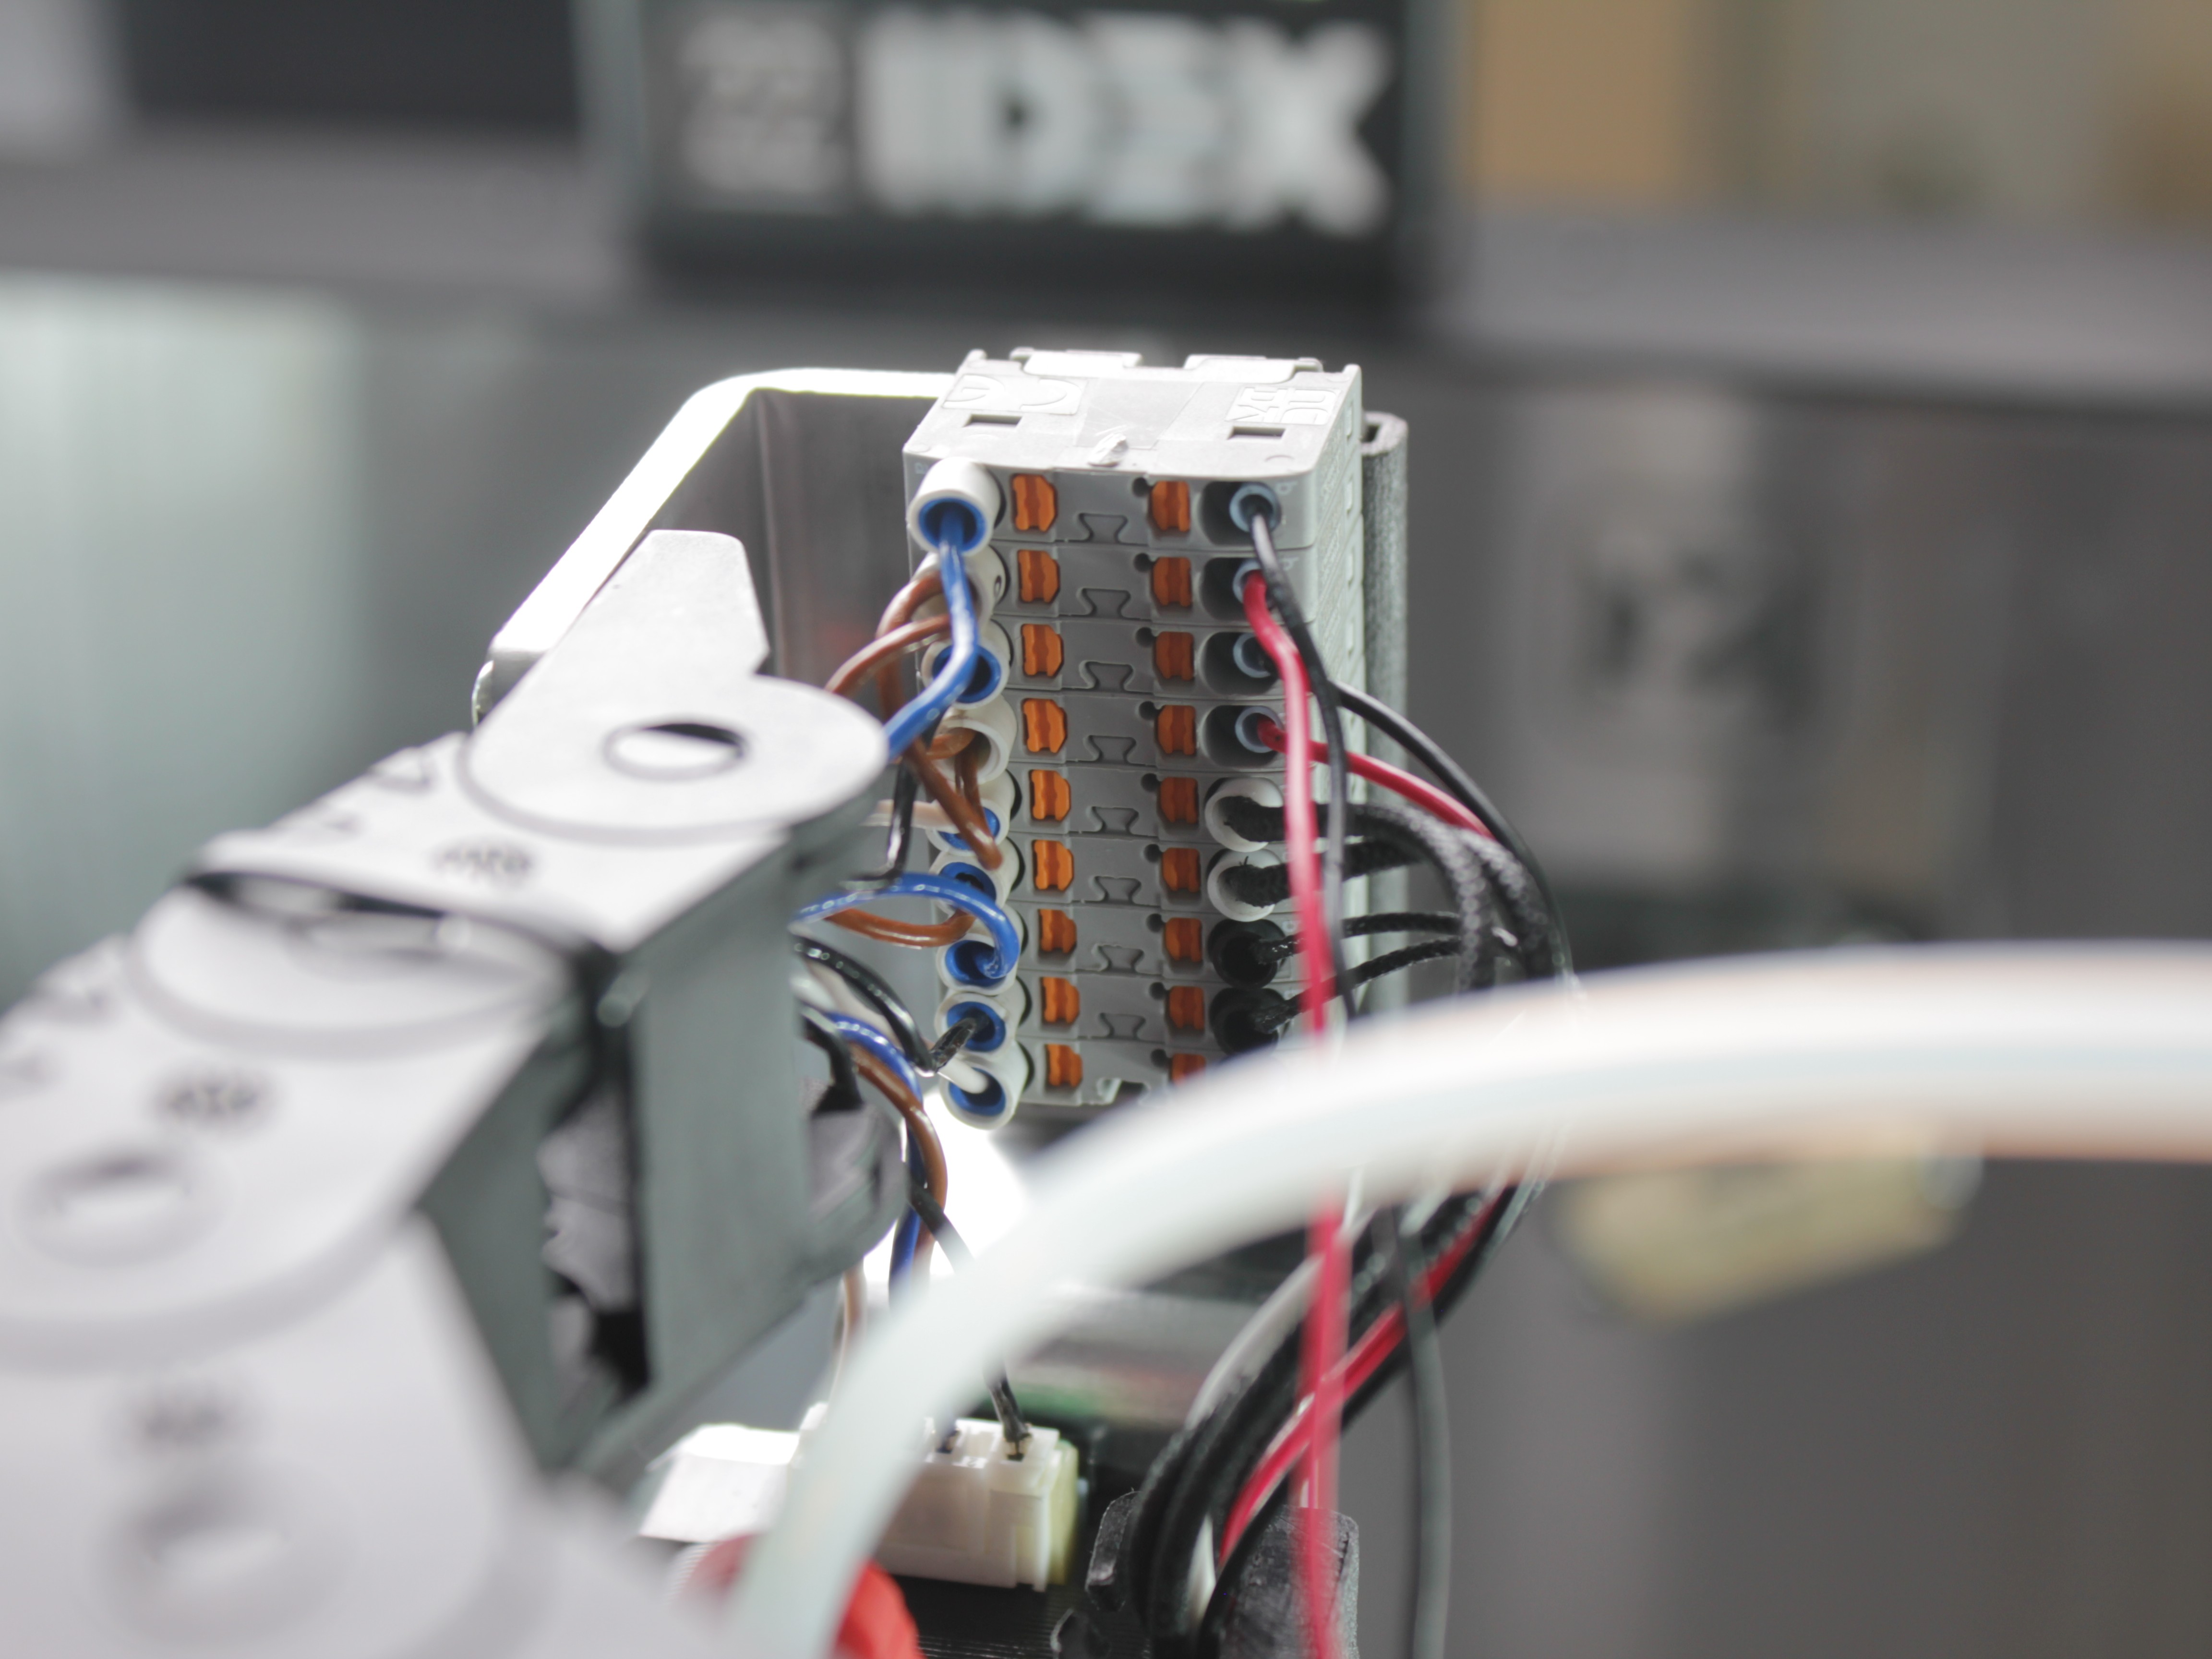
- If spikes persist, replace the temperature sensor.
2. Temperature Spikes Down
Symptom: The temperature suddenly drops on the graph (potentially down to -273°C).
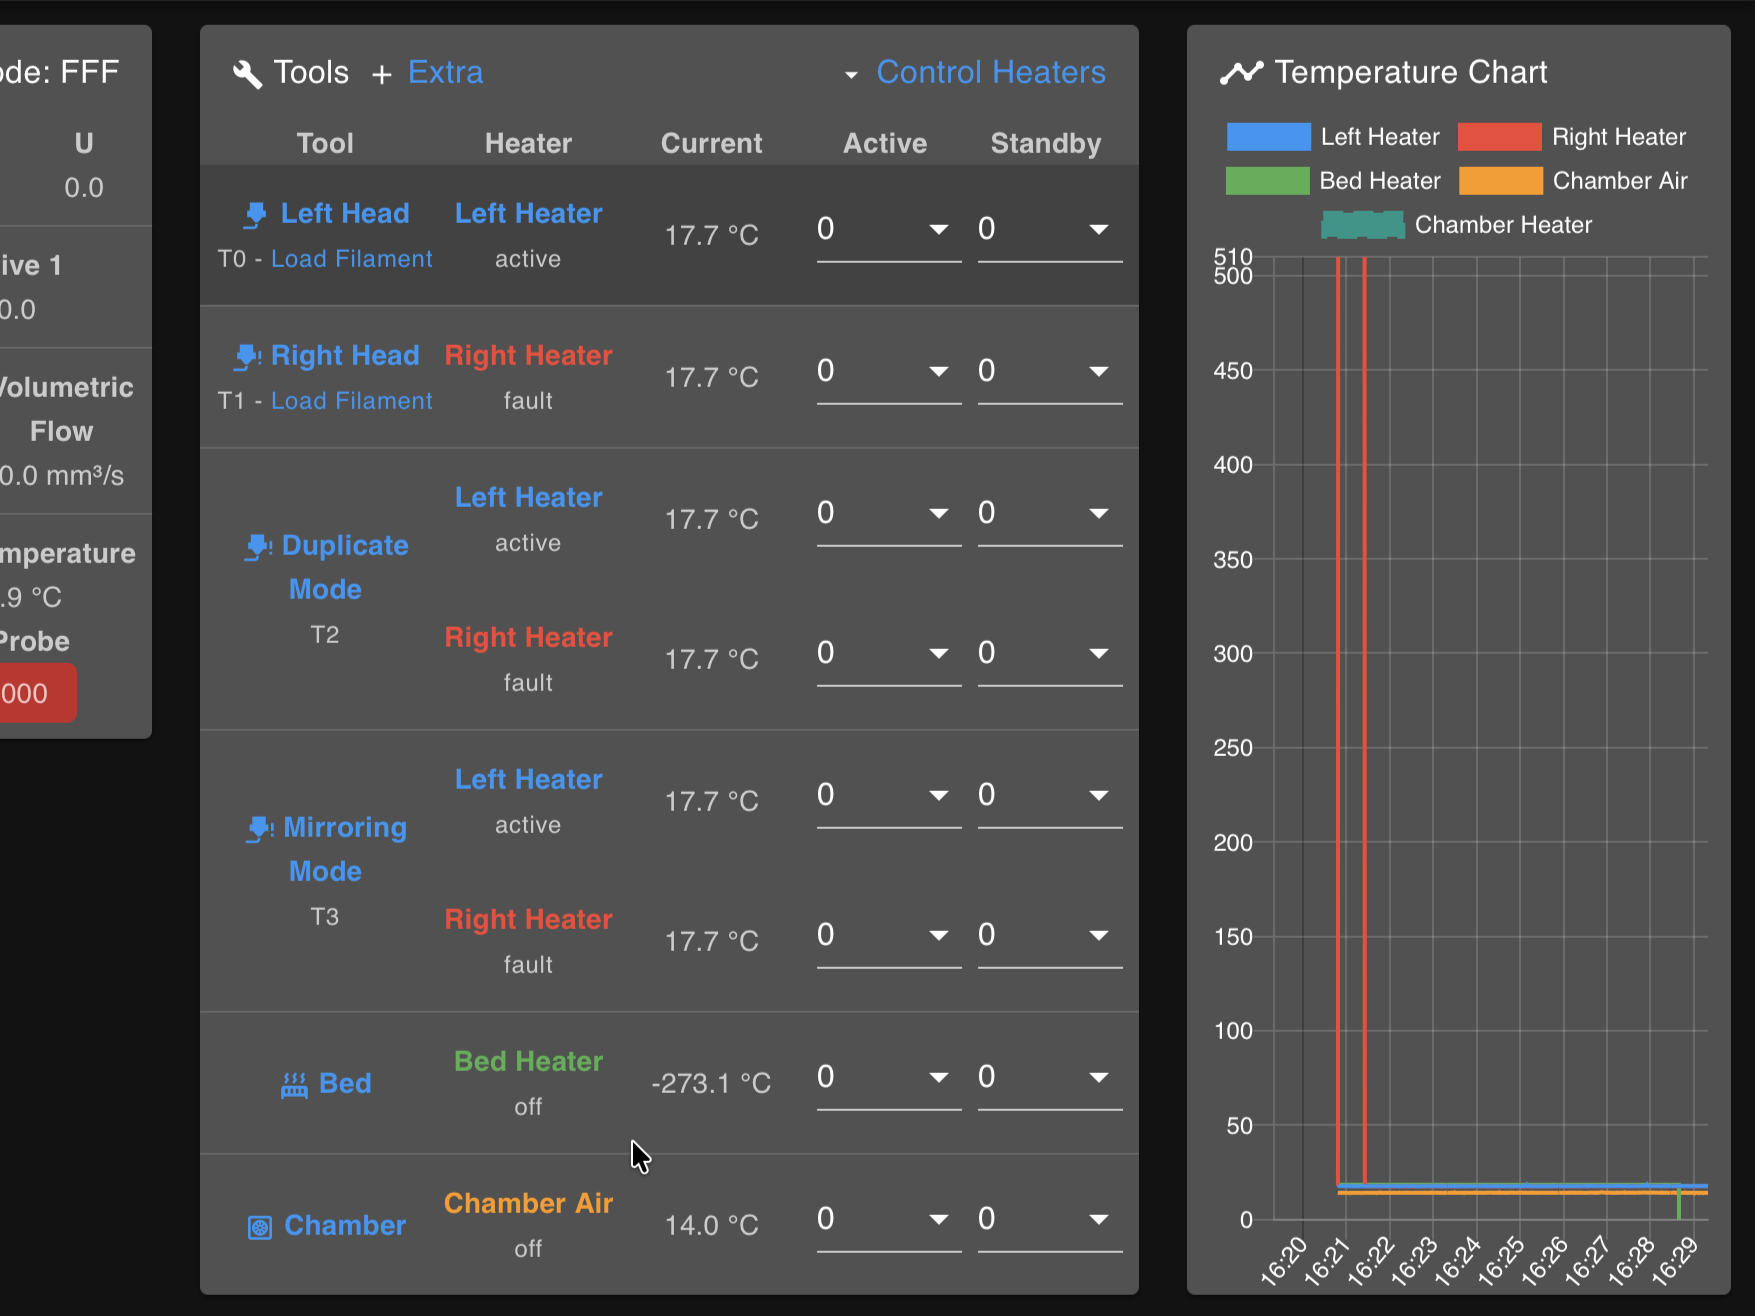
Possible Cause:
- Short circuit in the sensor wiring (worn insulation causing wire-to-wire contact)
- Severely damaged or frayed sensor cables
Inspect for exposed wires
Frayed heater or sensor wires can damage the mainboard. Check the tool head wiring thoroughly.
Diagnostic Steps:
- Power off the printer.
- Inspect the temperature sensor wire thoroughly for cuts or exposed metal.
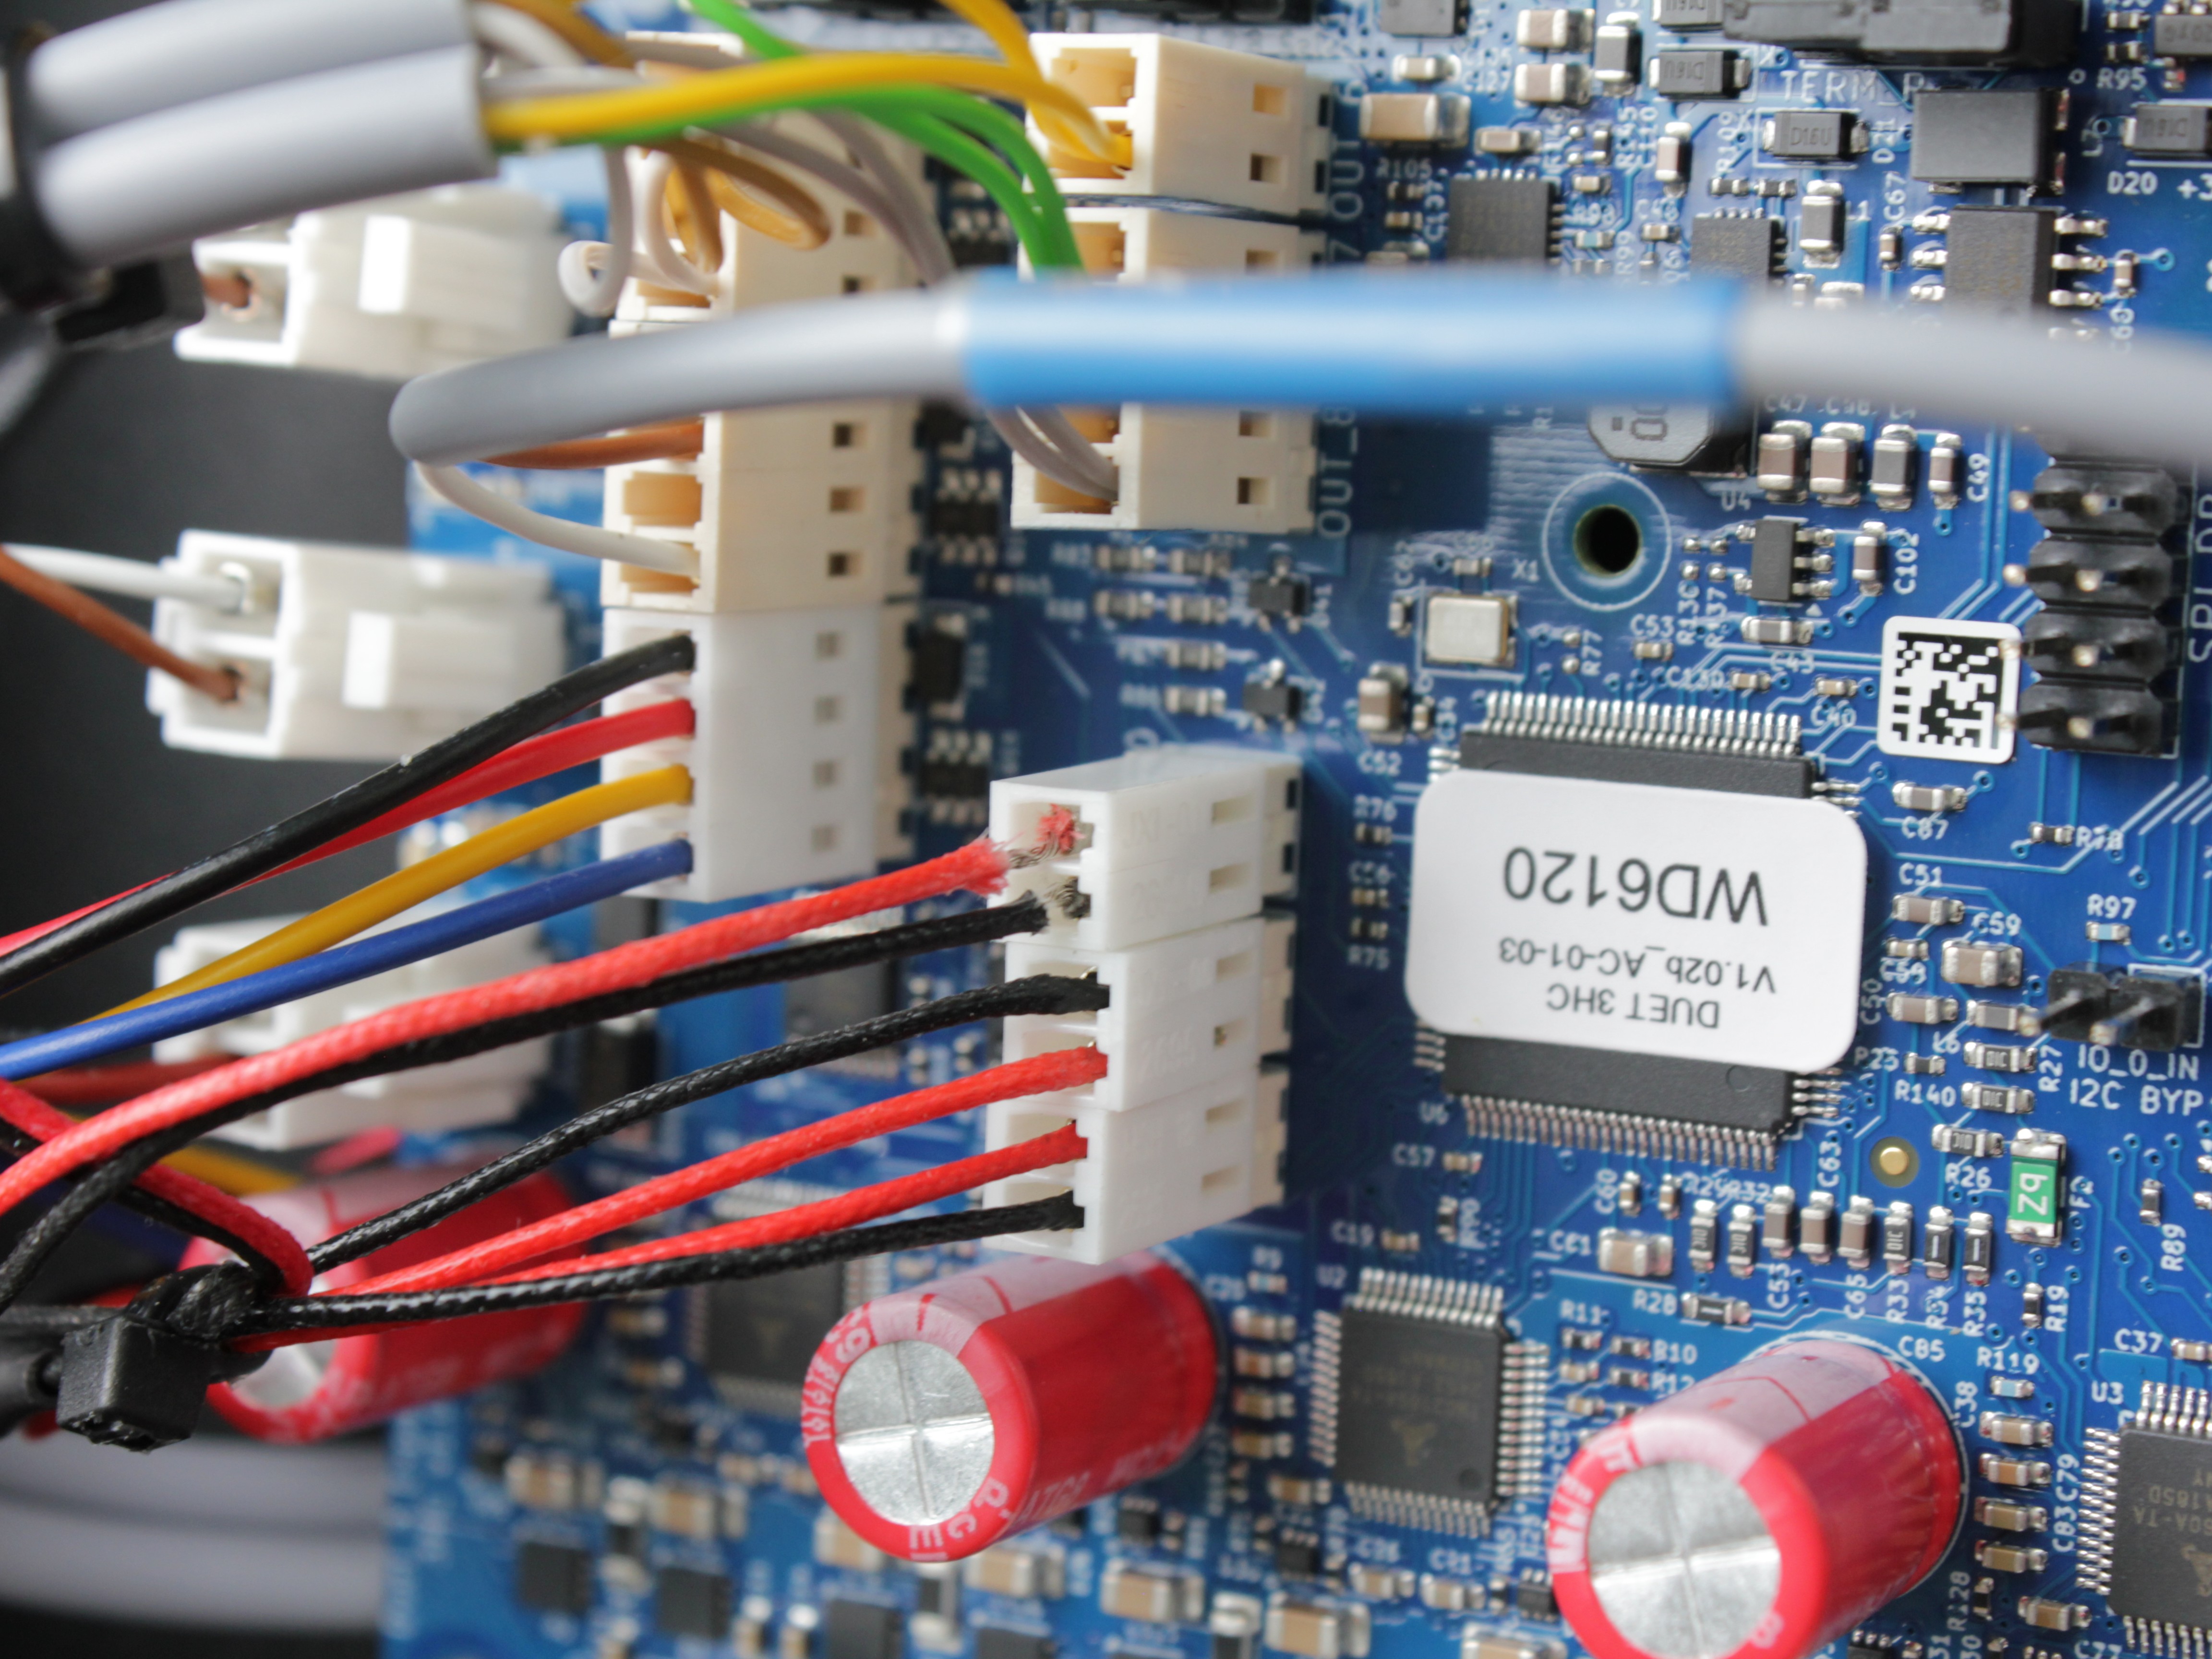
- If damaged, replace the temperature sensor – see Hotend Heater & Sensor.
- Check the heater wires on the tool head as well – any fraying must be addressed.
3. Inadequate Heating Rate (Slow Heat-Up or Sudden Cooling)
Symptom:
- The printer stops heating and displays a "temperature lower than expected" error
- Temperature fails to rise fast enough or drops suddenly during printing
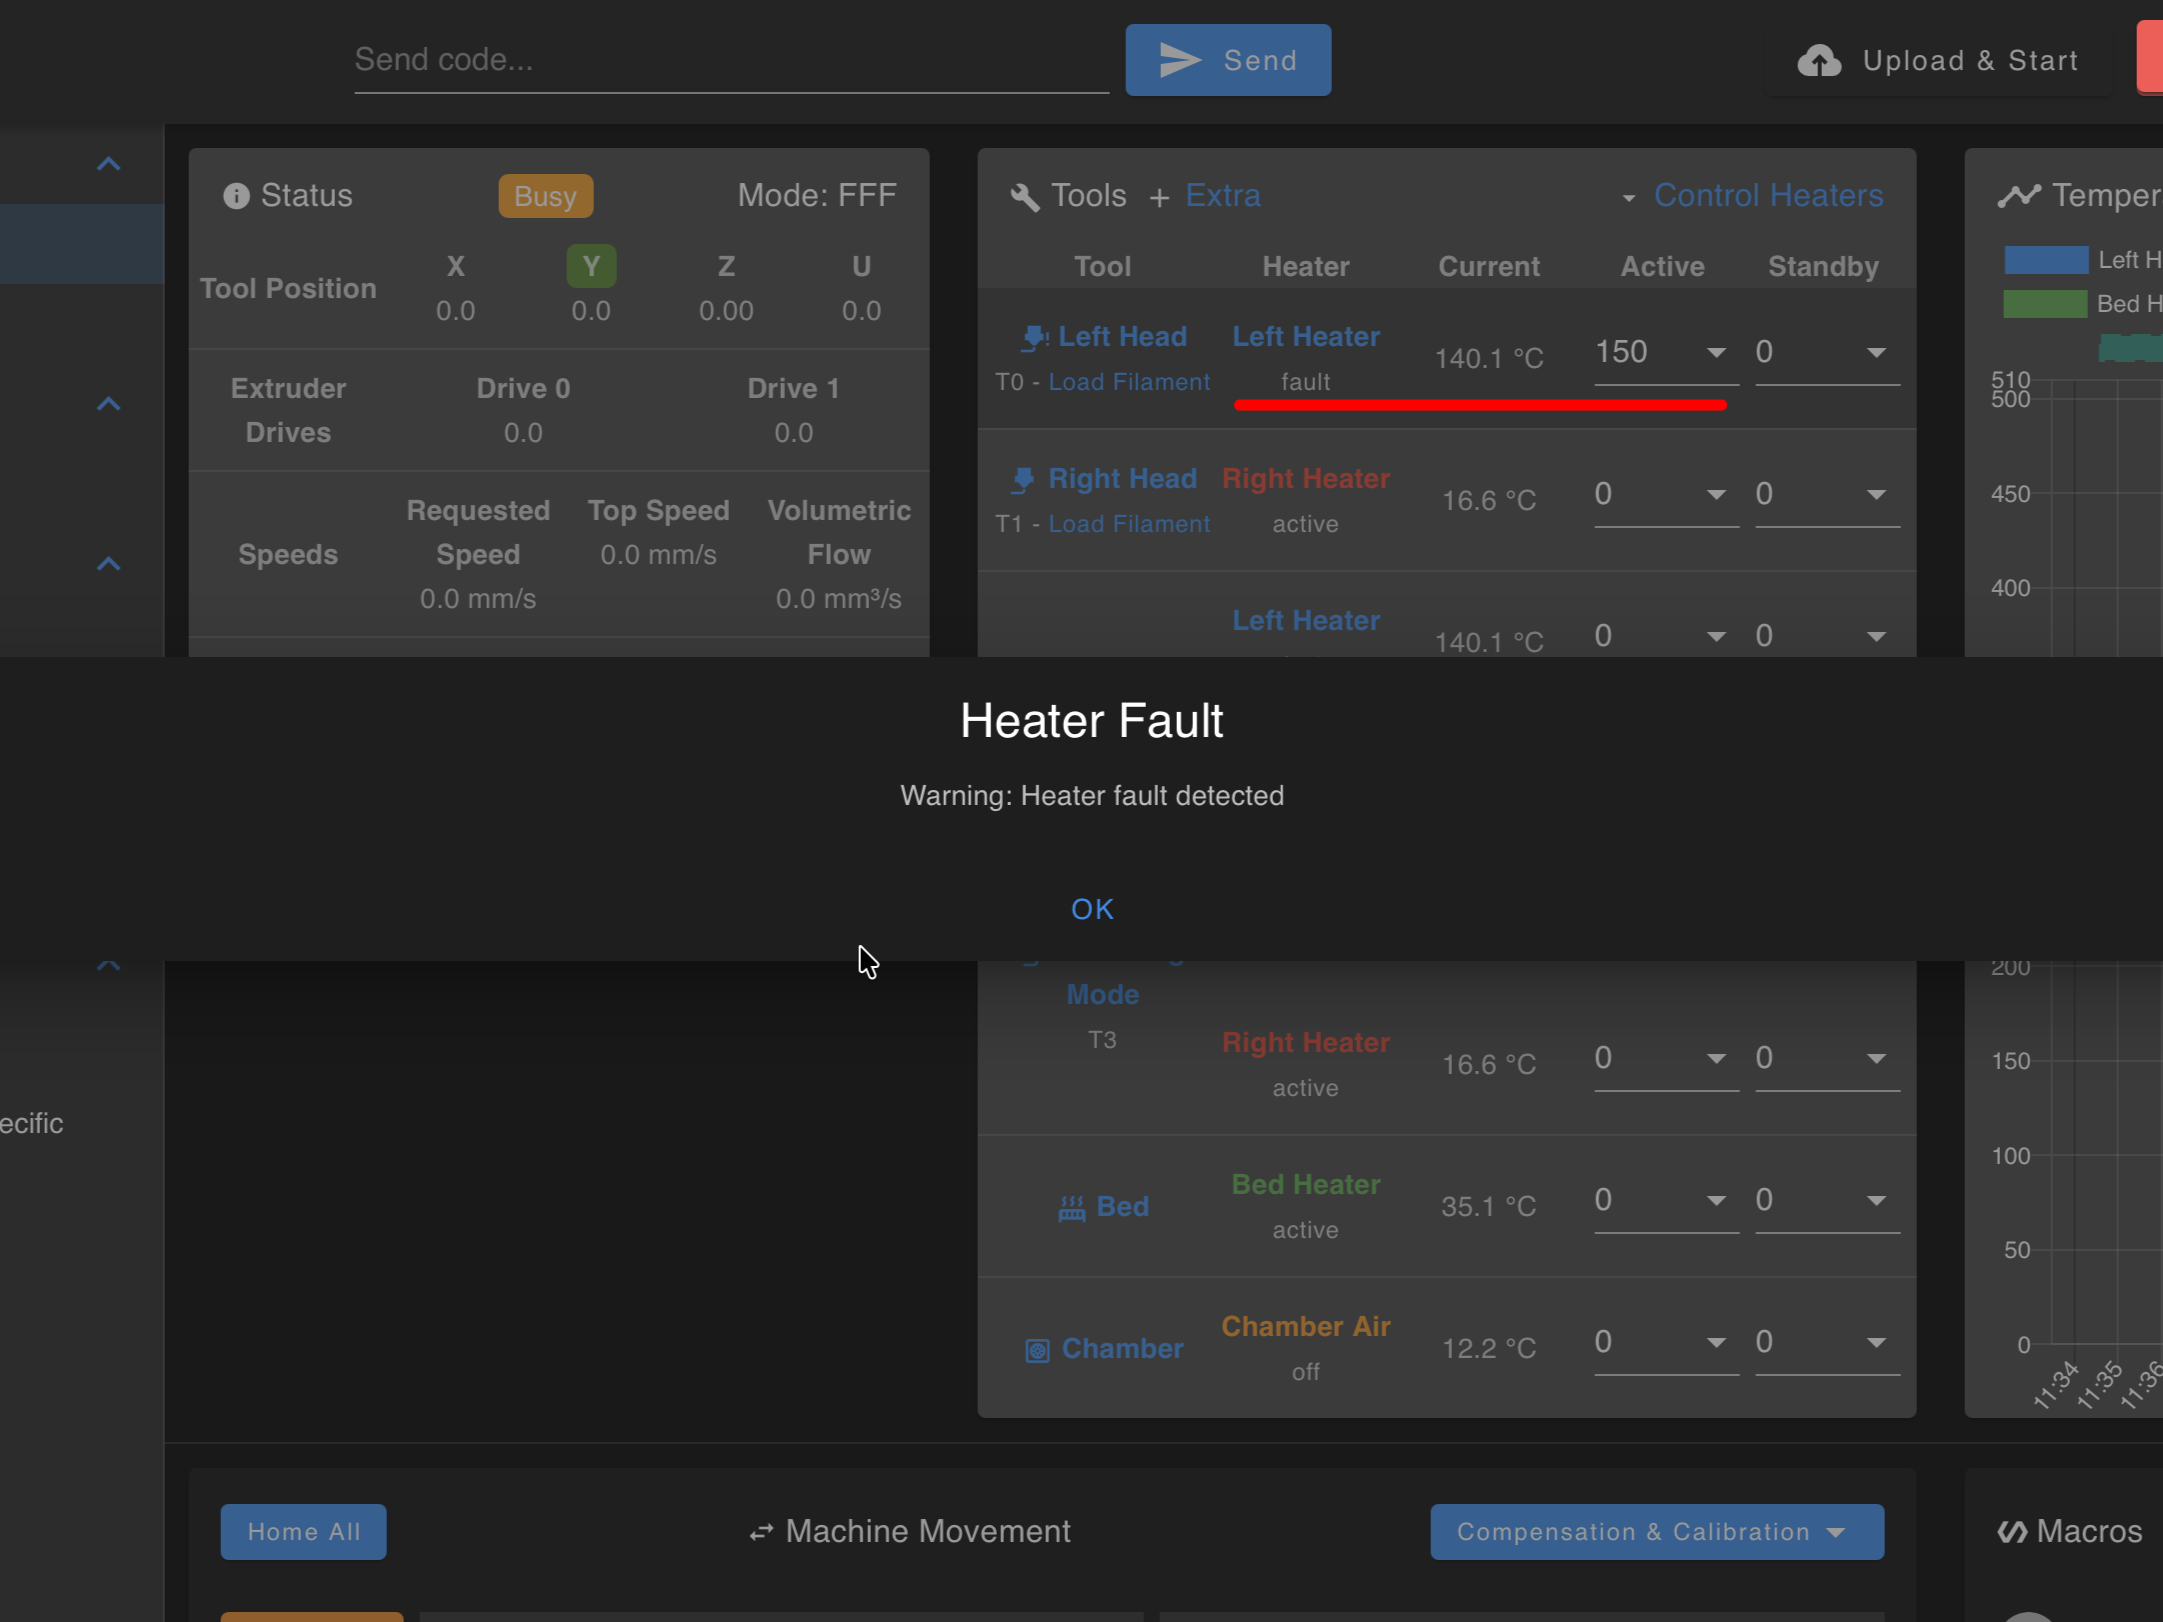
Possible Causes:
- Cold surface on a hot bed – Placing a cold build surface on a hot bed can rapidly cool the plate
- Open chamber – Leaving the door open while heating to high temperatures (200°C or more) causes heat loss
- Fan shroud fans turning on mid-print – A common pattern for hotend faults: the first layers print with the part cooling fans off, then the slicer switches the fan shroud fans on partway into the print, the airflow drops the nozzle temperature, and the heater faults. On the graph this looks like a steady temperature that suddenly sags right when the fans kick in.
- HEPA air circulation cooling the bed sensor (V4, older firmware) – The HEPA filter system filters the air and circulates it around the chamber. On V4 machines with older firmware, this circulation airflow could reach the bed temperature sensor and lower its reading, causing bed heater faults. This is fixed in the latest firmware – if you see unexplained bed faults on a V4, update the firmware first.
Fixes:
- Close the printer door/lid when heating to maintain a stable chamber.
- Preheat or at least allow the build plate to partially reach its set temperature before placing a cold build surface.
- Reduce the fan speed in your slicer or use a silicone sock to insulate the hotend. If the fault consistently happens at the layer where the fan shroud fans turn on, lower the fan speed for that material.
- On a V4 with bed heater faults and no wiring issues – update to the latest firmware.
4. Temperature Oscillation (Wavy Line on the Graph)
Symptom: Instead of staying near the setpoint, the temperature line oscillates up and down in a wavelike pattern.
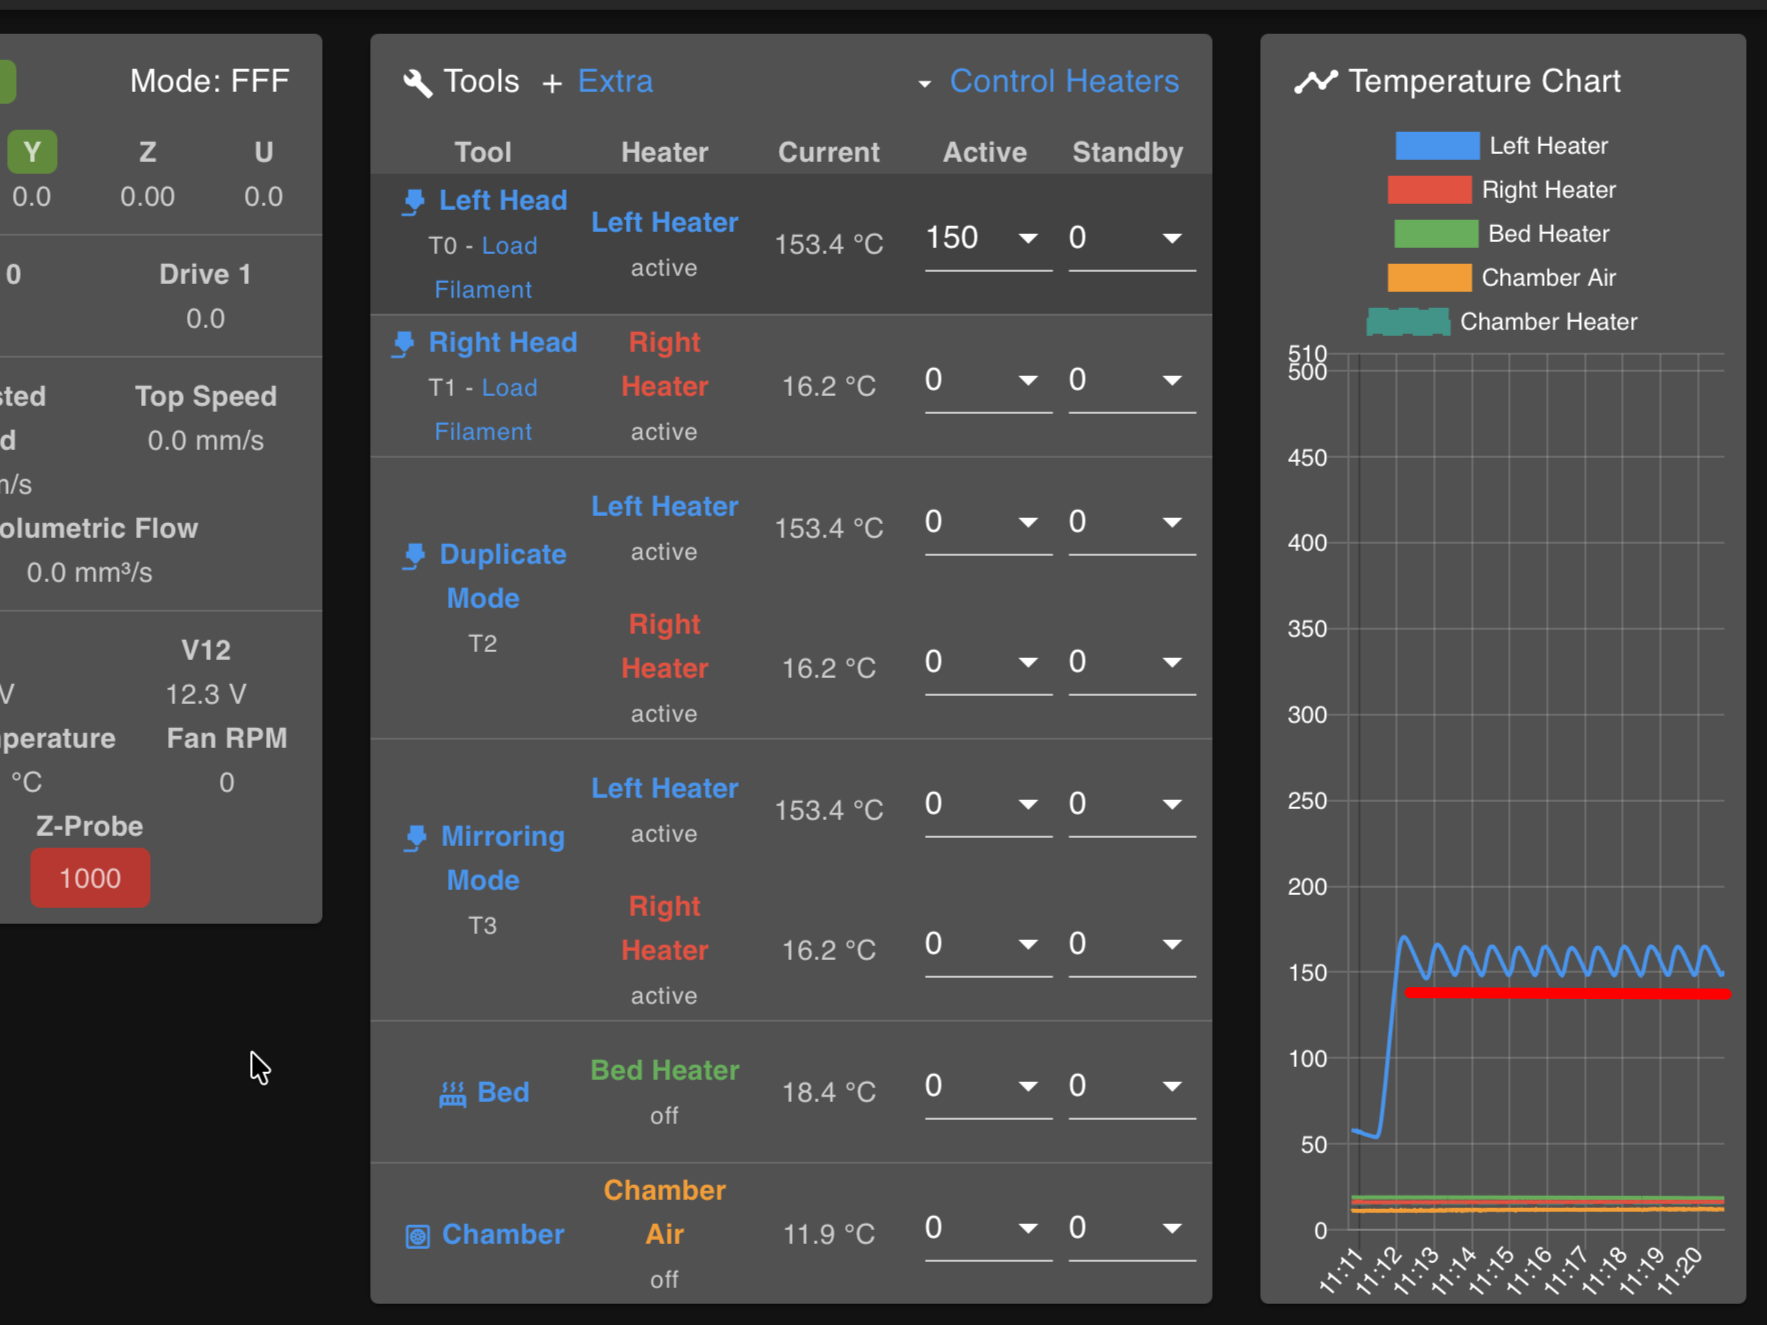
Possible Cause: PID (Proportional-Integral-Derivative) control settings are off, causing the system to over- and under-shoot the target temperature.
Run PID tuning from ambient temperature
For accurate tuning, ensure the hotend or bed starts from room temperature. Do not leave the printer unattended during calibration.
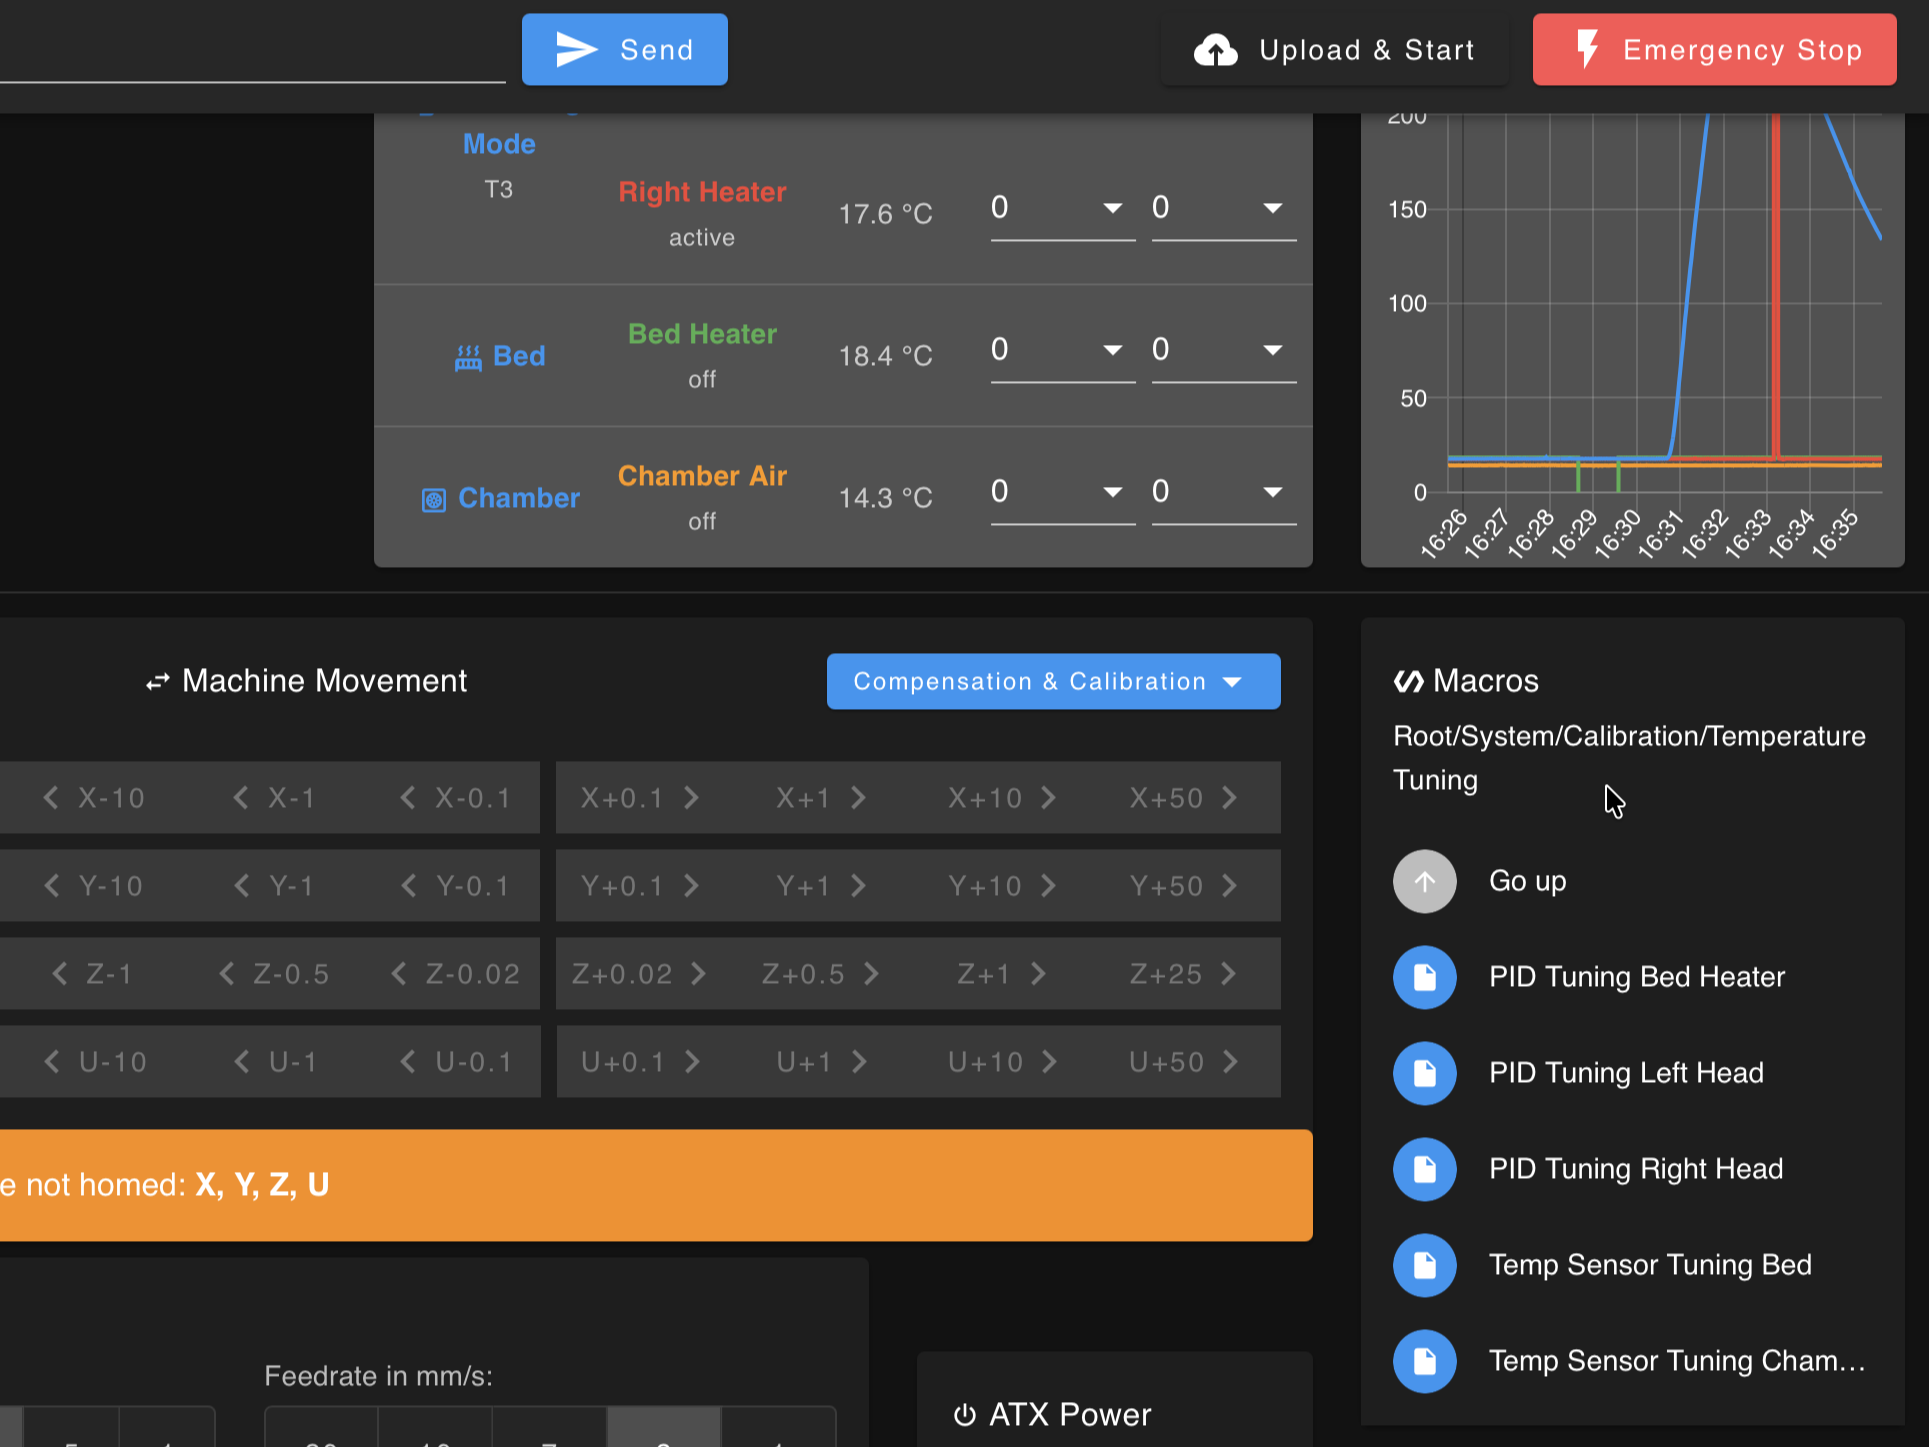
Fixes:
- Perform PID Tuning:
- Open the Web Interface
- Go to the Dashboard → Macros tab
- Navigate to System → Calibration → Temperature Tuning
- Choose the appropriate macro for the affected heater
- Start with the hotend or bed at ambient temperature. The full procedure is in the PID Tuning guide.
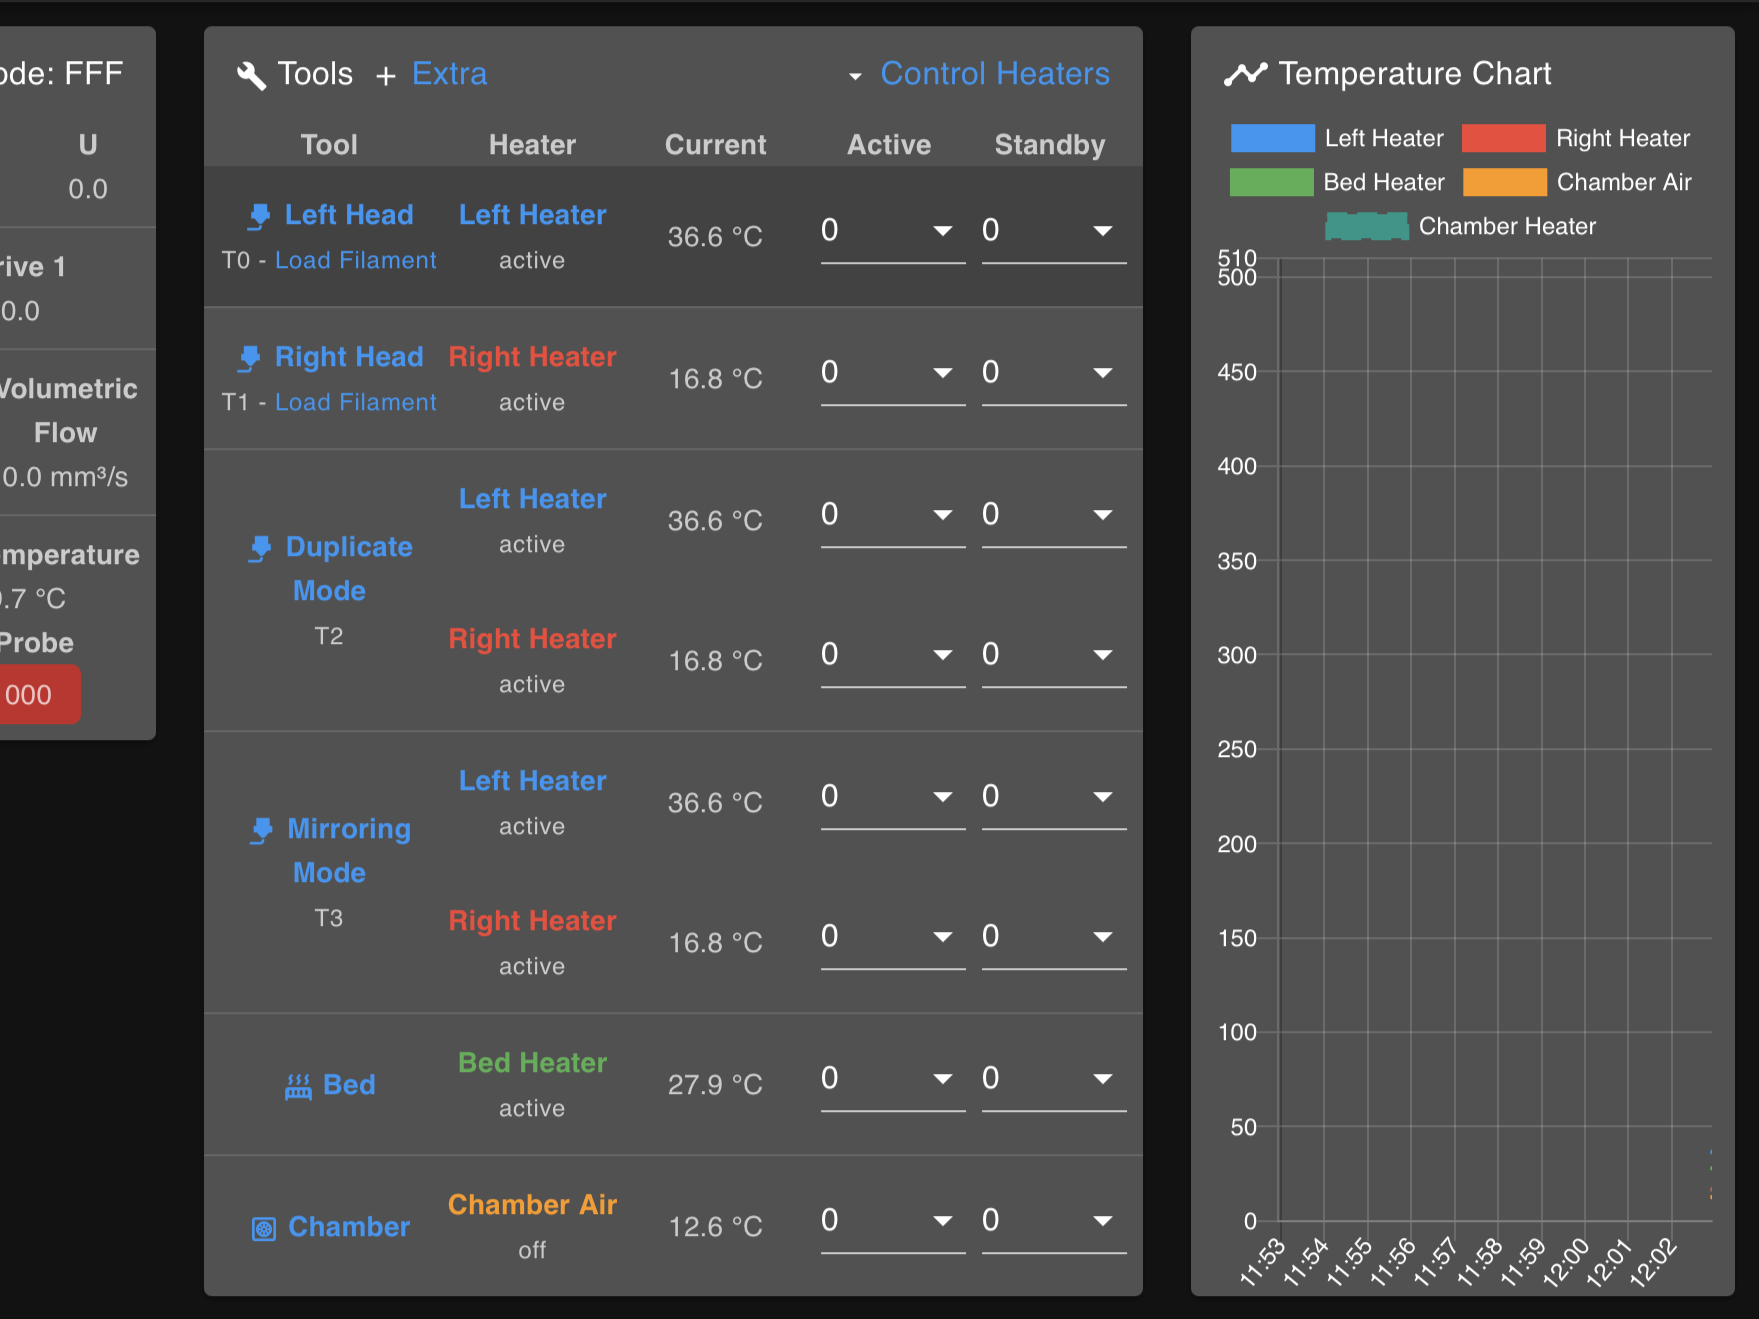
5. Inaccurate Ambient Temperature Readings
Symptom: After the machine is completely cooled to room temperature, most temperature sensors read a similar ambient value, but one sensor reads significantly higher or lower than the others.
Possible Cause:
- Higher-than-ambient reading (while physically cold to the touch): often indicates a loose contact or partially disconnected sensor
- Lower-than-ambient or negative reading (while physically cold to the touch): often indicates a short circuit or frayed/damaged wires
Verify temperature before touching
Use an IR temperature gun or carefully touch the component to confirm it is actually cold. The sensor might be accurate and the surface genuinely hot.
Diagnostic Steps:
-
Confirm the machine is cold:
- Use an IR temperature gun to verify temperature
- If safe, carefully touch the component (bed or tool head)
-
Check the suspect sensor:
- If it reads higher than ambient but is cold to the touch, inspect all wire connection points (distribution block, mainboard, tool head wiring) for looseness. Reseat if necessary.
- If it reads noticeably lower or negative, look for wire damage or frayed insulation that could cause a short.
-
Replace the sensor if wiring is damaged:
- A sensor that continues to read incorrectly after reseating or repairing connections may need to be replaced.
After a Heater Fault
When a fault triggers, the firmware shuts the heater off and keeps it off. If a print is running, it is paused automatically, the chamber LEDs flash red, and a Heater Fault dialog appears.
By default the printer only shows the warning and stays powered. You can also configure an automatic shutdown in Macros > System > Settings > Faults > Action After Heater Fault: immediate power-off, or a delay of 30 / 60 / 120 seconds or a custom duration. With a delay configured, the fault dialog counts down ("the printer will shut down in ... seconds") with Shut down now and Keep power on buttons - if nobody responds before the timer runs out, the printer powers off.
Before turning anything back on:
- Find and fix the cause first. Use the scenarios above. Resetting the fault without fixing the cause will just trigger it again – or worse, mask a real wiring problem.
- Reset the fault by running the Reset Temp Fault macro (
Macros > System > Reset Temp Fault). You do not need to restart the printer.
- Try the heater again and watch the temperature graph during heat-up and printing. If the same heater faults again, stop and continue diagnosing – repeated faults on one heater almost always mean a sensor or wiring issue on that circuit.
Support
If you could not find an answer here, reach out to our support team.