Macros & Settings
Reference for every built-in 22 IDEX V4 macro: auto-calibration, filament change, cold pull, Z-offset, network, job end and troubleshooting scripts.
The Vision Miner 22IDEX V4 includes a set of built-in macros – pre-written scripts that automate common tasks like calibration, filament changes, network setup, and troubleshooting. This article is a complete reference of every macro available on the printer, organized by folder. Use it to understand what each macro does and when to run it.
Before you begin - safety and risk
Read the Safety - Before You Begin article to understand the hazards involved in working on the Vision Miner 22IDEX V4 - including electrical, thermal, mechanical, and chemical risks. All procedures in this wiki are provided as recommendations only. By choosing to follow any procedure, you do so at your own risk.
Macros in the Calibration folder move the toolheads and build plate automatically. Make sure the build area is clear – remove prints, tools, and loose objects before running any calibration macro.
Do not run macros while a print is in progress unless the macro is specifically designed for it (e.g., Save Current Z - Offset). Running a calibration or filament macro mid-print will interrupt or ruin the job.
How to Access Macros
Open the Web Interface in your browser. There are two ways to reach the macros:
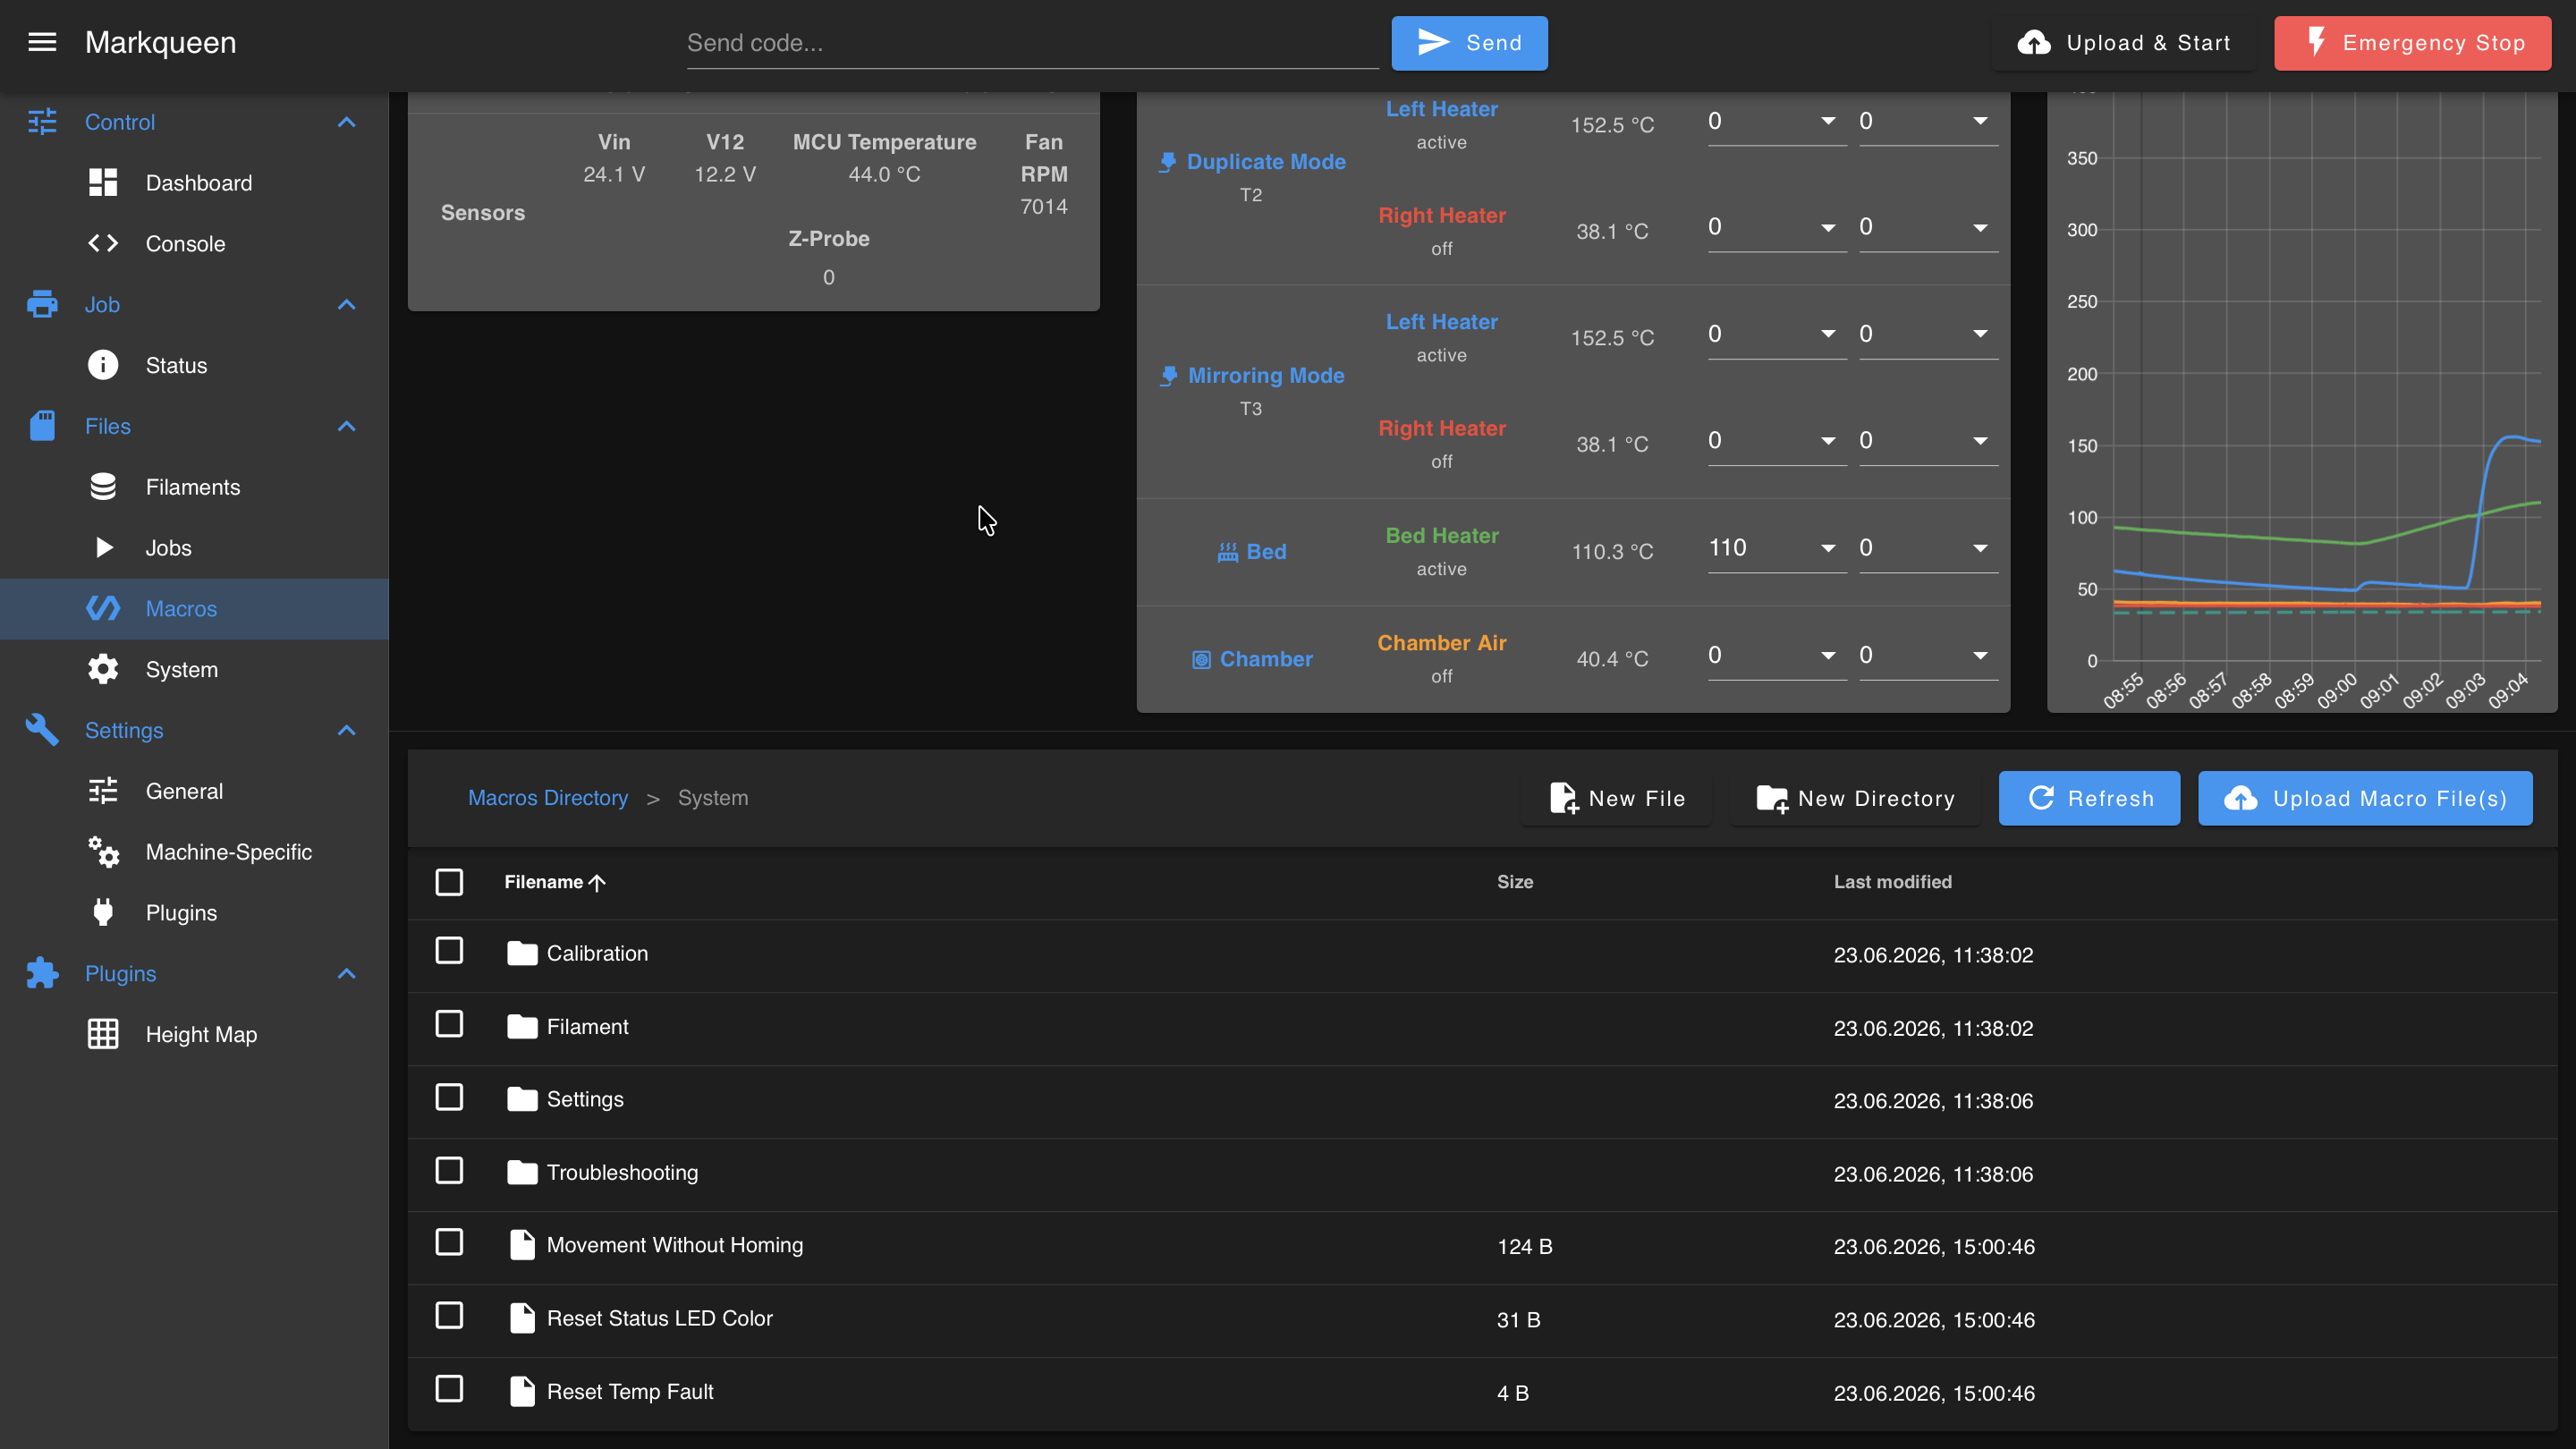
Method 1 – Macros tab. In the left sidebar, click Macros.
Method 2 – Dashboard. In the left sidebar, click Dashboard. The macros are listed in the Macros panel on the right side of the screen.
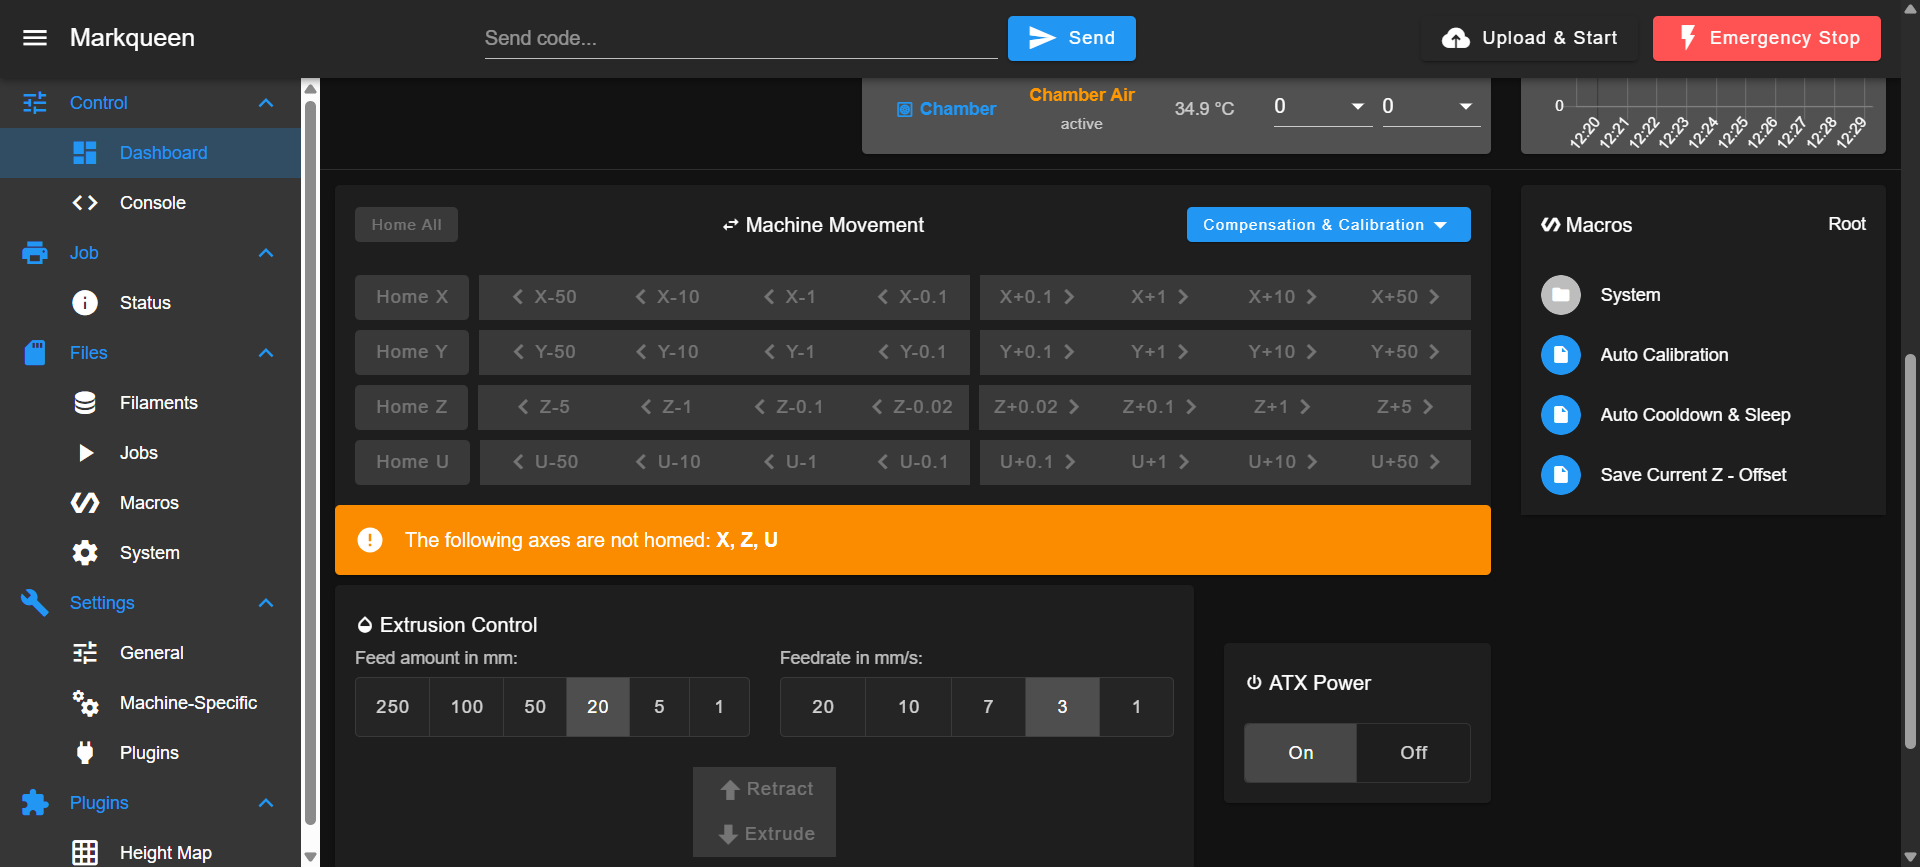
Either way, you will see the root-level macros and the System folder, which contains all advanced macros organized into subfolders.
Main Macros
These three macros sit at the root level of the Macros page. They are the most frequently used.
Auto Calibration
The master calibration routine. Runs all calibration procedures in the correct order:
- Heats both toolheads to user-specified temperatures.
- Prompts you to remove the build plate.
- Homes all axes.
- Runs Tool Height Calibration (Z-offset between T0 and T1).
- Runs Z-Offset Calibration (probe-to-nozzle offset).
- Runs Mesh Bed Calibration (if mesh mode is set to auto).
- Runs XY Auto Squaring (if enabled).
- Runs XY Offset Calibration (U and Y offset between tools).
- Displays a summary of all calibrated values.
Remove the build plate before starting. The macro will remind you, but running calibration with the plate installed will produce incorrect results or damage the probe.
Auto Cooldown & Sleep
Safely shuts down the printer after use. Asks for confirmation, then:
- Homes all axes (if not already homed).
- Lowers the build plate to the bottom (Z = 420 mm / ≈ 16.5 in.).
- Turns off all fans, heaters (nozzles, bed, chamber).
- Releases XYU motors.
- Puts the 24V power supply into standby.
Use this instead of the physical power button for a normal (non-emergency) shutdown.
Save Current Z - Offset
Saves the current babystepping value as a permanent Z-offset. During a print, you can adjust the Z babystep in real time to fine-tune the first layer. This macro writes that adjustment into the printer's configuration so it persists across reboots.
- During a print: the save is deferred until the print finishes.
- Outside a print: the offset is applied and saved immediately.
System Utilities
Located in System/ (top level, not inside any subfolder).
| Macro | What it does |
|---|---|
| Movement Without Homing | Toggles the ability to jog axes without homing first. Useful when you need to move a toolhead manually (e.g., for inspection or maintenance) but cannot home safely. Disabled by default – axes require homing before movement. |
| Reset Status LED Color | Resets the printer's status LEDs to the default color. Use this if a macro or error left the LEDs in an unexpected state. |
| Reset Temp Fault | Clears all heater temperature fault flags. If a heater triggered a fault (e.g., temperature sensor disconnected, heater timeout), this macro resets the error so the heater can be used again. Diagnose the cause of the fault before resetting. |
The Movement Without Homing macro allows moving axes without position verification. Careless movement can cause the toolheads to collide with the frame, the build plate, or each other, damaging the printer's mechanics. Only use it when you are certain the path is clear and the toolheads will not hit anything.
Filament Management
Located in System > Filament/.
Change Filament
Full filament change workflow. Walk-through:
- Select which tool to change (T0 / T1).
- Enter the temperature of the currently loaded filament.
- The macro heats, then unloads the old filament (using a cold pull if needed for high-temperature materials).
- Enter the temperature of the new filament.
- The macro heats and loads the new filament.
If the old and new materials have a large temperature gap (e.g., swapping PEEK for PLA), the macro uses an intermediate purge with cold pull to avoid cross-contamination.
Cold Pull
Cleans the inside of the nozzle by performing a controlled cold pull. The macro:
- Heats the nozzle and pushes filament through.
- Gradually cools the nozzle while applying pressure.
- At the calculated pull temperature, retracts the filament sharply – pulling out debris with it.
The pull temperature is calculated automatically based on the filament type. Works in two modes:
- Interactive – prompts you for the temperature, lets you control the process.
- Automated – called with parameters by other macros (e.g., during filament change).
Reset Selected Filament
Clears the filament assignment for Tool 0, Tool 1, or both. The Web Interface shows a filament name next to each tool – this macro removes that label. Use it when the displayed filament does not match what is actually loaded, or after manually swapping filament without using the Change Filament macro.
Calibration
Located in System > Calibration/. This is the largest section. Most of these macros are called automatically by the Auto Calibration master routine, but they can also be run individually.
For routine calibration, always use the main Auto Calibration macro – it runs all procedures in the correct order. Running individual calibration macros one by one manually is not recommended. Use individual macros only when troubleshooting a specific issue, to save time and avoid re-running the full calibration cycle.
Temperature Tuning
Located in System > Calibration > Temperature Tuning/.
| Macro | What it does |
|---|---|
| PID Tuning Bed Heater | Runs PID auto-tune on the bed heater. Default target: 150 °C. You can enter a custom target. If the target is above 140 °C, the macro pre-heats the chamber to 100 °C first to simulate real printing conditions. Results are saved to the printer's configuration automatically. |
| PID Tuning Hotend | Runs PID auto-tune on a toolhead heater. A dialog asks which hotend to tune – Left Head (T0) or Right Head (T1). Enter a target temperature; results are saved automatically. |
| Temp Sensor Tuning Bed | Calibrates the bed temperature sensor using a pyrometer (infrared thermometer). The macro heats the bed, waits for thermal stabilization, then asks you to measure the actual surface temperature. It iteratively adjusts the sensor's calibration coefficient until the sensor reading matches the measured value within ±0.2 °C. |
| Temp Sensor Tuning Chamber | Calibrates the chamber air temperature sensor. Full guide: Temperature Sensor Calibration. Supports automatic mode (uses the average nozzle temperature as a reference) or manual mode (IR thermometer measurement). Adjusts the sensor coefficient to match within ±0.5 °C. |
PID tuning macros turn off all heaters at the start to avoid interference.
Live XY Offset Adjustment
Located in System > Calibration > Live XY Offset Adjustment/.
Four directional macros for manually fine-tuning the XY offset between Tool 0 and Tool 1 in real time. Each press adjusts the offset by 0.05 mm (≈ 0.002 in.) in the indicated direction. Use these while examining a dual-color test print to dial in alignment.
| Macro | Direction | What it adjusts |
|---|---|---|
| ← Move T1 Left | Left | U-offset +0.05 mm |
| → Move T1 Right | Right | U-offset -0.05 mm |
| ↑ Move T1 Forward | Forward | Y-offset -0.05 mm |
| ↓ Move T1 Backward | Backward | Y-offset +0.05 mm |
Changes are saved immediately and persist across reboots.
Mesh Calibration
Located in System > Calibration > Mesh Calibration/.
These macros control the mesh bed compensation – a correction that accounts for slight differences in bed flatness across the X-axis.
| Macro | What it does |
|---|---|
| Toggle Mode | Switches mesh compensation between auto (measured by the probe during Auto Calibration) and manual (set by the user with the macros below). When switching to auto, optionally triggers a full Auto Calibration. |
| ↑_↓ RHS Down | Adjusts manual mesh compensation: moves the right side of the build plate down by 0.04 mm (≈ 0.0016 in.). Forces manual mode. |
| ↓_↑ RHS Up | Adjusts manual mesh compensation: moves the right side of the build plate up by 0.04 mm (≈ 0.0016 in.). Forces manual mode. |
| Reset | Resets all mesh compensation values to zero and switches to manual mode. |
XY Squaring
Located in System > Calibration > XY Squaring/.
Controls the XY squareness correction – a compensation that adjusts for any slight angular misalignment between the X and Y axes.
| Macro | What it does |
|---|---|
| Toggle Mode | Switches between auto (measured by the probe during Auto Calibration) and manual mode. Shows the currently active offset value. |
| Adjust ↑↓ CW | Manually adjusts the squaring offset clockwise by +0.1 mm (≈ 0.004 in.). Maximum ±2 mm. Forces manual mode. |
| Adjust ↓↑ CCW | Manually adjusts the squaring offset counterclockwise by -0.1 mm (≈ 0.004 in.). Maximum ±2 mm. Forces manual mode. |
| Reset Offsets | Resets all squaring offsets (auto, manual, mode) to zero. |
Z Probe
Located in System > Calibration > Z Probe/.
Macros for managing the automated Z-probe – the sensor that the printer picks up from a holder and uses to measure bed height and tool offsets.
| Macro | What it does |
|---|---|
| Enable Probe | Turns on the Z-probe relay (powers the probe). |
| Disable Probe | Turns off the Z-probe relay. |
| Pick the Probe | Homes XYU axes if needed, then picks up the probe from its holder. |
| Place the Probe | Homes XYU axes if needed, then returns the probe to its holder. |
| Probe Calibration | Full probe calibration wizard. Guides you through adjusting the probe servo height, fine-tuning the pickup angle, saving the probe X/Y pickup positions, and running 3 test pick/place cycles to verify reliability. |
| Adjust pickup angle CW | Decreases the probe servo pickup angle by 1° (min 155°). |
| Adjust pickup angle CCW | Increases the probe servo pickup angle by 1° (max 180°). |
| Rotate holder to 0 degree | Rotates the probe holder servo to 0°. |
| Rotate holder to a set degree | Rotates the probe holder servo to the configured pickup angle. |
Reset Bed Level
Located in System > Calibration/.
Interactive procedure for resetting the mechanical bed level. Disables the homing requirement, guides you through lowering all three Z-axis leadscrews to the physical bottom, then moves the bed back up. If the motors stall during the process, the macro increases motor current and retries. Optionally re-homes all axes after completion.
This macro intentionally grounds out the Z motors to find the mechanical bottom. You will hear grinding – that is expected and does not damage the machine.
Steps per mm Mode
Located in System > Calibration/.
Toggles automatic steps-per-mm calibration on or off. When enabled, the Auto Calibration macro measures the actual axis travel distances by probing reference holes and calculates corrected steps/mm values for X and Y. When disabled, the firmware uses the default factory values (80 steps/mm for X, Y, and U).
Beta Macros
Located in System > Calibration > Beta/.
Beta macros are experimental features under development. They may change or be removed in future firmware updates. Do not use them on your own – only run beta macros after discussing it with Vision Miner support.
| Macro | What it does |
|---|---|
| Bed Dance | Demo/test macro. Remaps the three Z motors and runs a synchronized circular movement pattern. Not used in normal operation. |
| Rear ↑ Up | Adjusts Y-axis bed compensation (rear of build plate) upward by 0.05 mm (≈ 0.002 in.). |
| Rear ↓ Down | Adjusts Y-axis bed compensation (rear of build plate) downward by 0.05 mm (≈ 0.002 in.). |
Settings
Located in System > Settings/. These macros configure how the printer behaves in various situations – fault handling, post-print behavior, network, and print-specific settings.
Fault Handling
Located in System > Settings > Faults/.
| Macro | What it does |
|---|---|
| Action After Heater Fault | Configures what happens when a heater fault is detected. Options: disable auto-shutdown, immediate shutdown, or delayed shutdown (30 / 60 / 120 seconds, or a custom value). |
| Bed Fault Detection | Enables or disables bed heater fault detection. When enabled, the firmware monitors the bed heater for temperature drift and triggers a fault if the heater cannot maintain the target within the specified timeouts. |
| Chamber Fault Detection | Same as Bed Fault Detection, but for the chamber heater. |
Disabling fault detection removes a safety mechanism. Only disable it for specific troubleshooting scenarios and re-enable it as soon as you are done.
Filament Runout Sensors
Located in System > Settings > Filament Runout/.
| Macro | What it does |
|---|---|
| Sensor Mode Tool 0 | Enables or disables the filament runout sensor for Tool 0 (left toolhead). When enabled, the printer pauses the print if filament runs out or breaks. |
| Sensor Mode Tool 1 | Enables or disables the filament runout sensor for Tool 1 (right toolhead). |
| 2nd Tool Backup | (Under development) When enabled, Tool 1 automatically takes over if Tool 0 runs out of filament. Both tools must be loaded with the same filament. |
Firmware
Located in System > Settings > Firmware/.
| Macro | What it does |
|---|---|
| Check Firmware | Displays the installed software versions – macro files, mainboard, and expansion board firmware – and provides a link to the Firmware Update page. |
| Delete Old Files | Removes obsolete files left over from previous firmware versions. Runs automatically during a firmware upgrade, but can also be started manually. Writes a cleanup log to 0:/sys/logs/. |
| Upgrade to 4.1.0 | Migration macro used during the firmware update. Converts settings from the old layout to the current one: moves user files to 0:/sys/user/, renames them, and recreates them with the saved values. |
Job End Behavior
Located in System > Settings > Job End/.
These macros configure what the printer does automatically after a print finishes.
| Macro | Options |
|---|---|
| Bed Position | Move bed to a custom Z height, lower to the bottom (Z = 420), or move up 50 mm (≈ 2 in.). |
| Bed Temperature | Set bed to 0 °C (off), hold at 110 °C, hold at 150 °C, or maintain the current temperature. |
| Chamber Temperature | Keep the current chamber temperature or turn off the chamber heater. |
| Power | Put the printer to sleep (auto shutdown) or stay idle. If sleep is selected, you can also configure the bed position. |
| Tools Unload | Always retract filament 150 mm (≈ 6 in.) at reduced temperature, keep filament loaded (minimal retraction), or retract once then auto-disable the feature. |
Network
Located in System > Settings > Network/.
| Macro | What it does |
|---|---|
| Connect to new WiFi network | WiFi setup wizard. Prompts for SSID and password, tests the connection, and saves if successful. The printer's WiFi module only supports 2.4 GHz networks. |
| Enable WiFi - Client Mode | Switches to WiFi client mode (connects to an existing WiFi network). Uses the last configured network credentials. |
| Enable WiFi - Access Point Mode | Switches to WiFi access point mode. The printer creates its own WiFi network that you connect to directly. Default password: 1234567890, default IP: 192.168.0.1. |
| Enable Ethernet Mode | Switches to Ethernet with three sub-modes: DHCP (automatic IP), static IP (you specify the address), or direct Ethernet-to-PC connection (default IP: 192.168.1.50). |
| Assign Static IP | Assigns a static IP address to the current network connection. Auto-detects whether the printer is on Ethernet or WiFi. Offers a test-before-save option. |
| Change Machine's Name | Sets a custom hostname for the printer (used for <name>.local mDNS access). Optionally updates the WiFi access point name to match. Requires a restart to take effect. |
| Reset Network Settings | Factory-resets all network settings. Erases all saved WiFi networks, clears subnet/gateway configuration, and reverts to WiFi access point mode with default settings. |
After changing network settings, the Web Interface connection will drop. You will need to reconnect to the printer using the new IP address or network. Write down the new address before confirming the change.
Printing
Located in System > Settings > Printing/.
| Macro | What it does |
|---|---|
| Wait for Chamber Temp | Enables or disables waiting for the chamber to reach the target temperature before starting a print. When enabled, the printer also heat-soaks the chamber after the target is reached - from a few seconds up to 5 minutes, depending on how cold the chamber was at the start. The soak is skipped entirely if the chamber started warm enough, or if you overrode the chamber wait with Start Now. |
| Wiping during the print | Configures periodic nozzle wiping during active prints. Options: every layer, every 2nd layer, every 5th layer, or custom interval. Useful for oozy materials like ULTEM, PEI (9085/1010), or PPSU. |
| Tool Change Retraction | Configures custom retraction and extrusion distances for tool changes on T0 and T1 separately. |
| Hepa Fan Adjustment | Sets the HEPA filter fan speed (0–100%; recommended 50–80%, factory preset ≈75%). The fan runs thermostatically when the chamber temperature is above 35 °C. |
| Event Logging | Enables or disables logging of printer events to the event log file. |
| Adjust Brush Position | Adjusts the Y-center position of the nozzle cleaning brush (range: -100 to -50 mm / ≈ -3.9 to -2.0 in., default: -62 mm / ≈ -2.4 in.). |
| Adjust Homing Position | Adjusts the homing Y-position for the X and U axes (range: 160–180 mm / ≈ 6.3–7.1 in., default: 172 mm / ≈ 6.8 in.). |
Troubleshooting Macros
Located in System > Troubleshooting/. These macros run diagnostic tests to help identify hardware problems.
| Macro | What it does |
|---|---|
| Endstops Test | Runs the endstop detection test 10 times in a row to check for intermittent endstop issues. |
| Heating Test | Comprehensive heating performance test. Choose to test both heaters, bed only, or chamber only. The macro logs all temperatures to CSV files in 0:/sys/logs/ every 10 seconds. Hold the X or U endstop to cancel. See Heater Fault at Print Start for details. |
| HEPA Fan Test | Automatically tests the HEPA fan at five speed stages and compares measured RPM to expected ranges. Writes hepa_fan_test_log.csv to 0:/sys/logs/. See HEPA Fan Test for details. |
| Voltage Test | Reads and displays the mainboard input voltage. Use this to verify the 24V power supply is delivering the correct voltage. |
| Z - Binding Test | Tests Z-axis movement for mechanical binding or excessive friction. Each leadscrew is tested individually. |
| Z - Homing Test | Runs Z-homing a specified number of times (default 10, max 1000) to test repeatability. Logs each attempt to the event log. |
| Z - Motion Test | Cycles the Z axis continuously between 10 mm and 420 mm to reveal intermittent Z motion problems. Hold the X or U endstop to stop the test. |
| Z - Probe Test | Tests the Z-probe pick, measure, and place cycle to verify probe reliability. |
Quality Control (QC) Macros
Located in System > Calibration > QC/.
QC macros are designed for factory testing during printer assembly. They run extended automated test sequences. You should not need these during normal use – the Troubleshooting macros above provide the same individual tests in a user-friendly format.
| Macro | What it does |
|---|---|
| Test 1 | Factory acceptance test suite 1: voltage check, LED test, heater test, fan test, motor direction test, Z-screw check, Z-binding test, endstop test (×10), homing test, probe test, and probe calibration. |
| Test 2 | Factory acceptance test suite 2: Y-axis endstop alignment, nozzle tightening and purge bucket adjustment, true bed leveling, Z-homing iteration test, and XY movement test. |
| Enable Probe / Disable Probe | Quick toggles for the Z-probe relay (same as the Z Probe folder versions). |
| Rotate Z - Probe to Default 0 Position | Rotates the probe servo to its default 170° position. |
The QC > Tests/ subfolder contains the individual factory test steps that Test 1 and Test 2 call: Bed & Chamber Heaters Test, Endstops Test x10, Fans & Heaters, Hepa Fan Test, HomeY, Homing, LED, Motion Accuracy, Motion Script, Motor Direction, Nozzle & Purge, Probe, TBL & Lube, Voltage, XY - Movement, Z - Binding, and Z screws fixing. For field diagnostics, use the user-friendly equivalents in the Troubleshooting folder instead.
The QC > AutoCal/ subfolder contains the individual calibration routines that the Auto Calibration master macro calls:
| Macro | What it does |
|---|---|
| Tool Height Auto Calibration | Measures and corrects the Z-height difference between Tool 0 and Tool 1. Uses three-point bed leveling, then probes nozzle touchdown positions for both tools. If the deviation exceeds tolerance, guides you through a physical heat break adjustment. |
| Z - Offset Calibration | Calibrates the Z-probe offset by comparing nozzle contact height to probe trigger height at the same point. Takes 3 probe measurements and averages them. |
| Mesh Bed calibration | Probes the left and right sides of the bed with both the Z-probe and nozzle contact, calculates the difference, and derives an X-axis mesh compensation value. |
| XY - Offset Calibration | Measures the XY offset between T0 and T1 by probing a reference hole from 4 directions with each tool nozzle. Two passes per direction for accuracy. |
| XY Auto Squaring | Probes 3 reference holes to measure axis scaling (steps/mm) and squareness angle. Calculates mechanical corrections with safety factor and deadband. Optionally writes corrected steps/mm values. |
User Configuration Files (0:/sys/user/)
The 0:/sys/user/ directory stores all user-specific settings and calibration results. Every time you change a setting through a macro – whether it is a PID tune, a network switch, a calibration, or a job-end preference – the macro writes the result to a small .g file inside this folder. On startup, the firmware reads these files and applies them automatically.
The folder is split into two subfolders:
- actions/ – ready-to-run G-code commands (for example, the
G31probe offset or anM570fault detection line) that the firmware executes on startup. - variables/ – global variables (
set global.* = ...) that macros read and display, such as the saved Z-offset or the HEPA fan preset.
The 0:/sys/user/ folder is not overwritten by firmware updates. This is what preserves your calibration data, network credentials, and custom settings across updates. Do not delete or rename files in this folder unless instructed by support.
The tables below list every file. The Default value column shows the factory setting that ships with a new printer.
actions/ – executable settings
| File | What it stores | Default value |
|---|---|---|
| BedFaultDetection.g | Bed heater fault detection parameters (M570 H2). Written by Bed Fault Detection. | Enabled (60 s period, 50 °C tolerance) |
| BedFinishBehavior.g | The bed temperature command (M140) to run after a print finishes. Written by Bed Temperature (Job End). | M140 S0 (bed off) |
| BedTempCalibration.g | Bed temperature sensor configuration (M308 S2) including thermistor type, beta value, and calibration coefficient. Written by Temp Sensor Tuning Bed. | (factory-calibrated) |
| ChamberFaultDetection.g | Chamber heater fault detection parameters (M570 H3). Written by Chamber Fault Detection. | Enabled (600 s period, 70 °C tolerance) |
| ChamberFinishBehavior.g | The chamber temperature command (M141) to run after a print finishes. Written by Chamber Temperature (Job End). | M141 S0 (chamber off) |
| ChamberTempSensor.g | Chamber air temperature sensor configuration (M308 S3). Written by Temp Sensor Tuning Chamber. | (factory-calibrated) |
| ChamberWait.g | The wait commands (M116) used when resuming a print – wait for the bed and, if active, the chamber. | Wait for bed and chamber |
| EventLogging.g | Whether event logging is enabled (M929). Written by Event Logging. | Enabled |
| FilamentSensor-0.g | Filament runout sensor configuration for Tool 0 (M591). Written by Sensor Mode Tool 0. | Enabled |
| FilamentSensor-1.g | Filament runout sensor configuration for Tool 1 (M591). Written by Sensor Mode Tool 1. | Enabled |
| LowerBed.g | The bed movement command to run after a print finishes. Written by Bed Position (Job End). | Move to Z = 420 mm (bottom) |
| NetworkMode.g | The active network mode: WiFi access point (M552 S2), WiFi client (M552 S1), or Ethernet. Written by the Network macros. | WiFi AP mode |
| PIDBedHead.g | PID parameters for the bed heater (M307 H2). Written by PID Tuning Bed Heater. | (factory-tuned) |
| PIDLeftHead.g | PID parameters for the left toolhead heater – T0 (M307 H0). Written by PID Tuning Hotend. | (factory-tuned) |
| PIDRightHead.g | PID parameters for the right toolhead heater – T1 (M307 H1). Written by PID Tuning Hotend. | (factory-tuned) |
| PowerEndBehavior.g | Post-print power behavior: stay idle or auto-sleep. Written by Power (Job End). | Stay idle |
| ProbeOffset.g | Z-probe trigger threshold, X/Y offset from nozzle, and trigger height (G31 command). Written by Z - Offset Calibration. | G31 P500 X0 Y28.50 Z... (Z varies per machine) |
| ResetZBabyStep.g | Stores any pending babystep correction that should be applied on next startup. Written by Save Current Z - Offset. | (no action) |
| RetractFinishBehavior.g | Filament retraction mode after a print finishes. Written by Tools Unload (Job End). | Skip extended retract |
| StepsCalibration.g | The M92 command with the current steps/mm values for all axes. Overwritten by Auto Calibration when steps/mm calibration is enabled. | 80 steps/mm for X, Y, U; 400 for Z and E |
| ToolOffset.g | The combined T1 tool offset in U and Y axes (G10 P1 U... Y...). Written by XY - Offset Calibration and the Live XY Offset Adjustment macros. | (set during calibration) |
| WiFiPass.g | The saved WiFi network credentials (M587 – SSID and password) used in WiFi client mode. Written by Connect to new WiFi network. | (set when you connect to a network) |
variables/ – global variables
| File | What it stores | Default value |
|---|---|---|
| APName.g | The printer's hostname and WiFi access point name (used for <name>.local mDNS access and the AP SSID). Written by Change Machine's Name. | 22 IDEX |
| BrushYPosition.g | Custom Y-center position of the nozzle cleaning brush. Written by Adjust Brush Position. | (null – built-in default) |
| ChamberWait.g | Whether the printer waits for the chamber to reach the target temperature before starting a print. Written by Wait for Chamber Temp. | Enabled |
| FilamentBackup.g | Whether the 2nd-tool backup feature is enabled (Tool 1 takes over when Tool 0 runs out). Written by 2nd Tool Backup. | Disabled (false) |
| HeaterFaultTimer.g | Auto-shutdown delay after a heater fault, in seconds (-1 = auto-shutdown disabled). Written by Action After Heater Fault. | Auto-shutdown disabled (-1) |
| HepaFan.g | HEPA filter fan preset speed (0–255 internal scale, where 255 = 100%). Written by Hepa Fan Adjustment. | 191 (≈ 75%) |
| HomeXUPosition.g | Custom homing Y-position for the X and U axes. Written by Adjust Homing Position. | (null – built-in default) |
| PeriodicWiping.g | Periodic nozzle wiping interval during printing. Written by Wiping during the print. | Disabled (0) |
| PickUpAngle.g | The servo angle used when picking up the Z-probe from its holder. Written by Probe Calibration. | 170° |
| PickUpPosition.g | The X-axis position of the probe holder. Written by Probe Calibration. | 96.700 mm |
| PickUpPositionY.g | The Y-axis position of the probe pickup. Written by Probe Calibration. | (null – built-in default) |
| StepsCalibration.g | Whether automatic steps/mm calibration is enabled (true/false). Written by Steps per mm Mode. | Disabled (false) |
| Tool-0-Retract.g / Tool-1-Retract.g | Custom retraction distance and speed for Tool 0 / Tool 1 during tool changes. Written by Tool Change Retraction. | -5 mm at F3000 |
| Tool-0-Extrude.g / Tool-1-Extrude.g | Custom extrusion (prime) distance and speed for Tool 0 / Tool 1 after a tool change. Written by Tool Change Retraction. | 10 mm at F9000 |
| Tool-1-ZOffset.g | The height difference between Tool 0 and Tool 1 nozzles. Written by Tool Height Auto Calibration. | 0.0 |
| UOffset.g | The U-axis component of the T1 offset (for display and manual adjustment). | (set during calibration) |
| XCompMode.g | Mesh compensation mode: "auto" (measured by the probe) or "manual" (set by the user). | manual |
| XCompAuto.g | The mesh compensation value measured automatically during Auto Calibration. | 0.0 |
| XCompManual.g | The mesh compensation value set manually via the Mesh Calibration macros. | 0.0 |
| XySquareMode.g | XY squaring mode: "auto" (measured by the probe) or "manual" (set by the user). | manual |
| XySquareAuto.g | The squaring offset measured automatically during Auto Calibration. | 0.0 |
| XySquareManual.g | The squaring offset set manually via the XY Squaring macros. | 0.0 |
| YComp.g | Y-axis bed compensation (rear of the build plate). Written by the Beta Rear ↑ Up / Rear ↓ Down macros. | (null – no compensation) |
| YOffset.g | The Y-axis component of the T1 offset (for display and manual adjustment). | (set during calibration) |
| ZOffset.g | The master Z-offset – the distance between the probe trigger point and the nozzle tip. Written by Z - Offset Calibration and Save Current Z - Offset. | (set during calibration) |
If the printer starts behaving unexpectedly after many setting changes, you can ask Vision Miner support for a fresh set of default 0:/sys/user/ files to restore factory settings without a full firmware reinstall.
FAQ
Support
If you could not find an answer here, reach out to our support team.