¶ Brief Overview
This guide details the methods for loading and unloading filament into the Vision Miner 22IDEX, covering both automatic and manual procedures. Correct filament handling is crucial for successful prints and preventing damage to the extruder mechanism.
¶ Introduction
Properly loading filament ensures a consistent feed to the hotend, while correct unloading prevents clogs and damage. This guide covers the standard procedures using the built-in features and the web interface. Prerequisites include having the correct filament type for your print and ensuring the printer is powered on and connected to the network for web interface access.
¶ Tools & Materials
- Filament Spool (correct material type for your print)
- Flush Cutters (for cutting filament)
- Heat-Resistant Gloves (optional, for safety)
¶ Safety & Pre-checks
- Extruder Lever Position: Before loading or unloading, ensure the Extruder Gear Lever for the relevant toolhead is set to position
2. For details, refer to the Extruder Gear Lever Manual. - Filament Path: Ensure the filament path from the spool to the inlet is clear and unobstructed.
- Hot Surfaces: Be aware that the nozzle and potentially surrounding areas will be hot during these procedures.
Warning: Use caution when working near the extruder and nozzle, as they reach high temperatures.
¶ Step-by-Step Instructions
¶ 1. Automatic Method
¶ 1.1 Loading Filament
Tip: Before loading or unloading the filament, it's helpful to check the lever position on the used extruder. Refer to the Extruder Lever Manual.
- Place Spool: Position the filament spool onto the holder inside the chamber. Ensure the filament feeds from the bottom of the spool towards the filament inlet, preventing sharp bends or tangles.
- Access Web Interface: Open the printer's Web Interface and navigate to the Dashboard.
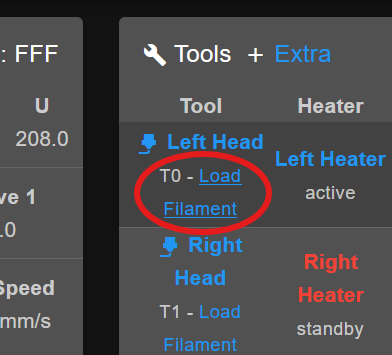
- Initiate Load: Click Load Filament for the desired tool (Tool 0 for Left, Tool 1 for Right).
- Select Material: Choose the corresponding material type from the prompt that appears. The printer will home if it hasn't already.
- Prepare Filament: Cut the end of the filament at a sharp 45-degree angle using flush cutters. This creates a point for easier insertion.
- Insert Filament: Guide the cut end of the filament into the corresponding filament inlet tube for the selected tool.
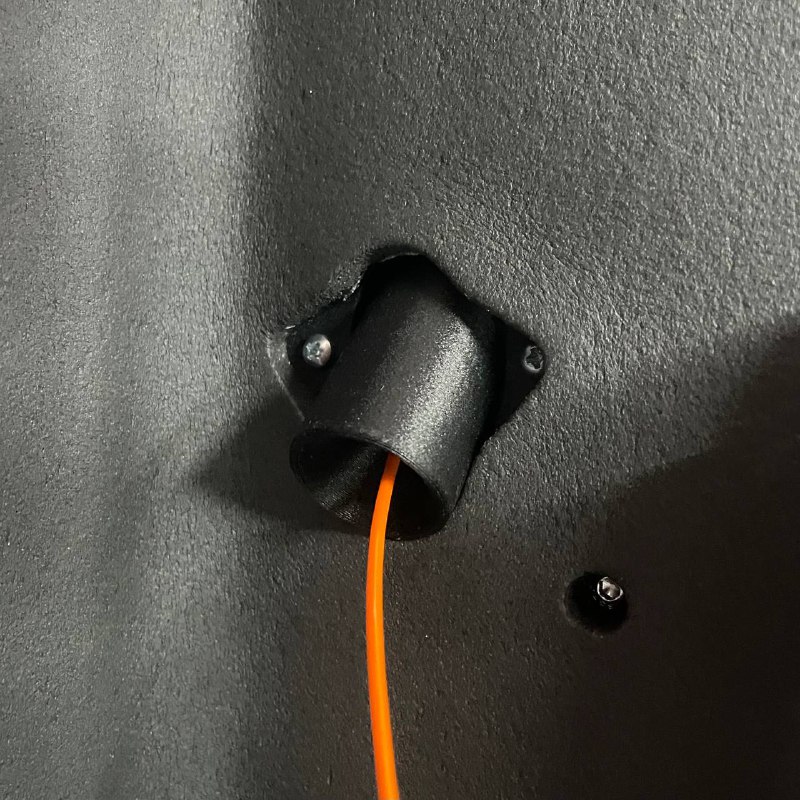
- Feed to Gears: Gently push the filament until you feel resistance, indicating it has reached the extruder drive gears.
- Engage Extruder: Click Extrude in the Web Interface prompt. The machine will begin automatically pulling the filament through the extruder and towards the hotend.
- Check Extrusion: The interface will ask if you want to extrude more filament.
- If the new filament color/type is not yet visibly extruding from the nozzle, select Extrude more.
- Once you see the new filament consistently extruding, confirm by selecting Yes, filament is extruding.
- If filament doesn't feed: If you click Extrude more multiple times and don't feel the gears grabbing the filament, proceed to the troubleshooting step: Filament Won't Engage with Gears.
¶ 1.2 Unloading Filament
- Access Web Interface: Navigate to the Dashboard in the Web Interface.
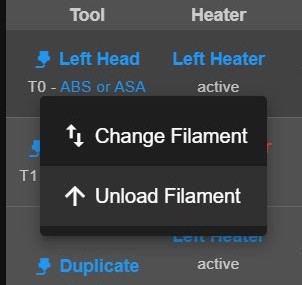
- Initiate Unload: Select Unload Filament for the corresponding tool.
- Automatic Retraction: The printer will automatically preheat the nozzle to the appropriate temperature and retract the filament out of the hotend and extruder.
- Remove Spool: Wait for the machine to signal completion (often via a prompt in the Web Interface). Gently pull the filament fully out of the guide tube.
Important: As the filament is retracted, hold the loose end and guide it back onto the spool, securing it to prevent tangling. Remove the spool from the chamber.
¶ 2. Manual Method
¶ 2.1 Loading Filament
- Place Spool: Position the filament spool onto the holder inside the chamber, ensuring filament feeds from the bottom towards the inlet.
- Activate Tool: In the Web Interface Dashboard, pre-activate the tool you intend to load (T0 for Left, T1 for Right). The selected tool's status area will highlight, and the heater state will show as active.
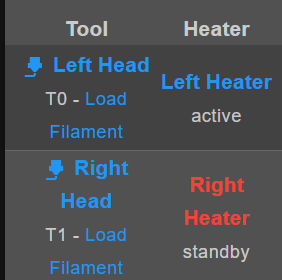
- Set Temperature: In the tool's status area, enter the appropriate printing temperature for your filament (refer to manufacturer recommendations) and click Set, or select a pre-defined material. Wait for the nozzle to reach the target temperature.
- Prepare Filament: Cut the end of the filament at a sharp 45-degree angle.
- Feed Filament: Insert the cut end into the corresponding filament inlet tube until it stops, indicating it has reached the extruder gears.
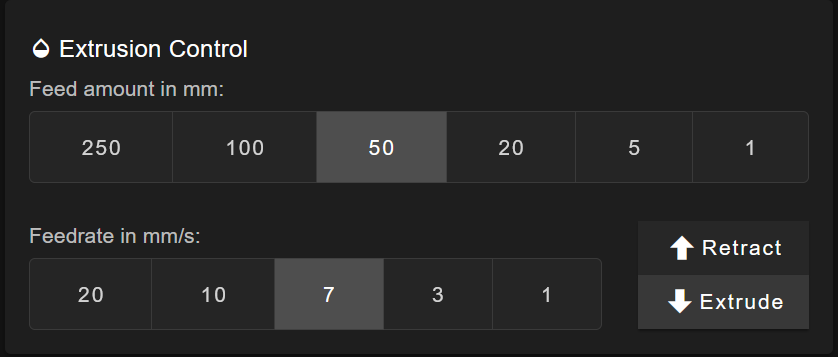
- Extrude Filament: Scroll down to the Extrusion Control section in the Dashboard.
- Set Amount (mm) to
50. - Set Feedrate (mm/min) equivalent to
7 mm/s(which is420 mm/min). - Gently push the filament while simultaneously clicking the Extrude button.
- Set Amount (mm) to
- Confirm Extrusion: Continue clicking Extrude until you see filament consistently extruding from the nozzle. Ensure the extruder gears are gripping and pulling the filament smoothly.
Tip: If you repeatedly click Extrude but don't feel the gears grabbing the filament, see the troubleshooting step: Filament Won't Engage with Gears.
¶ 2.2 Retracting Filament (Manual Unload)
- Preheat Nozzle: Activate the correct tool and set the temperature.
Tip: For retraction, set the temperature slightly lower than the printing temperature but high enough for the filament to soften (e.g., if printing Nylon at
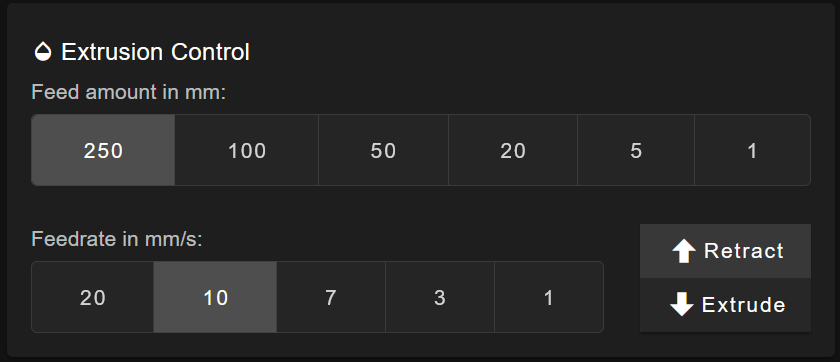
300°C, retract at250°C). This helps prevent molten plastic from fouling the cold-end drive mechanism. - Retract Filament: In the Extrusion Control section:
- Set Amount (mm) to
250(or more if needed to clear the tube). - Set Feedrate (mm/min) equivalent to
10 mm/s(which is600 mm/min). - Click the Retract button. Repeat if necessary.
- Set Amount (mm) to
- Remove Filament: Once the filament is fully retracted past the extruder gears, gently pull it completely out of the guide tube.
Important: As the filament is removed, hold the loose end and guide it back onto the spool, securing it to prevent tangling. Remove the spool from the chamber.
¶ Troubleshooting & FAQs
- Filament Won't Feed Into Extruder:
- Ensure the filament end is cut cleanly at a 45-degree angle.
- Check that the Extruder Gear Lever is correctly set to position
2. - Ensure there are no obstructions or old filament pieces in the path.
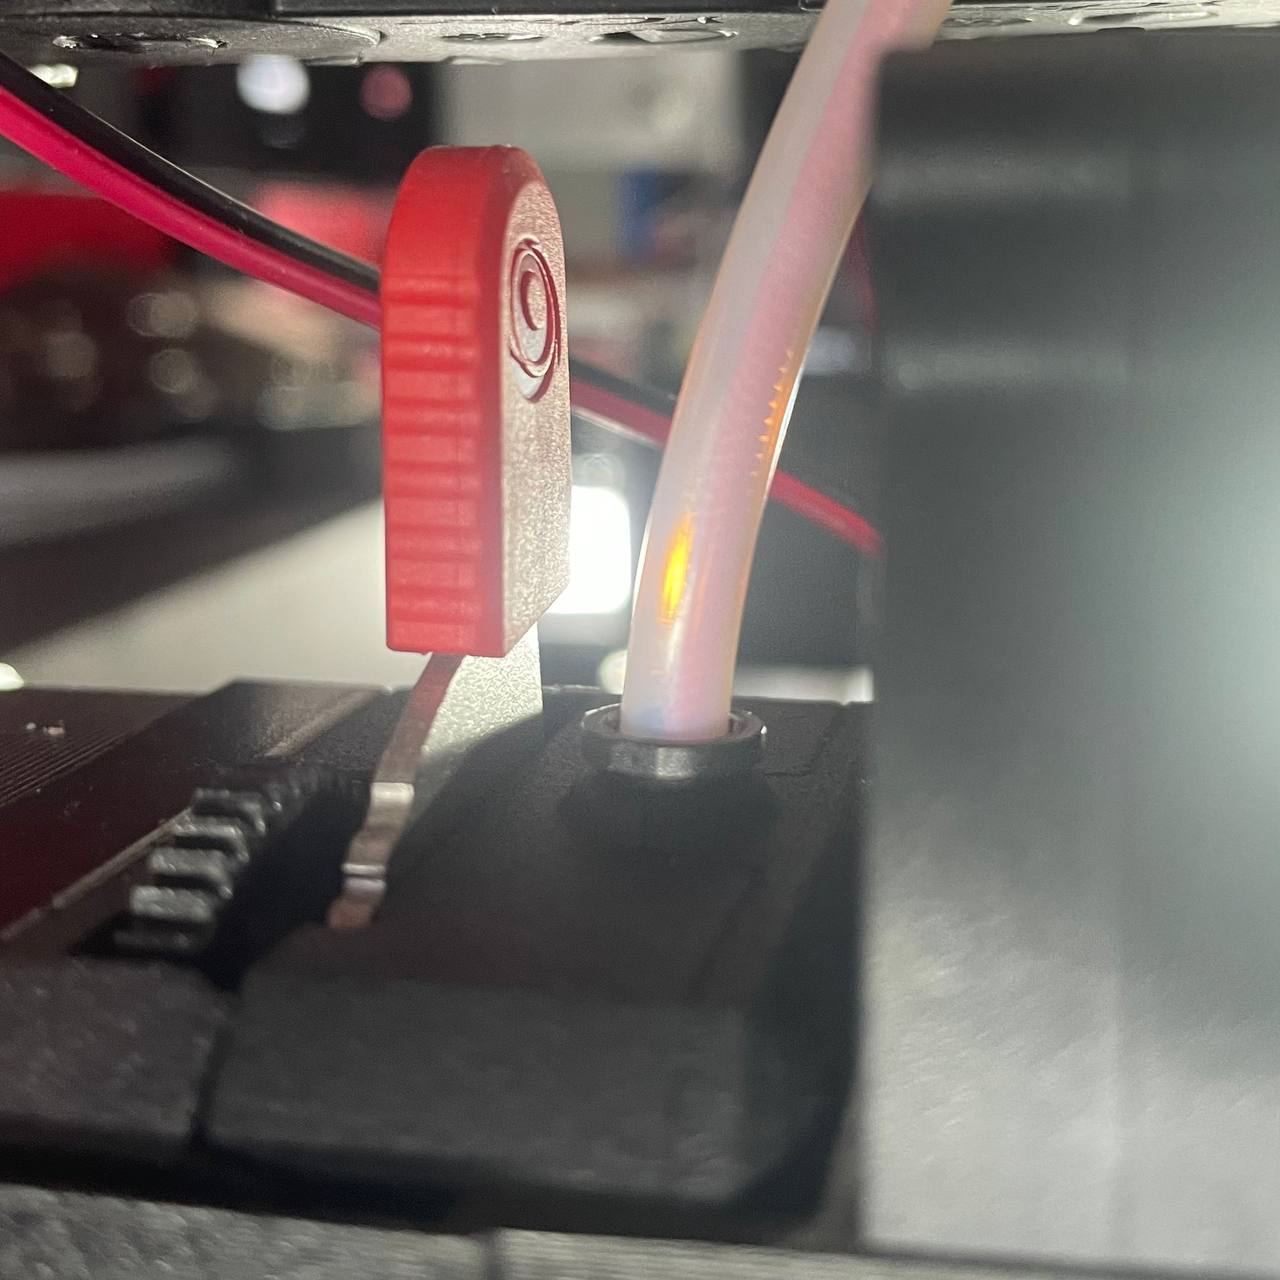
- If the filament stops just before the gears, you may need to carefully adjust the PTFE guide tube leading into the extruder.
Warning: The extruder area can be hot. Use caution or wear heat-resistant gloves if reaching inside. Reach inside the chamber and gently wiggle the white PTFE tube where it enters the extruder body. Ensure it is fully seated and perpendicular to the extruder inlet. Try feeding the filament again while gently adjusting the tube.
- Filament Won't Engage with Gears (Automatic or Manual Load):
- This often happens if the filament tip doesn't perfectly align with the extruder gear inlet.
- Procedure: While clicking Extrude (either in the Automatic Load prompt or the Manual Control section), use one hand to gently push the filament into the inlet. With your other hand, carefully reach inside the chamber and wiggle the white PTFE tube right where it enters the top of the extruder body. Ensure the tube is straight and perpendicular to the extruder entry point. This combined action often helps guide the filament tip correctly into the gears.
Warning: Be mindful of hot components when reaching inside the chamber.
- Filament Gets Stuck During Unload:
- The nozzle temperature might be too low, or too high causing a bulge at the tip. Try adjusting the temperature slightly (+/- 10°C) and attempting retraction again.
- If severely stuck, you may need to manually heat the nozzle, release the extruder tension lever, and carefully pull the filament out. Refer to the Extruder Gear Lever Manual.
- Filament Tangled on Spool:
- Always secure the loose end of the filament to the spool immediately after unloading or when storing it. Use the provided holes or clips on the spool rim. Never let the end loose, as this is how tangles often start.
¶ Conclusion & Additional Resources
Following these procedures ensures reliable filament management. Always remember to handle filament carefully to prevent tangles and ensure it is stored correctly in a dry environment when not in use.
- Using Spools Outside the Chamber: For specific needs like using oversized spools or materials sensitive to the chamber heat, refer to the dedicated guide: External Spool Holder Setup
- Cold Pull Procedure: To effectively clear residual material when changing between filament types with significantly different temperature requirements (e.g., switching from a high-temp to a low-temp material or vice versa), use the Cold Pull macro, see below.
¶ ColdPull Procedure
When switching between materials with significantly different printing temperatures (e.g., switching from a high-temp material like PEEK to a lower-temp material like PLA, or vice versa), simply loading the new filament may not be sufficient. Residual high-temperature material can solidify at the lower temperature, causing a blockage. The ColdPull procedure is designed to remove most of this residual material from the nozzle.
¶ What is ColdPull?
ColdPull involves heating the nozzle, extruding a small amount of the current material to ensure the nozzle cavity is full, then carefully cooling the nozzle while slowly extruding. This process aims to solidify the filament inside the nozzle, capturing any residue. The temperature is then briefly raised just below the melting point, and the firmware rapidly retracts the filament, ideally pulling out a clean cast of the nozzle's interior along with trapped contaminants.
¶ Steps for ColdPull Procedure (Experimental)
- Activate ColdPull Macro:
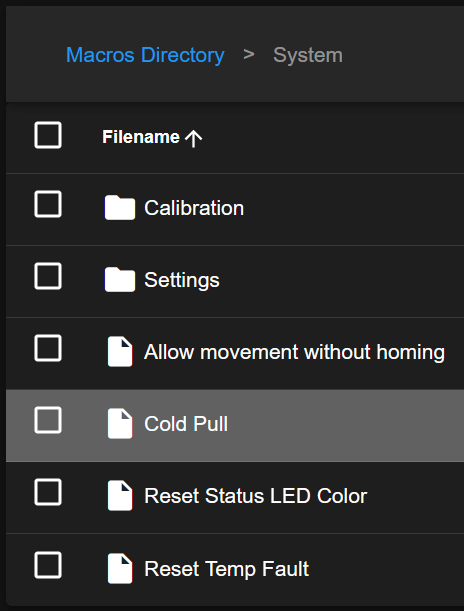
- In the Web Interface Dashboard, navigate to Macros -> System (or similar path).
- Select the ColdPull macro.
- Set Material Temperature:
- The system will prompt you to enter the current printing temperature of the material loaded in the nozzle.
- Enter this value accurately. This temperature is used initially to ensure the filament flows and properly fills the nozzle cavity before cooling.
- Automatic Process:
- The printer will execute the ColdPull sequence automatically:
- Heat nozzle to the specified temperature and extrude slightly.
- Cool down the nozzle while extruding slowly to solidify the filament.
- Lower temperature further below the melting point.
- Reheat to just below the melting point.
- Perform rapid, pulsed retractions to pull the filament out.
- Monitor the process via the Web Interface console.
- The printer will execute the ColdPull sequence automatically:
- Inspect Filament Tip:
- Once the filament is retracted, carefully remove it from the printer.
- Examine the tip. A successful Cold Pull will show a clean impression of the nozzle's internal cavity, often with the previous material's residue embedded at the very end. Repeat if necessary.