¶ Brief Overview
This guide helps diagnose and resolve common issues affecting the Z-axis movement on your Vision Miner 22 IDEX printer. Properly functioning Z-axis motors are crucial for accurate layer height and successful prints.
¶ Introduction
Z-axis problems can manifest as motors failing to move, grinding noises, or binding at certain heights. These issues can stem from mechanical misalignment, electrical faults, or physical obstructions. This guide categorizes common problems and provides step-by-step diagnostic approaches, including necessary safety precautions.
¶ Tools & Materials
- 2mm Hex Wrench/Screwdriver (for motor mounting screws)
- Isopropyl Alcohol (IPA) (for cleaning)
- Clean Towel/Rag (for cleaning)
- Lubricant (e.g., Super Lube, white lithium grease)
- Computer (with access to the 22 IDEX Web Interface)
¶ Safety & Pre-checks
- Power Off: Always disconnect the printer from power before inspecting or adjusting wiring or electrical components.
Warning: Working on electrical components with the power on can cause severe damage to the printer's electronics and poses a risk of electric shock.
- Hot Components: Be aware that the nozzle and bed can remain hot long after operation. Allow components to cool completely before touching them.
- Web Interface Access: Ensure you can access the printer's Duet Web Interface for controlling motor movements and checking console messages.
¶ Step-by-Step Instructions
¶ Categories of Z-Axis Motion Problems
- One or More Z-Motors Are Not Moving with Grinding Sound
- One or More Z-Motors Are Not Moving with NO Grinding Sound
- Z-Motors Bind at a Specific Height or Due to Physical Obstruction
¶ 1. One or More Z-Motors Are Not Moving with Grinding Sound
Symptoms: One or more Z-Motors attempt to move but appear stuck, accompanied by a distinct grinding or buzzing sound from the affected motor(s). This often occurs when the motor is at its lowest physical limit.
Diagnosis:
- Navigate to the
Dashboardtab in the Duet Web Interface. - If homing is required before movement, go to the
Macrossection at the right side, choose theSystemfolder and run theAllow Movement Without Homingmacro.
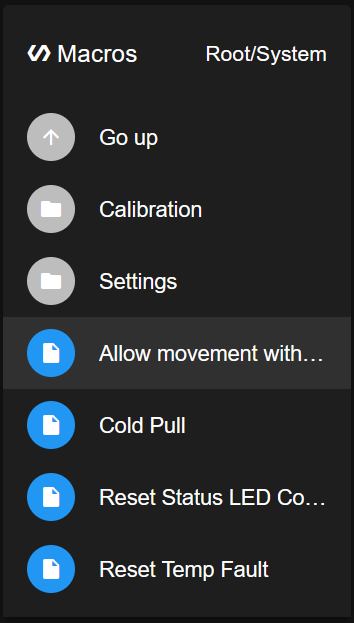
- Use the Jog buttons in the
Machine Movementsection to attempt moving the Z-axis up (Z- button).
If one or more motors produce a grinding sound and fail to move smoothly, especially from the bottom:
- This indicates the motor is receiving power but is physically prevented from turning, typically due to mechanical misalignment. The motor is essentially "stuck" and fighting against the bind.
- This situation requires Z-Motor alignment. Please follow the detailed instructions in the official Z-Motor Alignment Guide. Do not proceed with other troubleshooting steps until alignment is confirmed or ruled out.
¶ 2. One or More Z-Motors Are Not Moving with NO Grinding Sound
Symptoms: One or more Z-Motors fail to move when commanded via the web interface, but there is no grinding sound. The motor might be completely still or vibrate faintly without rotating.
Diagnosis:
- Navigate to the
Dashboardtab in the Duet Web Interface. - If homing is required before movement, go to the
Macrossection at the right side, choose theSystemfolder and run theAllow Movement Without Homingmacro.
- Use the Jog buttons (Z+ / Z-) to attempt moving the Z-axis. Observe which motor(s) are not responding.
If one or more motors are not moving and produce NO grinding sound:
- This strongly suggests the motor is not receiving power or command signals correctly. The issue is likely electrical, involving wiring, connections, the motor driver, or the motor itself.
Troubleshooting Steps:
Critical Warning: NEVER disconnect or reconnect motor wires while the machine is powered ON. Doing so can instantly and permanently damage the stepper drivers on the control board(s). Always power off the machine and disconnect the main power cable before touching any wiring.
- Check Console for Errors:
- Navigate to the
Consoletab in the Duet Web Interface. - Look for any error or warning messages related to motor drivers (especially drivers 1.0, 1.1, 1.2 for Z-motors) or movement, particularly messages appearing when you try to move the Z-axis (e.g., "Error: short-to-ground...", "motor phase A/B may be disconnected..."). Note any specific driver numbers mentioned.
- Navigate to the
- Inspect Basic Connections (Power OFF):
- Ensure the printer is powered OFF and unplugged.
- Carefully inspect the wiring connection at the non-functional motor. Ensure the plug is fully seated.
- Trace the wire back to the control board or expansion board. Ensure the connection is secure there. Check for visible damage (pinching, fraying). Consult the Wiring Schematic.
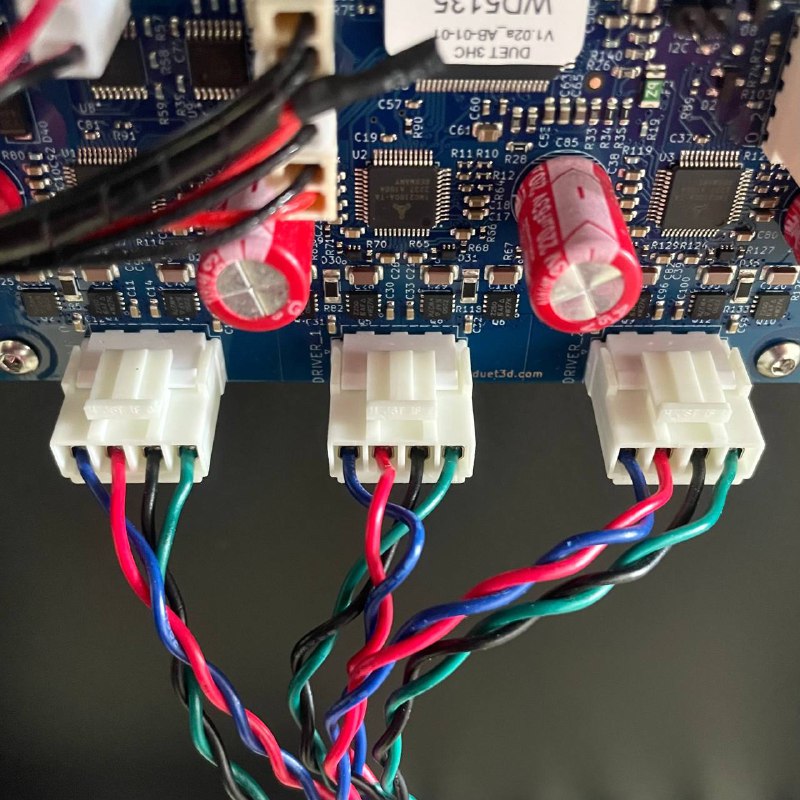
- Inspect the communication cable(s) connecting the main control board (Duet) and any expansion boards handling Z-motors. Ensure these are securely and firmly attached at both ends.
- Check Expansion Board Power LED (Power OFF then ON briefly):
- If your Z-motors connect to an expansion board, power off the printer. Locate the expansion board.
- Power the printer ON briefly and observe the status LEDs on the expansion board. Confirm if the LED indicating
24Vinput power is illuminated. Power OFF again immediately after checking. If the24VLED is off, it indicates a power supply issue to the board.
- Swap Motor Connections (Power OFF):
- To determine if the issue is the motor or the driver/wiring:
- Power OFF the printer and disconnect the power cable.
- Identify the connector for the non-working Z-motor (e.g., Z1) and a known working Z-motor (e.g., Z0) on the control/expansion board.
- Swap these two connectors at the board. (Plug the wire from Z1 motor into the Z0 driver port, and the Z0 motor wire into the Z1 driver port).
- Power the printer back ON. Use the web interface to command Z movement again.
- If the same motor still doesn't work (even when plugged into a different driver): The motor itself is likely faulty.
- If the problem moves to the other motor (the previously working one now doesn't move): The issue lies with the original driver port or the wiring leading to it.
- Power OFF the printer and restore the original wiring connections after testing.
- To determine if the issue is the motor or the driver/wiring:
- Check Fuses (Power OFF):
- Inspect the fuses on the control board(s), particularly any related to motor power. Refer to the Fuse Inspection Guide.
Note: A blown fuse often indicates an underlying electrical short that needs to be identified and fixed before replacing the fuse.
If the problem persists after these electrical checks:
- The issue likely involves a faulty motor driver on the board or the motor itself.
- Contact support at support@visionminer.com with detailed descriptions of the symptoms, the steps you've taken, any console warnings, and the results of the connection swapping test.
¶ 3. Z-Motors Bind at a Specific Height or Due to Physical Obstruction
Symptoms: The Z-axis moves smoothly for part of its travel but binds, stutters, becomes difficult to move, or skips steps at a specific height or range of heights. This may cause the build plate to become tilted. This can also manifest as the build plate making contact with other parts of the printer unexpectedly.
Diagnosis:
- Use the Jog controls (Z+ / Z-) in the web interface to move the build plate slowly up and down through its full range of motion. Pinpoint the exact height where the binding or unusual contact occurs.
- Visually Inspect for Obstructions:
- Debris: Carefully inspect the Z-axis lead screws and linear rails, especially around the height where binding occurs. Look for any accumulated dust, filament strands, plastic debris, or foreign objects.
- Collision: Check for physical interference:
- Is the build plate or any attached component hitting the spool holders at the rear, particularly near the top of travel?
- Is any part of the Z-axis assembly making contact with frame components, wiring, or other parts it shouldn't?
Solution:
- Address Physical Obstructions/Collisions:
- If you find debris: Power OFF the printer. Clean the lead screws and rails thoroughly using a clean rag and isopropyl alcohol (IPA).
- If collision is identified (e.g., hitting spool holders): Verify correct assembly and mounting of all components. If parts seem misaligned or incorrectly installed, or if the cause isn't obvious, please Contact Vision Miner Support for guidance. Do not force movement.
- Clean and Lubricate (If no obvious collision/debris, or after cleaning):
- Power OFF the printer.
- Clean the Z-axis lead screws with IPA and a rag.
- Wipe down the linear rails.
- Apply a small amount of fresh lubricant (e.g., Super Lube, white lithium grease) evenly along the lead screws.
- Apply a thin film of lubricant to the linear rails.
- Power ON and use Jog controls to move the Z-axis up and down several times to distribute lubricant. Wipe away excess.
If binding persists after cleaning, lubrication, and checking for obvious obstructions:
- There might be a more subtle mechanical issue (e.g., bent lead screw, damaged bearing) or potentially an intermittent electrical problem.
- Please Contact Vision Miner Support with details about the binding location and the steps you've already taken.
¶ Conclusion & Additional Resources
By systematically working through these categories and steps, you should be able to identify and resolve most Z-axis motion problems on your 22 IDEX. Remember that careful observation, adherence to safety precautions (especially powering off before handling wiring), and methodical checks are key.
If issues persist after following this guide, provide detailed information about the symptoms, steps taken, results of tests (like wire swaps), and any console messages when contacting support.