Pre-Print Checklist
Run through every pre-print step: dry filament, clean and coat the plate, heat soak 15 minutes, check the toolhead assignment and watch the first layer.
Pre-Print Checklist covers essential steps before starting a print on the Vision Miner 22IDEX V4. Proper preparation increases print success rate: file optimization, machine readiness, material handling, slicer configuration, and initial monitoring. Following this checklist minimizes print failures and ensures reliable operation.
Before you begin - safety and risk
Read the Safety - Before You Begin article before working on your printer. It covers electrical hazards, hot surfaces, moving parts, and other risks that could cause injury or equipment damage.
High-temperature materials and moisture
Hygroscopic materials: High-temperature filaments reabsorb moisture quickly (sometimes within 10 minutes) after drying if exposed to ambient air. Print immediately after drying or store in sealed container with desiccant.
Tools and Materials
- Computer with slicing software installed
- 3D model file (STL, OBJ, or STEP format)
- Vision Miner 22IDEX V4 printer
- Filament (appropriate type for print job)
- Vacuum chamber (as needed for material drying)
- Build plate adhesive (e.g., Nano Polymer Adhesive)
- Cleaning supplies (isopropyl alcohol, lint-free cloths)
1. File Preparation
- Verify file format: Ensure 3D model is in compatible format (STL, OBJ, or STEP). Check file for errors or non-manifold geometry using appropriate software tools.
- Optimize design: Make necessary modifications to enhance printability. Consider minimizing overhangs, reducing support structures, and ensuring wall thicknesses are appropriate for chosen nozzle size.
- Orient for strength: Analyze intended mechanical loads on final part. Orient model in slicer to ensure layer lines run optimally for strength and durability based on these forces.
2. Filament Preparation
- Dry filament: Consult the Filament Drying Times and Guide for your specific material. Plan sufficient drying time before your print.
Always dry high-performance filaments
Always dry high-performance filaments thoroughly, even if new. Moisture is primary cause of print defects.
- Load filament: Follow procedure in Filament Loading Guide. Ensure filament feeds smoothly and extrudes cleanly from nozzle without signs of moisture (popping sounds, bubbles, excessive oozing).
3. Machine Preparation
-
Maintenance check: Perform visual inspection and confirm all routine maintenance is complete according to Maintenance Schedule. Address any outstanding lubrication, calibration, or cleaning tasks.
-
Firmware check: Verify printer is operating on latest recommended firmware version. Update if necessary.
-
Nozzle check: Before a long print, verify the nozzle is clean, with no buildup or signs of partial clogging. This is especially important for multi-day jobs with filled materials (carbon-filled, glass-filled) and high-temperature plastics.
A partially clogged nozzle can gradually stop extruding partway through: the printer keeps going through the motions while nothing comes out ("air printing").
Quick test: heat the nozzle and extrude some filament in mid-air. The strand should come out smooth and bubble-free, hanging straight down without curling hard to one side.
If the strand curls, sputters, or extrusion feels strained, clean the nozzle before starting: see the Nozzle Torch Cleaning Guide and the Unclogging Guide.
- Build plate preparation: Clean build plate surface thoroughly. Always apply Nano Polymer Adhesive (NPA), regardless of the material you are printing - including PLA. Follow the instructions in Build Plate Adhesion Guide.
- Preheat and heat soak: Preheat nozzle, bed, and chamber (if used) to target printing temperatures specified in slicer profile. Once target temperatures reached, allow printer to "heat soak" for at least 15 minutes before starting print. This stabilizes temperatures throughout system, especially crucial for heated chamber, ensuring consistent material behavior from start.
4. Slicer Configuration
- Update software and profiles: Ensure you are using latest version of chosen slicer software (e.g., PrusaSlicer, Cura) and have downloaded most recent Vision Miner machine and filament profiles for 22IDEX V4. Consult Slicer Settings Guide for detailed information.
Comprehensive slicer resource
Slicer Settings Guide is a comprehensive resource covering profile optimization, physics, and troubleshooting. A highly recommended reading.
- Load model: Import prepared 3D model file into slicer. In PrusaSlicer, drag and drop the STL onto the build plate, or use File → Import → Import STL. If the plate on screen says Original Prusa instead of 22 IDEX, the slicer is still on a Prusa preset; fix the Printer dropdown in the next step and the plate changes.
- Select profiles: Choose appropriate machine, print, and filament profiles for your job. Use high-temperature profiles for advanced materials (generally above CF-Nylon). In PrusaSlicer these are the three dropdowns in the right-hand panel, top to bottom:
| Dropdown | What to pick |
|---|---|
| Print settings | A 22 IDEX print profile, for example 22 IDEX Standard. |
| Filament | The material you loaded. The upper slot is the left toolhead (T0), the lower slot is the right toolhead (T1). |
| Printer | The physical printer created during Slicer Setup, under Physical printers, for example 22 IDEX Standard Mode 0.40 nozzle. The mode (Standard, Mirror, Duplicate) and nozzle size must match the machine. |
Check you assigned the right toolhead
On a dual-toolhead machine this is the single most common slicing mistake. Before you slice, confirm two things: that the model is assigned to the toolhead that actually has filament loaded (left or right), and that the filament profile on that toolhead matches the material you physically loaded into it.
If you only ever print from one toolhead this rarely bites you. As soon as you start using both, it is easy to send the job to the empty one, or to print a high-temperature material with the profile of whatever was loaded last.
- Slice and preview: Slice model. Carefully examine layer-by-layer preview, paying close attention to:
- Gaps: Ensure no unintended gaps between lines or in thin walls.
- Connectivity: Verify all parts of model are connected properly on each layer.
- Feature Size: Confirm small features are adequately resolved by chosen nozzle diameter and layer height.
- Add supports: Generate support structures where necessary for overhangs and complex geometries. Optimize support settings for reliable printing and easier removal.
- Adjust settings: Fine-tune print settings (speeds, infill, layer height) based on material requirements and part geometry. Consider adding adhesion aids like brims or mouse ears if printing materials prone to warping.
5. Start and Monitor
- Final readiness check:
- Confirm printer has reached and maintained target temperatures (nozzle, bed, chamber) after heat soak period.
- Ensure filament is loaded correctly, nozzles are clean, and initial extrusion is consistent. Re-check for any signs of wet filament (bubbles, steam, excessive oozing).
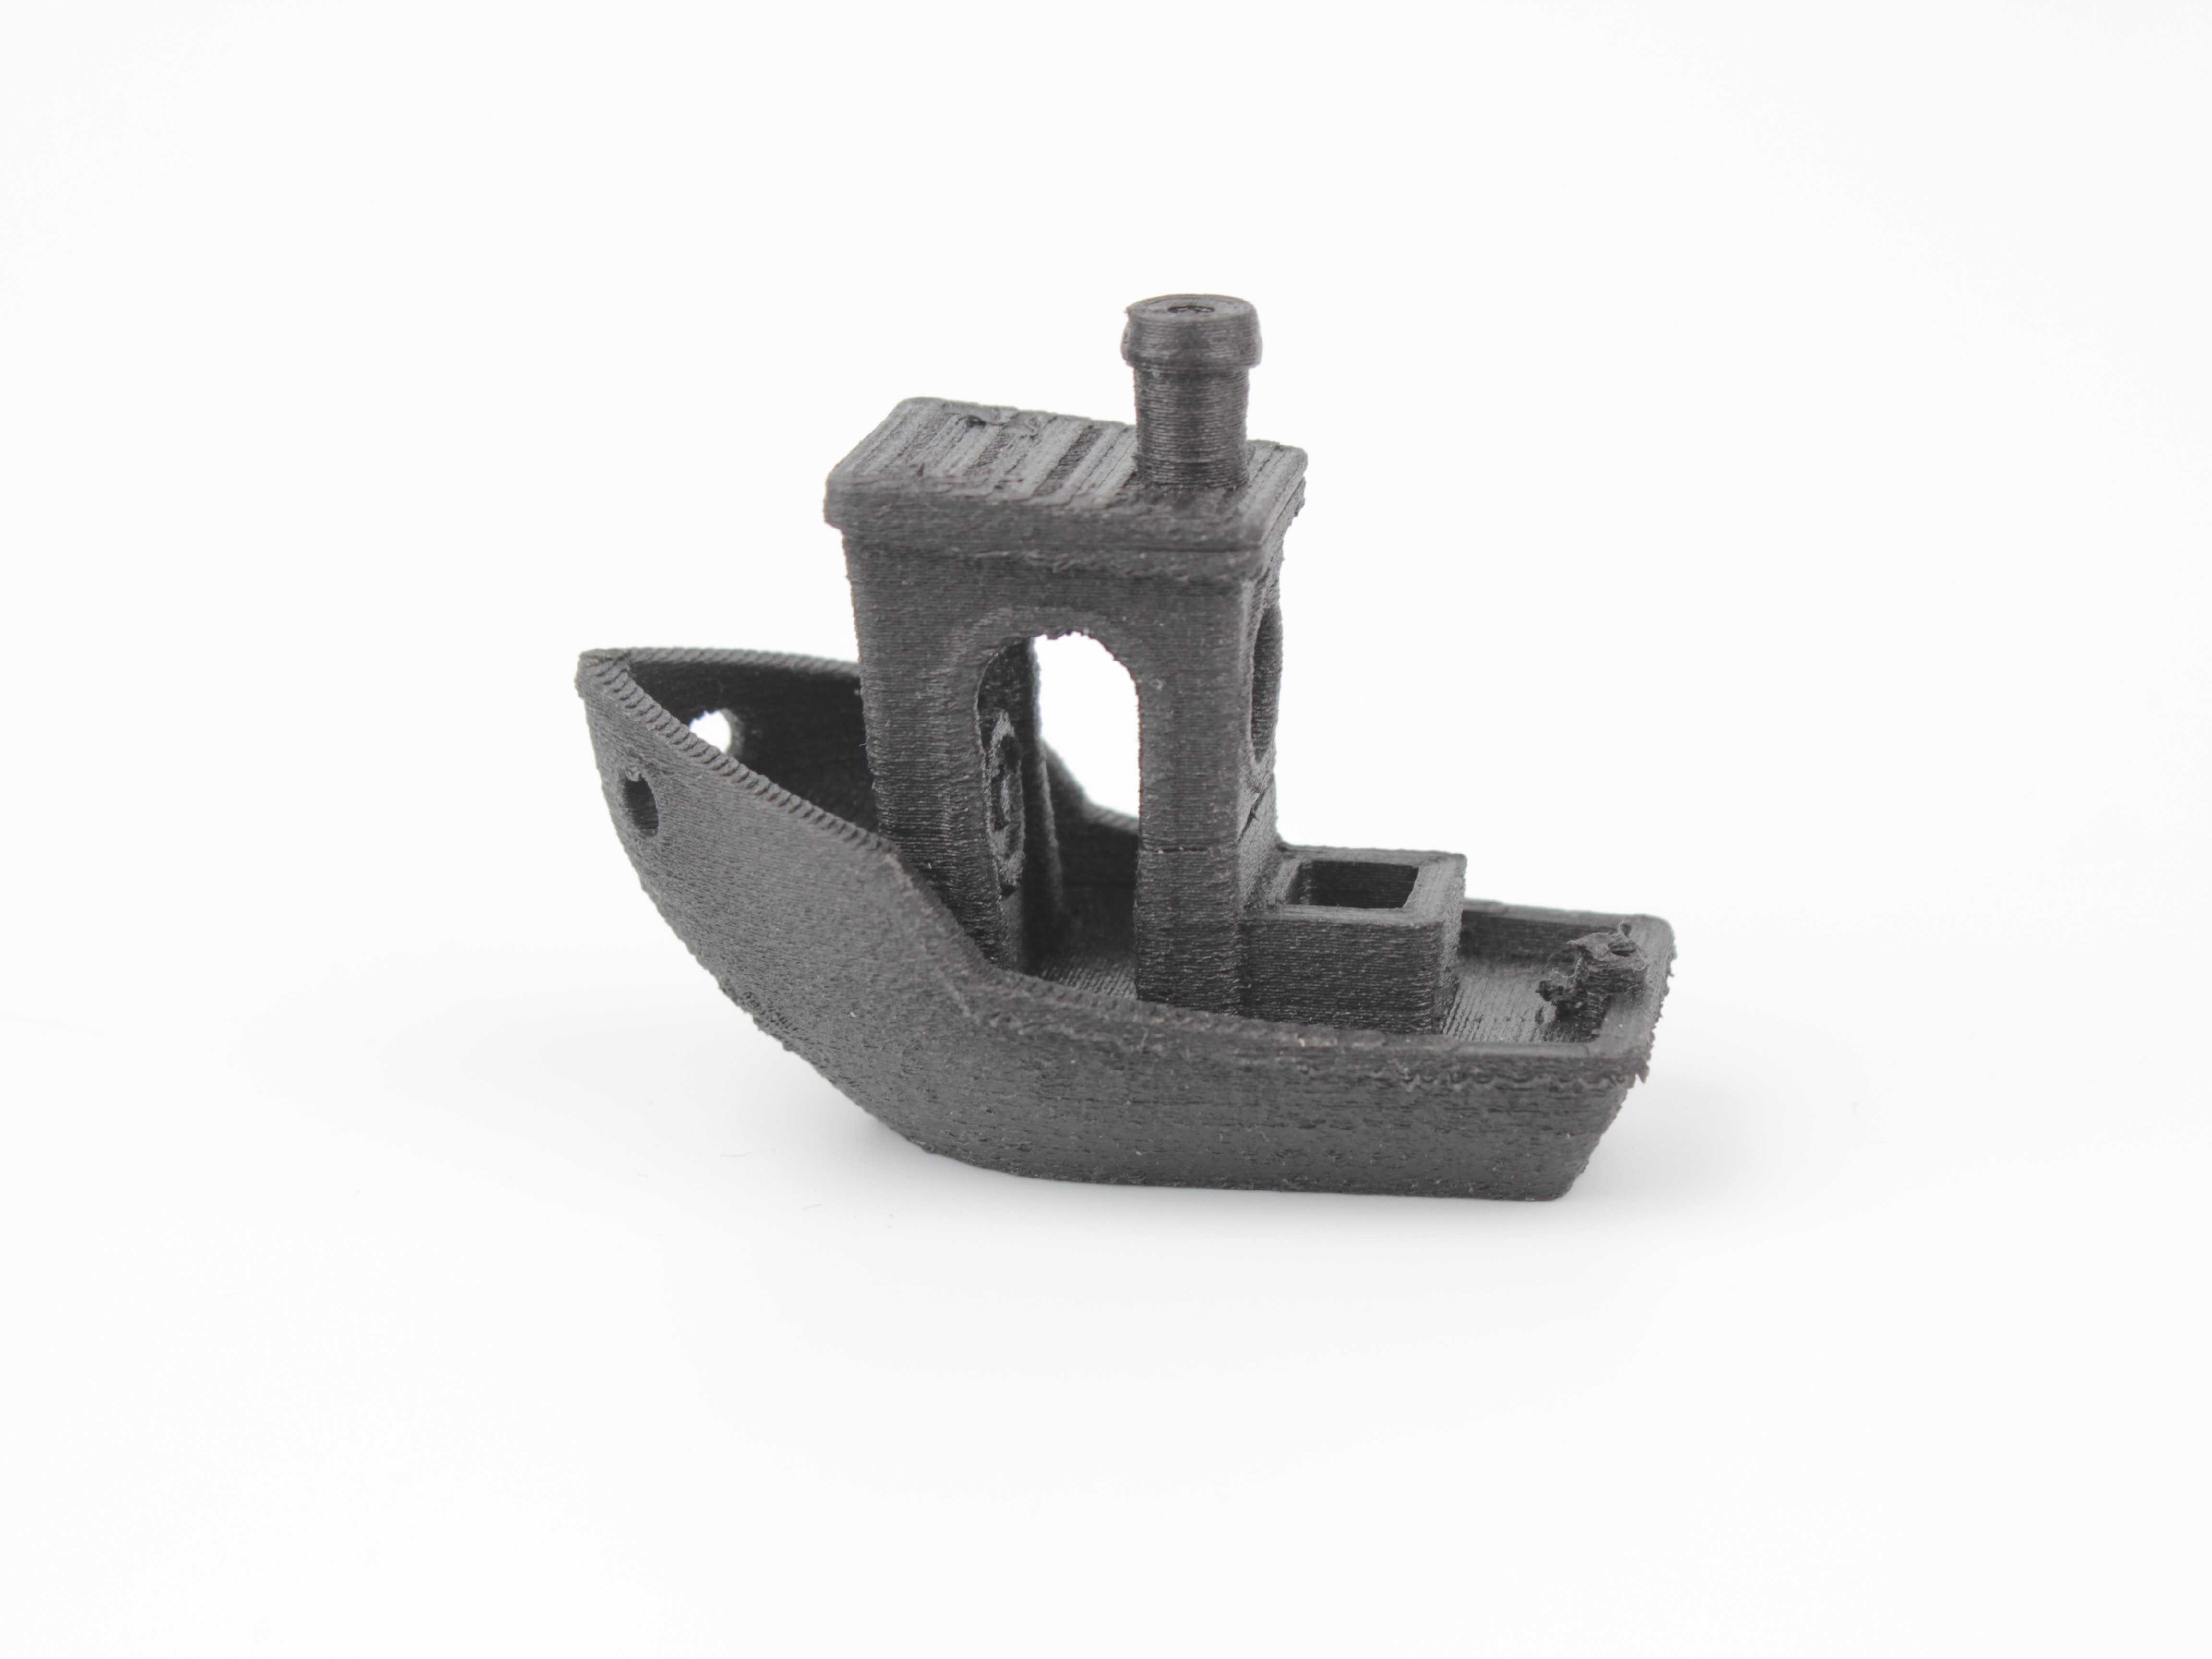
Part printed with wet filament:
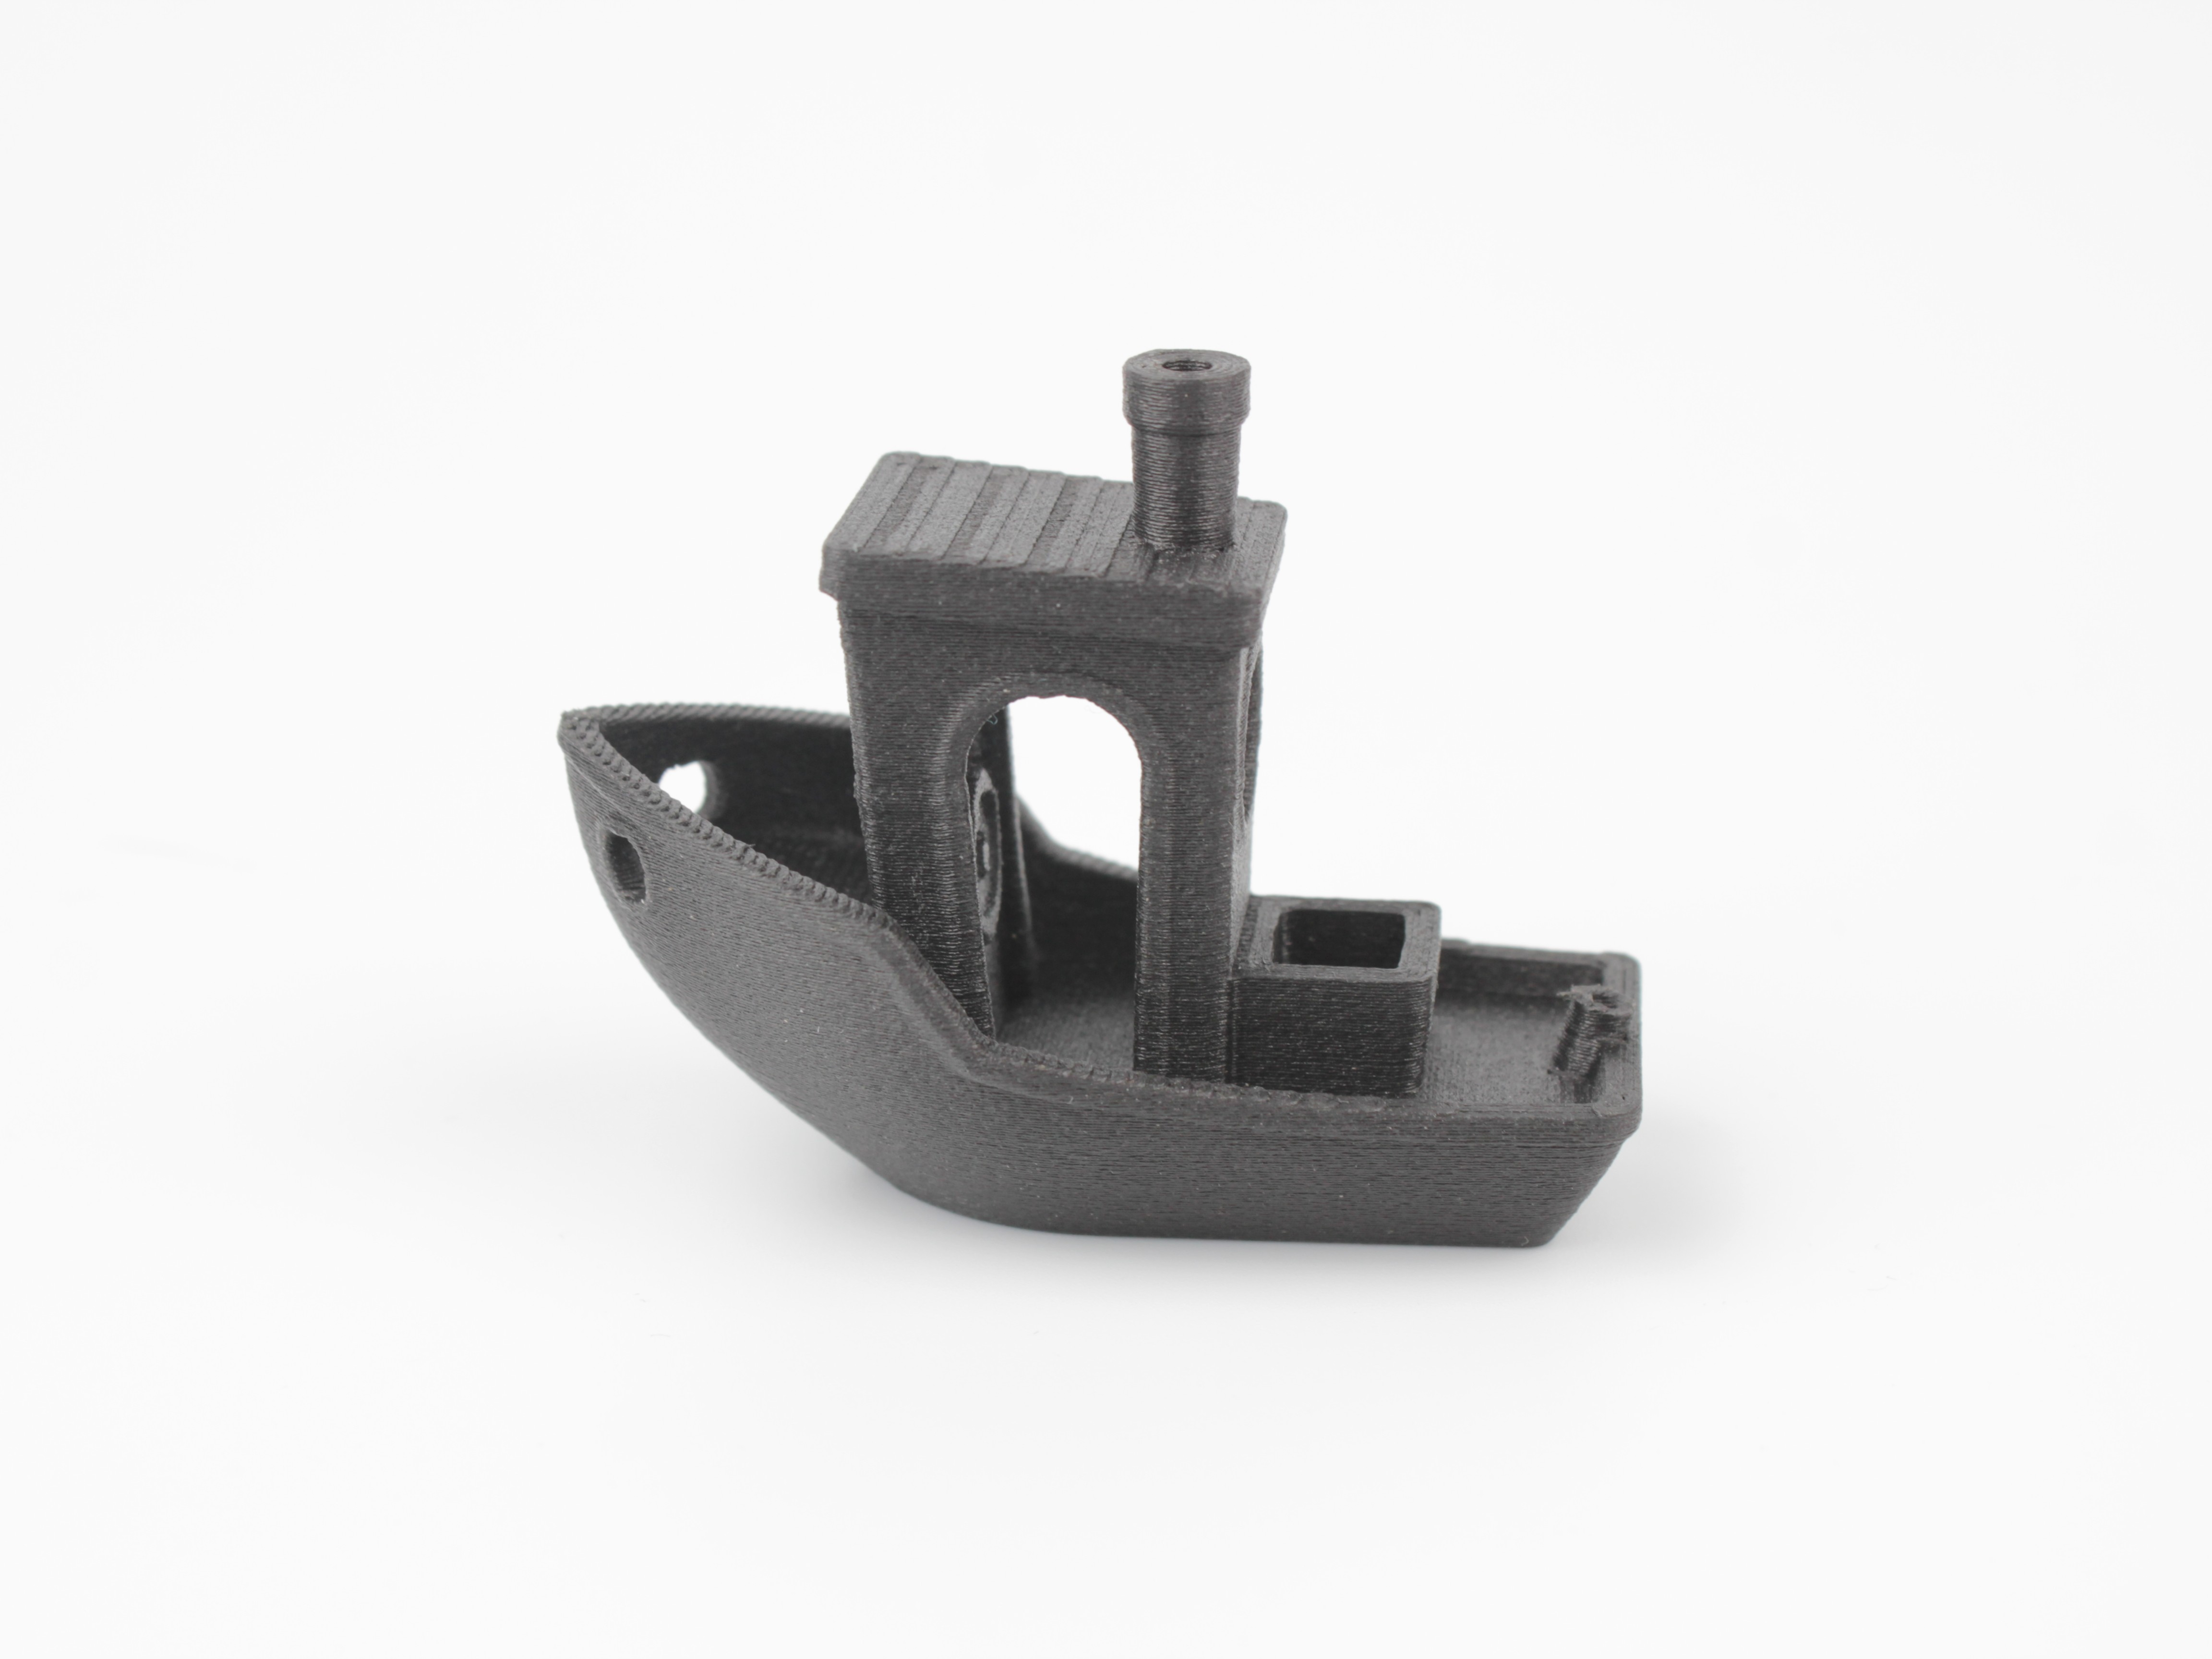
Identical part printed with dry filament:
Moisture degrades mechanical properties
Example above uses CF-Nylon, a highly moisture-sensitive material, to clearly demonstrate visual defects. Visible surface degradation varies by material type - some plastics show more dramatic effects, others show less.
Critical concern: The primary issue with wet filament is not just surface quality - moisture significantly degrades mechanical properties (strength, layer adhesion, impact resistance). Parts may look acceptable but fail under load. Always dry high-performance filaments thoroughly.
-
Send the file to the printer. Two ways; the first one is the everyday one, the second is the fallback.
- Directly from PrusaSlicer. Next to Export G-code there is a small G icon (Send to printer). It appears only when a Physical printer is selected; if it is missing, the
.inifrom Slicer Setup was not imported. Click it and choose Upload. Upload and Print starts the job right away without a final look at the machine, and Upload and Simulate only runs the file through the firmware for a time estimate, so for a normal print keep to plain Upload. The progress shows in the bottom bar of PrusaSlicer. - Export and upload. Click Export G-code, save the file, then open the Web Interface, go to Jobs, and drag the
.gcodefile into the list.
- Directly from PrusaSlicer. Next to Export G-code there is a small G icon (Send to printer). It appears only when a Physical printer is selected; if it is missing, the
- Initiate print: Open the Web Interface in the browser or in the Physical Printer tab inside PrusaSlicer, go to Jobs, confirm the file is in the list, click it, then Print. The printer homes, heats up, picks up the Z-probe, and starts the first layer.
- First layer monitoring:
Critical first layer observation
Closely monitor entire first layer deposition (including skirt or brim). This is most critical stage for print success. Do not leave printer unattended until confident first layer is perfect.
- Observe extrusion lines. They should be slightly squished onto build plate, adhering well, and touching adjacent lines without significant gaps or excessive overlap (smushing).
The easiest way to judge your own first layer is to see all three cases side by side. The patches below were printed in one job, changing only the Z-offset:
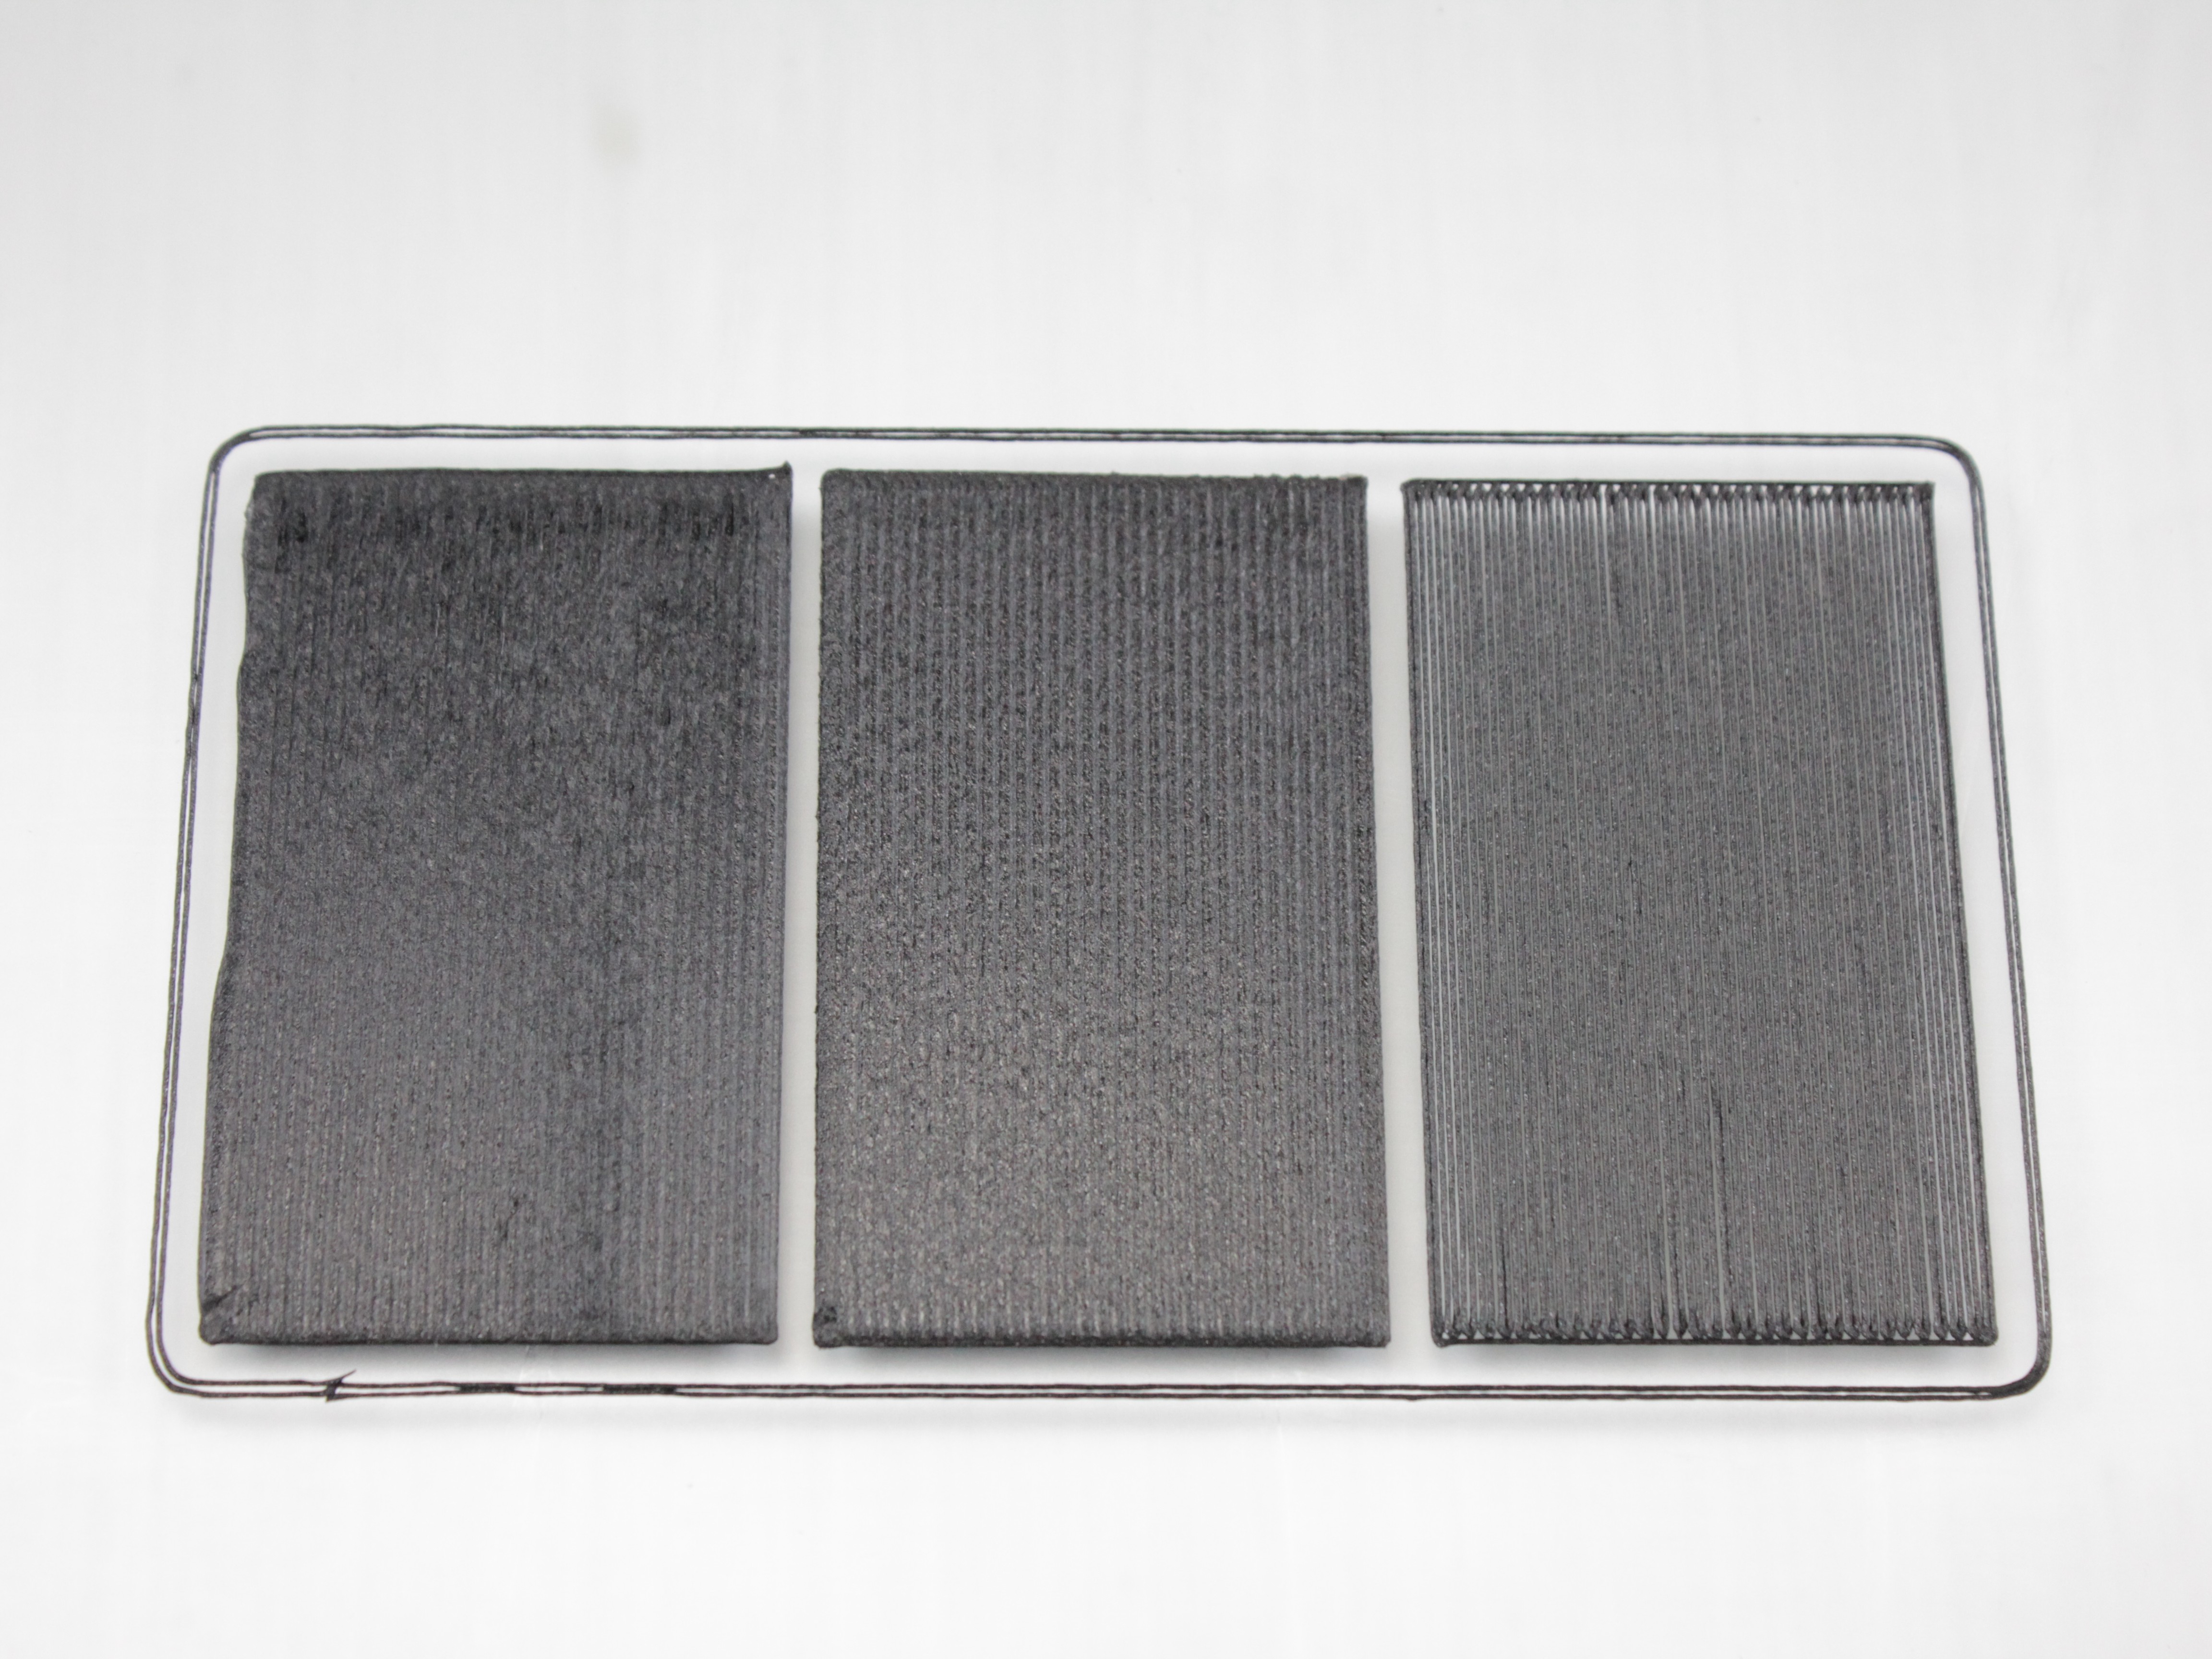
Left, Z too low (nozzle too close). The extruded plastic is crushed and spreads sideways, so the patch has ridges, a rough "washboard" texture, and material pushed out past the intended edge. Over-squishing also risks scraping the plate and clogging the nozzle.
Middle, correct. Lines are slightly squished, touch their neighbours, and bond into an even surface with no gaps and no ripples. This is what you are aiming for.
Right, Z too high (nozzle too far). Each line lands as a separate strand with visible gaps between them. The layer looks striped, adhesion to the plate is weak, and the part is likely to come loose mid-print.
- If necessary, use Z-offset adjustment (baby stepping) during skirt/brim printing phase to fine-tune nozzle height for perfect adhesion and line quality. Refer to First Layer Adjustment Guide.
- Ongoing monitoring:
- Check print again approximately one hour after start to verify continued adhesion and look for early signs of issues like warping, layer shifting, gaps, or under-/over-extrusion.
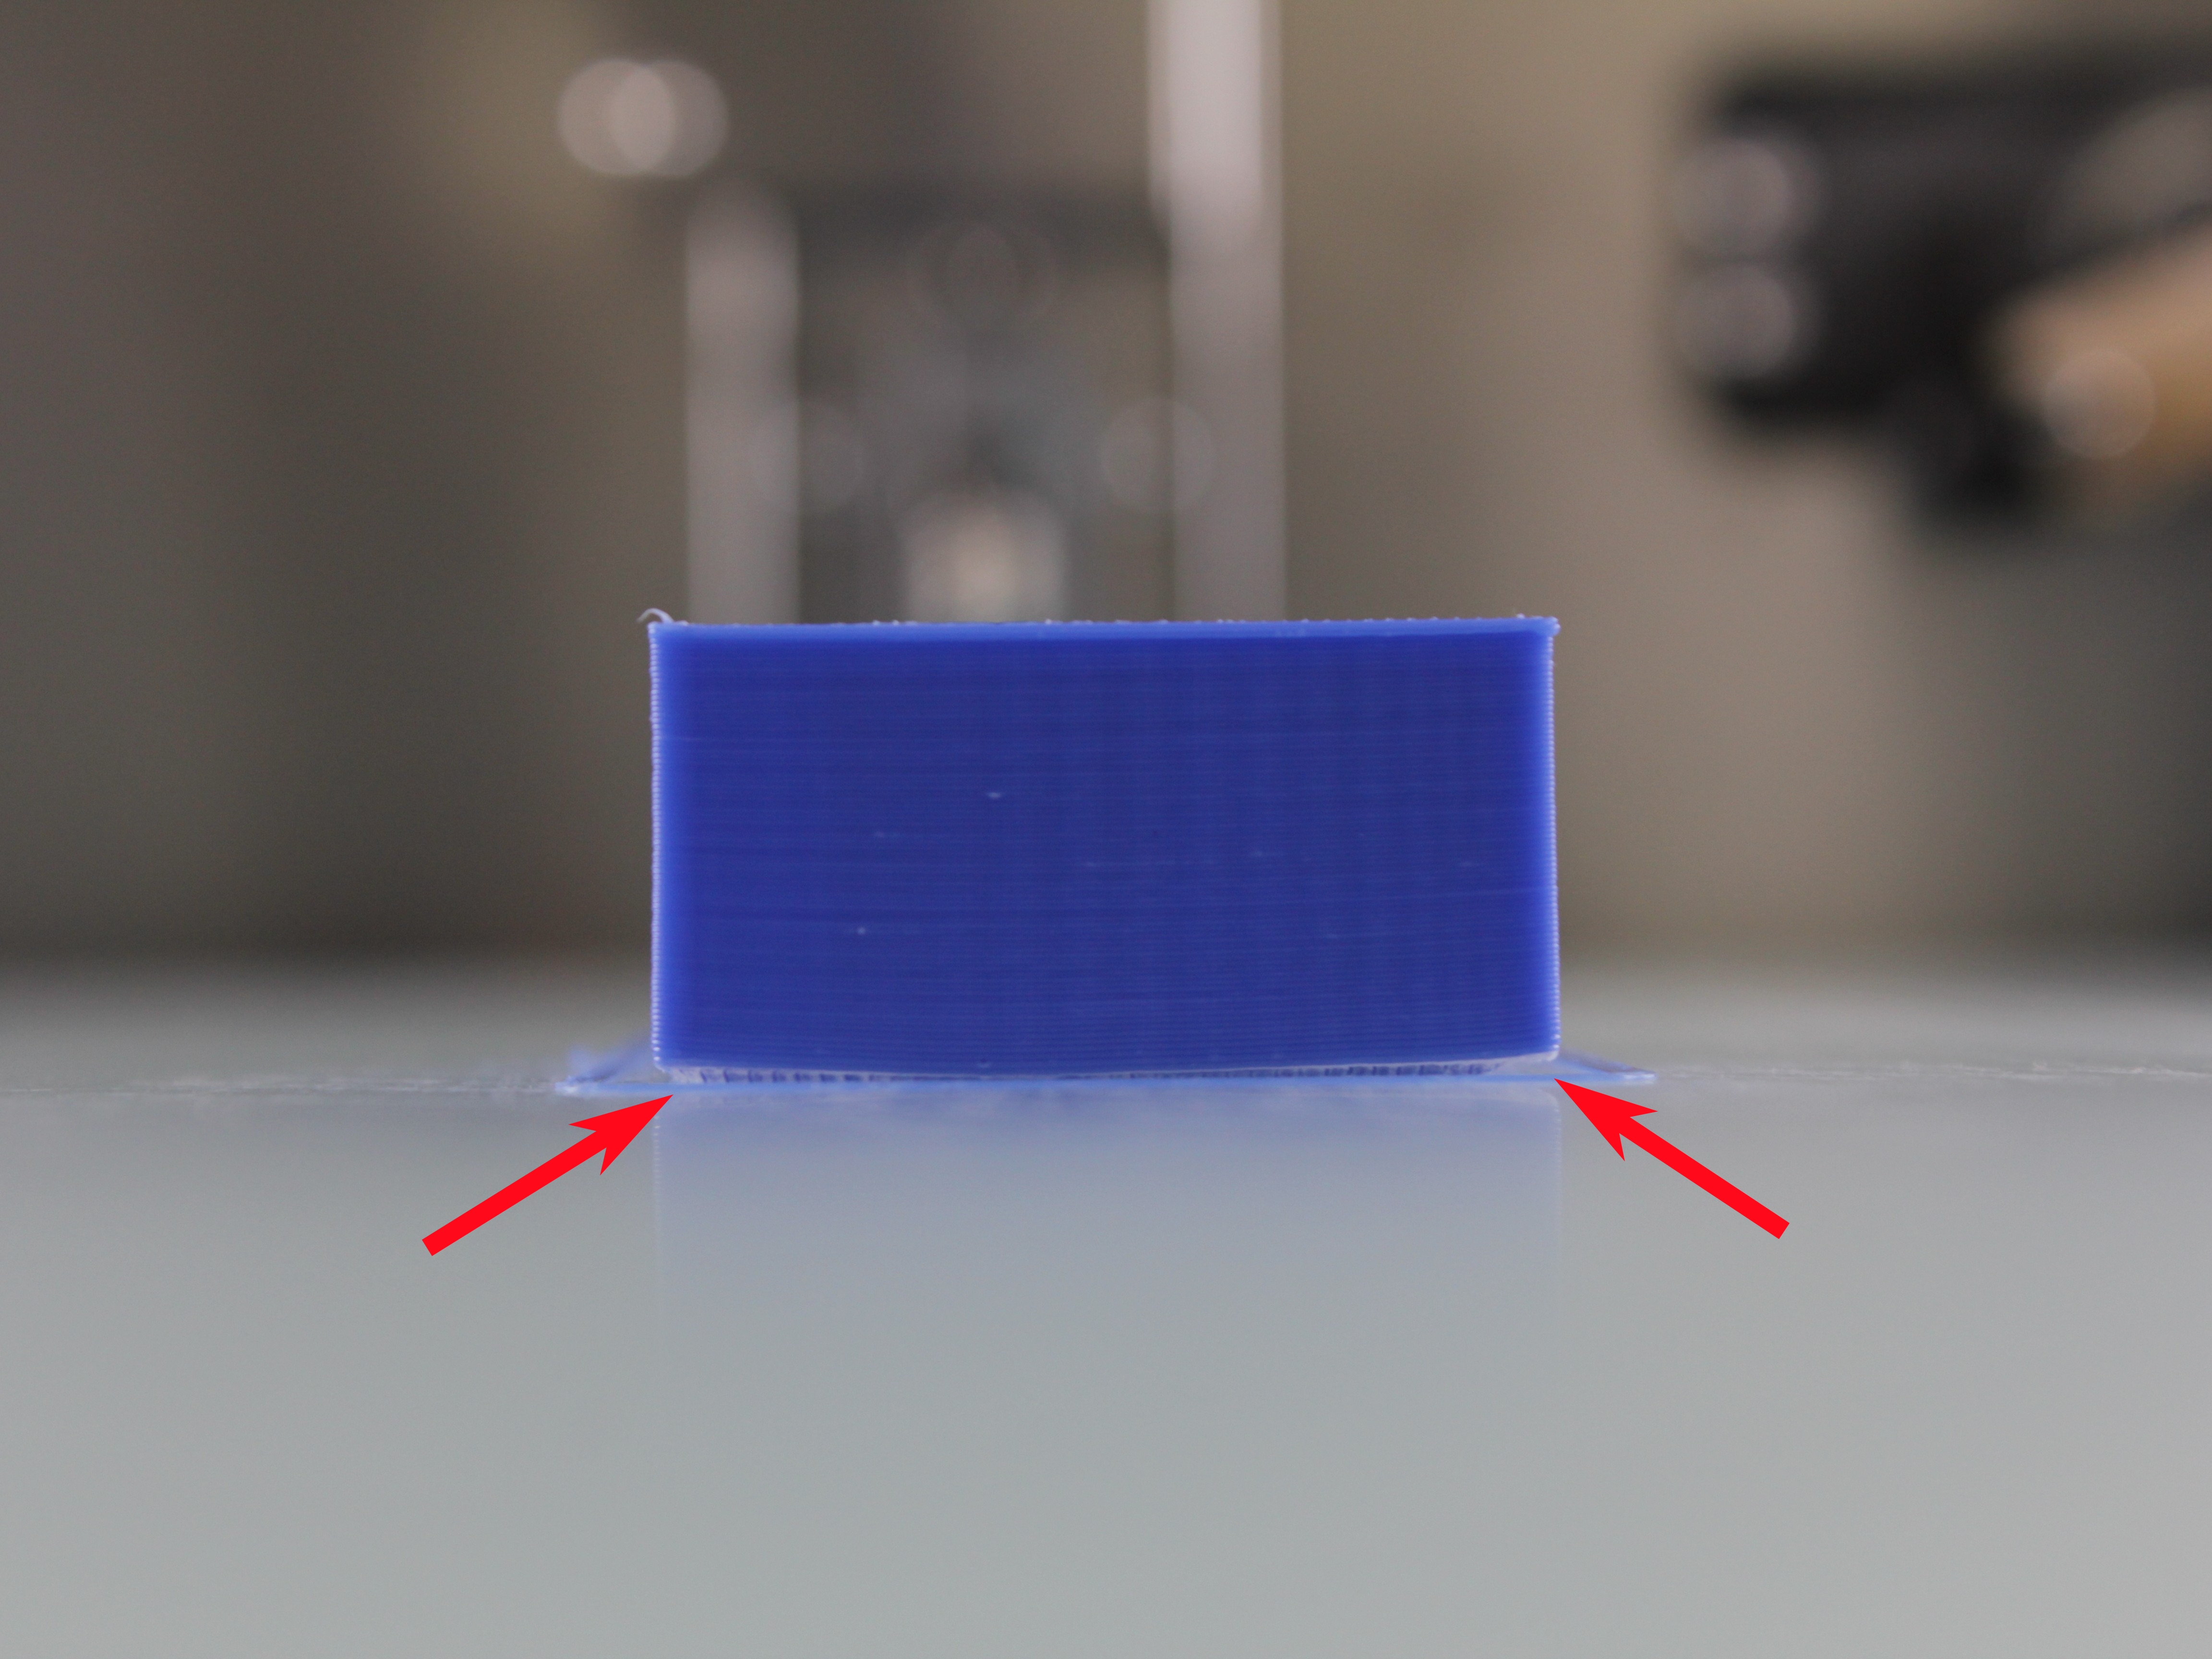
- Periodically monitor print's progress throughout job. Frequency depends on print duration, complexity, and material.
Troubleshooting
Support
If you could not find an answer here, reach out to our support team.